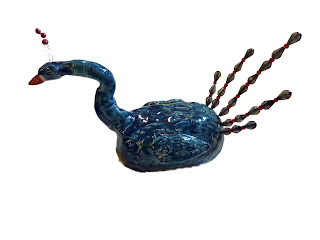
For this project we build the body of the peacocks the same way we have built our fish sculptures. Using 2 pinch pots that are scratched together and smoothed over to make a hollow egg shape. The neck is a rolled out snake or coil of clay with one end thicker to attach to the chest of the bird, use your fingers to pinch the thinner end into a pointy beak and use tools to create the nostrils, mouth and eye details. Wings are also scratched onto the the sides of the body, then texture is applied to give the bird a feathery look. The tail and head feathers are done using high temperature wire in different gauges. The high temperature wire (sometimes called kanthal wire) can be put into the clay when it is wet and fired in the clay. I used a thicker gauge on the tail feathers and a very thin gauge for the head feathers. The head feathers have small spheres of clay added on to the tips of the wire, while the tail feather wires are left empty. The pieces are fired and glazed and fired again. For the final step, I offered my students a selection of beads to put onto their tailfeather wires, we discussed using patterns and also using warm colors or cool colors depending on what they had choosen to glaze their birds. The final top bead got a drop of glue in it to keep them all from sliding off the wire. Once the glue dries the peacocks are ready.
!B CR8IV!
No comments:
Post a Comment