Showing posts with label nature. Show all posts

Friday, May 11, 2012

Long Bugs


 Well, we started off this week with Baby Bugs and we've moved onto our Long Bugs!  You'll need a rolling pin or large dowel for each student to support your bug as it dries for this project.  If you want to make this an art & literacy project, you could tie this to Eric Carle's book "The Very Hungry Caterpillar" for fun with your students.

To begin, give each student a rolling pin or dowel and a baseball size piece of clay.  Break off a small piece of clay and roll it into a coil that is about 3-4" long, drape it over the dowel- this will make one pair of legs.  Continue rolling out coils and draping them over the dowel to make 8, 10 or 20 legs for your Long Bug.  Scratch the tops of all the pairs of legs and put to the side while we make the body.  Take a larger piece of clay and roll it out to a thick coil, about as thick as a hot dog and as long as you want your bug to be.  Scratch the bottom of the larger coil and lay it on top of the scratched parts of the legs.  Use your fingers to blend the body to the legs well.  Shape one end to be the head and the other to be the tail.  You can add on eyes, a mouth, a snout, spikes and antennae (I used high temperature wire or Nichrome wire for my antennae). Textures and designs can be added on now as well.  When you've finished building your Long Bug, let it dry on the dowel.  Once it's dry, carefully slide the dowel out and your bug should stand on its own.  Bisque fire, glaze and glaze fire your bugs.  Find your critter a good place to hide in the garden!

!!!B CR8IV!!!

Wednesday, May 9, 2012

Baby Bugs

These cute little bugs are easy to build and your students can make a bunch in a short period of time.  Start with a small sphere of clay, about the size of a large marble and elongate it into an oval for the body.  Roll out a coil of clay and flatten it gently with your hands, scratch to attach it onto the body to create the wings.  You can add on big bulgy eyes or a stinger tail at this point too.  Next I used nichrome wire (this is high temperature wire--do not use any other type of wire in the kiln!) and cut short lengths of it to create the legs, push the pieces into the clay and let dry, you could also add antennae this way.  HINT: You may need to let the baby bugs dry on their backs until they are strong enough to stand on their wire legs.  You can also make a small wire loop to push into the back of the bugs, so that you could hang them and create a mobile of flying bugs after they are finished.  If you want to tie this project into your classroom curriculum, have students make each section of their insects anatomy realistic (head, thorax, abdomen, legs, wings & antennae).  HINT: If they are standing on their wire legs in the kiln for glaze firing, you can glaze the entire surface of the bugs without risking them sticking to the kiln shelf!

!!! B CR8IV!!!

Friday, May 4, 2012

Monet's Water Lilies

To introduce this water lily project, I start by showing my students Claude Monet's paintings and talking with them about the Impressionists.  We also look at photos of real water lilies so that they can see the density of the petals and the beauty of their form.  Then rather that recreating the paintings, we build three dimensional water lilies in clay.  This also gives students the ability to play with the textures that Monet achieved through his paintings.

Start by rolling out at slab of clay and cut out your lily pad shape, remind students that the size and shape are up to them and that they should not be perfect.  Using tools, create the veins in the lily pad or add texture to the leaf.  To start the flower, I have students cut out a many pointed star shape.  Scratch to attach the center of the star to the lily pad, then squeeze the points of the star thinner with their fingers, it should start to resemble a flower at this point.  Scratch the center of the star and start to add on more petals.  I like to roll small coils of clay and then flatten them into petals, some of my students prefer to roll out a thin slab and then cut them out.  Keep layering the petals until the lily is filled, making sure to scratch-to-attach each one on.  Students can also add on frogs, beetles, turtles, dragonflies...whatever swampy creature they'd like.  Let them dry, bisque fire, glaze and then glaze fire them, then they will be ready to display in your garden.

!!!B CR8IV!!!

Wednesday, April 25, 2012

Wonderland Flowers


Just in time for Mother's Day, these Wonderland Flowers bloom year round and don't require watering!  These images show several styles of flowers and you should b cr8iv with the shapes, textures and designs of your flowers, but the directions below will give you a basic idea of how to get started.

Start by making a pinch pot (roll a sphere of clay, push in your thumb, pinch around the sides) that is the general size you want your flower to be.  Scratch the entire inside of the pinch pot bowl with a tool.  Now start making your petals with your extra clay.  You can flatten small slabs of clay and cut them into your petal shape, you can roll coils of clay to create more spiny petals or you can slap small pieces of clay onto the table to stretch them into a petal shape--it's up to you, experiment and see what works best!  Now scratch the backs of each of your  petals and attach them into the pinch pot, layering them around as you go.  You can continue to layer them all the way into the center or you can create a small pinch pot and scratch-to-attach it on upside down to create the center of your flower.  Don't forget to experiment with different textures, sizes and shapes for your flowers. When you're finished building them, you'll need to put a hole in the bottom that is slightly larger than the rod you'll attach later.  I use 3/8th" steel rods for my flowers.  Let your flowers rest in bowls to help them  keep their shape as they dry.  Once you have bisque fired, glazed and glaze fired your pieces, you'll want to attach them to your "stems".  Choose your metal rods and clean them well, they will probably have a greasy residue that will need to be cleaned for your adhesive to stick.  I like to use a  putty epoxy for attaching the flower to the rod. It comes in two parts that you knead together, attach to your piece and it hardens in place.  It can be sanded, drilled and painted, so its a great choice for attaching the flowers to the stems.  I like to make a sphere of the putty and push it onto the tip of the rod, then push that into the hollow space of the flower, then I make a coil of the putty and wrap it around where the two come together and blend it in just like its clay.  Let the putty set up and then you can paint it to match your flowers.  You can make a perennial garden where no two flowers are alike!

!!!B CR8IV!!!


Wednesday, April 4, 2012

Textured Turtles

These turtles are a great lesson in texture and pattern.  Start by rolling out a long snake or coil of clay, about 15-18 inches long and about as thick as a pencil.  Scratch the entire length of the coil and then wrap it up into a spiral shape blending in the end piece.  You can smooth out the spiral design or leave it there, this piece will be the turtle shell.  Next roll out another snake of clay the same thickness but only about 6-8 inches long.  Cut this snake of clay up into 6 pieces; 4 for the legs, 1 for the head and 1 for the tail.  You can shape them with your hands as needed.  Scratch the ends of each of your pieces and the belly of the turtle shell and attach them on.  HINT:  Make sure to overlap the pieces when you attach them on to have a larger surface area of attaching, so don't attach them edge to edge, they'll be more likely to break off when you move them in and out of the kiln.  You can now add on a face to your turtle and start to decorate the back of the shell with a pattern using tools. This is a perfect ocean week lesson! You'll need to dry, bisque fire, glaze and glaze fire all the pieces for them to be finished.  

Sunday, March 25, 2012

Textured Pods

This is a great classroom challenge project for working with texture.  You can also make this as small or as large of a challenge as is appropriate for your classroom.  This can also be done over the course of a few sessions if needed too.  First I discuss texture with my class; what it is and how it can be created by pushing into clay and by adding onto clay or a combination of both techniques.  We look at shells, pine cones, stones etc...  We also doodle with a little bit of clay to think of different ways we can add on texture or what objects we can use to push into the clay to create unique textures.

Then the challenge:
Create 5 hollow pod forms (two pinch pots scratched-to-attached together) that are all a different shape.
Push in two unique textures on 2 of the forms.
Add on two unique textures on 2 of the forms.
Use a combination of push in and add on for the last form.
HINT: Adjust the numbers on this to fit your students level

Next create a tray or bowl (this could be a simple slab or a large pinch pot) to hold all of your textured pods but don't scratch-to-attach them to the container.  Be sure to poke a hole into the hollow space of each of your pods so that they don't explode in the kiln and then let all of your parts dry well and bisque fire them.  When glazing allow your students to paint the entire surface of each form and the surface of the container for them.  When they are in the glaze firing the pods will fuse to the container you have made to hold them and will create an interesting piece of abstract art.  Be inspired by natures forms, textures and colors for this project.

!!!B CR8IV!!!

Thursday, March 15, 2012

Landscapes in Clay

Creating 3-D landscapes in clay is a perfect opportunity to teach students about perspective and scale in art.  I make sure that my students understand what the background, middle-ground, foreground and horizon line using photographs or paintings as examples to identify each of these.  I have students cut out a large circle or square of clay that is about 3/8ths of an inch thick and about 8-10" across.  Fold the shape so that one side is perpendicular to the table.  The clay might be a little wobbly, so you can support it with a box or tool jar behind the clay until it dries enough to support itself.  Then using the extra clay, students create the background elements of their landscape. In this example, I created a moon, stars and mountains.  Then add pieces onto the middle-ground and then the foreground.  Remind students that if they have something in their landscape that moves between each of the planes, that they have to change its size accordingly.  So in this case, I have a river that starts at the mountains and runs all the way off the edge of my clay, so the river starts off thin and small and then gradually gets wider.  I challenge them to include at least 3 items in each plane of their landscape.  Also remember to scratch-to-attach all of your parts on well.  Students can theme your landscapes around a holiday, current curriculum or other worldly landscapes! Dry your pieces, bisque fire, glaze and fire again.

!!!B CR8IV!!!

Wednesday, February 22, 2012

Georgia O'Keeffe Flowers

Georgia O'Keeffe is known for her over sized flower paintings and this project can be used to introduce her work to your students.  Show lots of images of her work and different types of flowers to your students before you start or bring real flowers into the classroom for students to examine.  Also, you'll need to pick up some sturdy plastic reusable picnic plates for this project, one for each student to build their flower on.

Roll out a large slab of clay that is about 3/8ths of an inch thick and lay it over the plastic plate so that its completely covered.  Use a tool to cut off the excess around the edges of the plate.  Now use your excess clay to start shaping petals for your flower, start attaching them to the base piece from the outside edge working towards the middle.  Don't forget to scratch-to-attach them on well.  Keep layering in your petals until you have filled your plate and add texture or details on them as desired.  Next cut a circular hole in the middle of your flower and remove that piece of clay.  Now make a small pinch pot, turn it upside down and scratch-to attach it over the hole. You can add texture to the center of your flower.  HINT: If you don't remove the circular piece of clay from the base of your flower and you attach the pinch pot over the top, your flower can explode in the kiln because you are trapping air!  So don't forget that step!!  Also, you can hang your flower on the wall using that hole to hang on a nail.  Let your flower dry on the plate for support, it will shrink away from the plate and release as it dries. Then bisque fire, glaze and fire again to finish.

To display these flowers, I painted stems and leaves on the wall and hung the flowers above the stems, you can create a garden that never needs to be watered for your classroom this way!

!!!B CR8IV!!!

Friday, February 17, 2012

Twine Bird

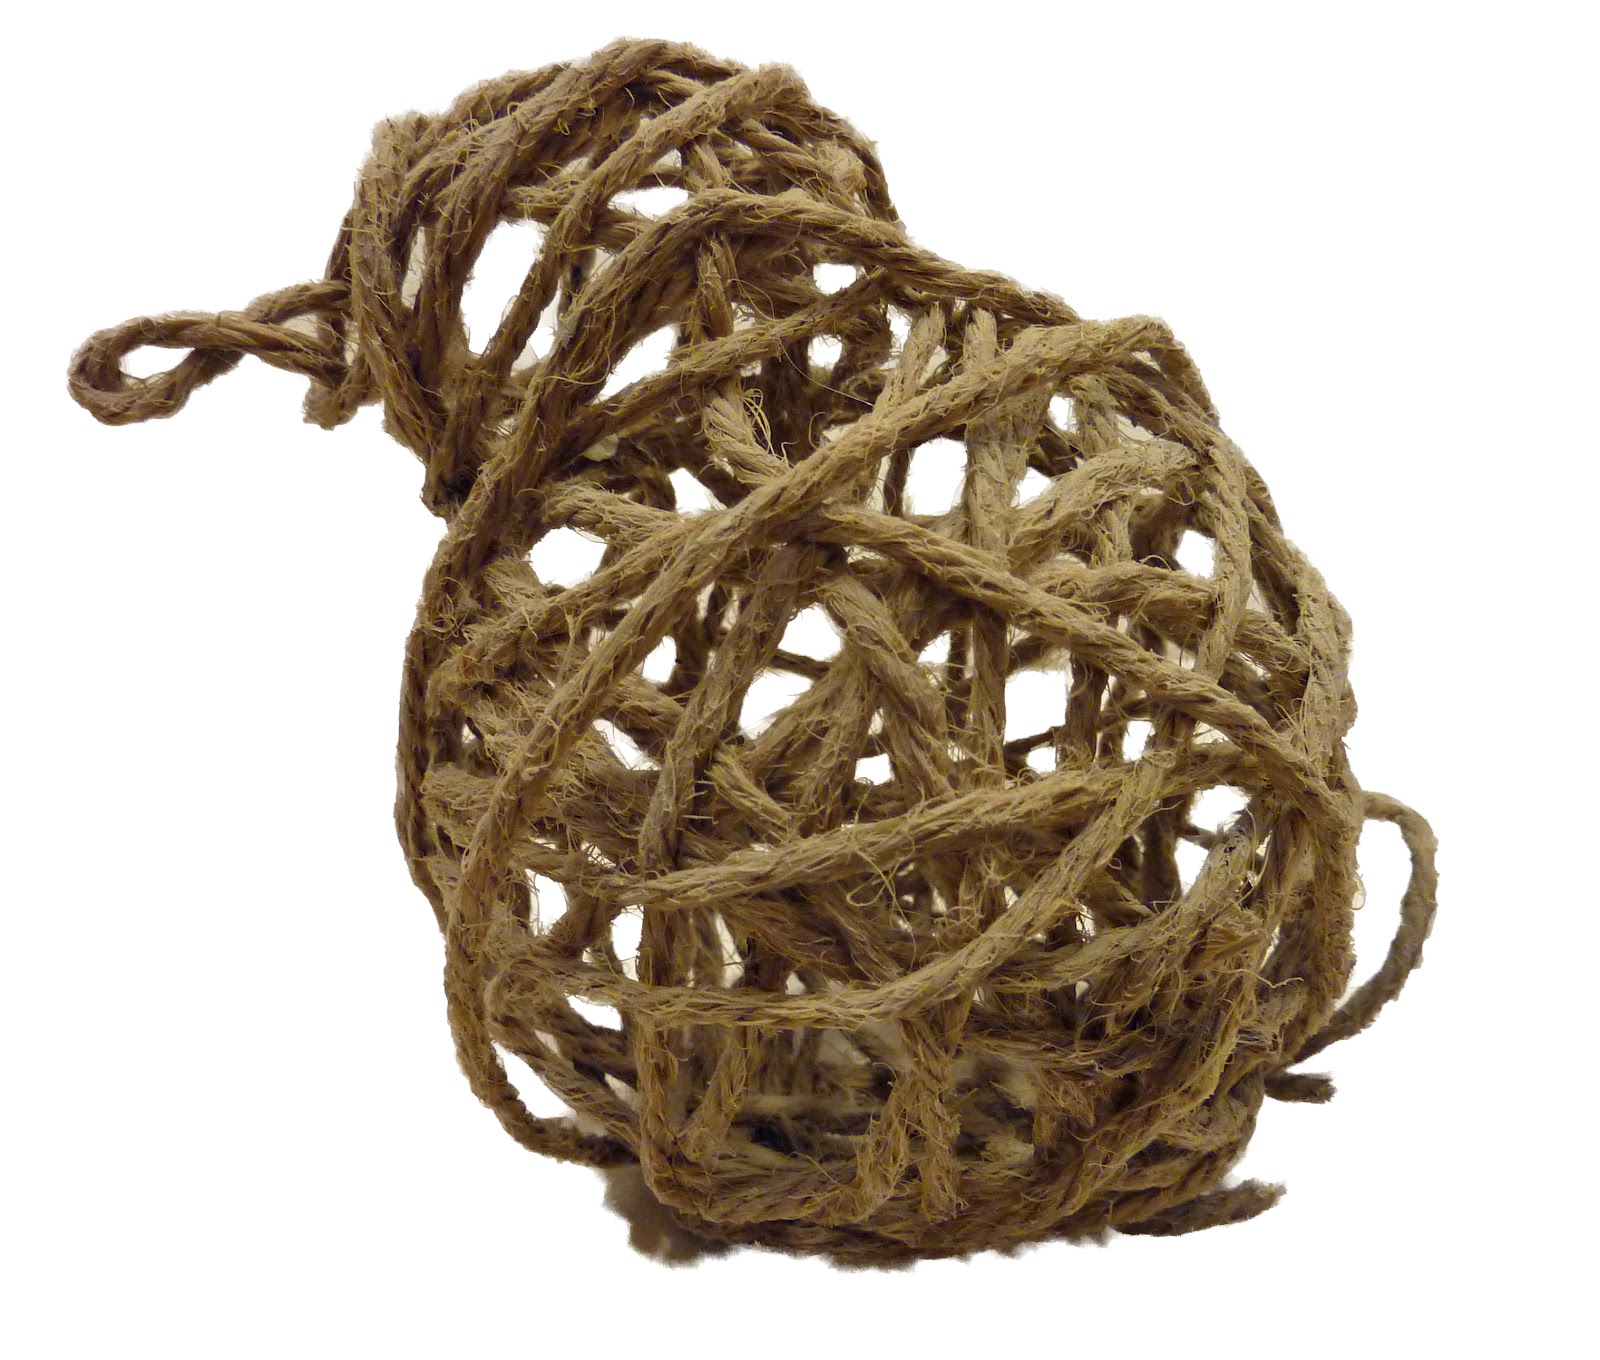
I created these hollow bird forms with my students as a way to express line and volume.  The artists Christo and Jeanne Claude would be great examples to introduce with this project too.

We started with two balloons, one for the body (about the size of a grapefruit) and a smaller one for the head.  I have students tape the balloons together with masking tape.  They can position the balloons so that the knot is where the beak will be on the head.  HINT: I also have students tape the knot of the body balloon to the table, it really helps to keep the balloons from rolling all over the place.

Once the basic form is ready, we took long lengths of twine and dipped them into fabric starch. HINT: Any natural fiber string will work for this!   The twine was then wrapped around the balloons and thought was given to the pattern of the wrapping while still maintaining the shape of the bird.  Some students let strings hang off of the back of the birds body in loops to create a tail, you could also do wings the same way.  Once wrapped, they were left to dry overnight.  As they dry the balloons should start wilting and peeling away from the string, if not you can pop the balloon.  Pull out all of your tape and balloons through one of the holes.  You can leave your bird with the natural string color or spray paint it.  Nests and eggs can be made the same way if you want to take it to the next step!

!!!B CR8IV!!!

Wednesday, February 15, 2012

Recycled Reef Fish

Upcycling old plastic bottles and containers into a recycled reef is a fun way for students to learn about cleaning up the oceans and protecting the earth.  Have students bring in lots of plastic bottles and encourage different shapes and thicknesses of plastic. Rinse out the insides and peel off labels first.  Then from your collection of bottles have students choose one that they will use for the body of their fish.  The water bottle in this photo works well for a small shark, but a large laundry soap bottle might work better for a puffer fish.  Have students plan out where eyes, mouths, fins and tails might go on their bottle.

Next students used flat plastic pieces to cut out their fish parts.  Scissors will work well for most of the work but you may want to have a few utility knives or x-acto knives on hand for adult use too.  As they worked on the details, I worked with each student to attach on the fins and tails.  Make a slice with a utility knife into the body of the fish and slide in the fin, they will stay pretty well if the cut isn't to large, but I also reinforced the attachment with a little hot glue.  Next, I let students choose what color they wanted their fish and I spray painted each bottle completely.  Once the main spray painted color dried, I gave students a plethora of different colored sharpie markers  to color in different parts of the fish, making scales, faces, details etc. HINT: Most plastics don't take paint well, but if you want to avoid the spray painting aspect of this project:  build your fish as described and then cover them in a layer of paper mache and then let students use acrylic paints to decorate their fish.

To display our reef, I hole punched a hole in the top fin of each of our fish and attached a string to hang them.  If you set them up at different levels they will look like they are swimming!

!!! B CR8IV!!!

Wednesday, February 8, 2012

Turtle Tower

I like to make these turtle towers a classroom challenge project, challenging students to see who can make the most or the smallest turtles.  I also challenge students to create a different texture/pattern on each of the turtle shells, giving examples of different designs can be helpful for sparking ideas here.  This project can of course be completed by making just one turtle per student.

Start by rolling out a long snake or coil of clay, about 15-18 inches long and about as thick as a pencil.  Scratch the entire length of the coil and then wrap it up into a spiral shape blending in the end piece.  You can smooth out the spiral design or leave it there, this piece will be the turtle shell.  Next roll out another snake of clay the same thickness but only about 6-8 inches long.  Cut this snake of clay up into 6 pieces; 4 for the legs, 1 for the head and 1 for the tail.  You can shape them with your hands as needed.  Scratch the ends of each of your pieces and the belly of the turtle shell and attach them on.  HINT:  Make sure to overlap the pieces when you attach them on to have a larger surface area of attaching, so don't attach them edge to edge, they'll be more likely to break off when you move them in and out of the kiln.  You can now add on a face to your turtle and start to decorate the back of the shell with a pattern using tools.  The smaller turtles will be built in exactly the same way, just using shorter lengths of coils to build them.  HINT:  I have my students stack up their turtles without scratching-to attaching them on. This way, when they glaze them it's easier to make each turtle a different color.  When they are finished glazing they re-stack them and in the kiln the glaze melts and fuses them into a tower.  You can also play with color theory on the glazing and have them make primary and secondary colored turtles or paint them in rainbow order.  You'll need to dry, bisque fire, glaze and glaze fire all the pieces for them to be finished.  
!!!B CR8IV!!!

Wednesday, December 21, 2011

Totem Poles

Native Americans of the Pacific Northwest have been carving totem poles for generations, this clay project exposes students to the traditional techniques and symbolism used by the carvers.  Start by showing students examples of totem poles and the symbolism of the animals used in the poles.  Generally the animals in the poles tell a pictorial story, this can be a way to incorporate a writing project with an art project in your classroom.  Once students have chosen their story or their choice of symbols and animals, its time to build.

Start by giving students 6-8 ping pong sized spheres of clay (one for each animal).  Have students break off a little bit of the clay and start by shaping the body of the animal, typically it will be round or oval shaped, then use the extra clay to make the body parts such as legs, arms, wings, tails, facial features etc... don't forget to scratch to attach on all the parts well.  Use tools to create details like scales on a fish or claws on a bear.  Once each animal is built, you will need to cut a hole from the top to the bottom of each animal, I used a thin wooden dowel.  The top animal of the totem pole only needs the hole to go in about halfway so that you don't see the dowel poking out the top of the totem.  Be sure to make the hole slightly larger than you think you'll need because clay shrinks when it dries and is fired.  Next, fire all the pieces, glaze them and fire them again.

Once all of the pieces are finished, its time to assemble them.  I use cut blocks of 2x4's for the bases, it's good to pre-cut these then have students write their name on the bottom and sand them smooth with sand paper.  I also pre-drill a hole into the center of the base the same size as the dowel that you'll be using to stack your totem.  Squeeze a little wood glue into the drilled hole and slide in the dowel.  While the glue is drying, have students wipe the sawdust off the bases and then paint them.  I used a black acrylic paint, but you can use any color you'd like or have students use markers to color them in so you don't have to wait for the paint to dry.  Once your base is ready, start sliding the animals onto the dowel, hopefully you've made the holes large enough and they all fit easily.  If you have trouble with fit, you can either use a smaller dowel or use a Dremel tool with a grinder bit and grind the hole in the animal larger (this can take some time!).  When you add the last animal on the top of the totem pole, put a little glue into the hole and fit it on snugly.  If the dowel is too long, just cut it to the correct height with garden shears, then glue on the top piece.  Have students share their totem story with the class!
!!!B CR8IV!!!

Wednesday, December 14, 2011

Cave Art

These primitive cave art slabs are a great way to teach students about the earliest forms of art.  Start by showing students images of early cave paintings and have them find common themes, such as bison, humans and horses.  It is a good idea to have students practice their cave paintings on paper before starting on their clay version.

You'll need to prep some materials before you begin.  This cave painting sculpture was made with a slab of clay for the base and was decorated using colored oxides made from raw pigments which is very similar to how cave paintings were originally made.  The colored oxides will need to be made in advance but are simple to do.  You'll have to make a trip to your local ceramic supply store to pick up small amounts of oxides and a flux to make them stick to the clay in the kiln, here I used red iron oxide, burnt umber, manganese dioxide and Gerstley Borate (GB) as my flux.  You can get oxides in almost any color that are commercially made they are called Mason Stains, but for this project, I chose to keep the color scheme more natural.  In individual containers mix 2 parts oxide to 1 part GB and mix well with water until you have a little thicker than watercolor paint consistency to your oxides. If you keep your oxides in containers with sealed lids, the pigment will settle to the bottom, but once stirred they can be used over and over on other clay projects and if they dry out, you can always add water to reconstitute them. Now you are ready to go!

Students will need to roll out their clay flat, I like to keep this in an abstract shape so that it represents a rock form.  I also have students make 2 holes at the top of their clay to be able to hang it up later.  Next students can use brushes to paint on their cave painting with the oxides that you made.  If they make a mistake with their painting, just use a clay scraping tool to wipe off the area and try again.  Encourage students to look at their practice drawings for shapes and ideas.  The final results should be primitive and rough looking.  I just bisque fire these pieces and don't use any glazes on them, but if you'd like to add some shine and clear glaze over the top of everything would work too.

!!!B CR8IV!!!

Friday, December 9, 2011

Gustav Klimt's Tree of Life


Begin by showing Gustav Klimt's Tree of Life mural and some of other his other paintings to students and discuss his repeated use of gold and patterns in his work.  Have students find patterns in his work and practice drawing them with markers on paper.

To build the tree, give each student at least 10 pipe cleaners that are about 12" long (color doesn't matter here).  Have students stack the wires in a bundle and twist them together in the middle of the bundle to create the trunk of the tree. Leave some wires splayed out at the bottom for roots and about 5" of wire left for the branches -little hands may need help with this.

For the roots, divide the 10 wires into small groups of 2 -3 wires, twist those and then divide them up into groups of 1-2 wires and twist the groups of 2 until you have just little wire ends left.  The idea is to have the roots look like they are going from thick to thinner and thinner pieces.  The branches will be created the same way, separate the wires into small groups and twist, separate them in to groups again and twist.  When you get to the end of the tree branches, use a pencil to wrap the end of the wire around to create the spiral that is used frequently in Klimt's paintings.  One all of the branches have been formed, take the time to arrange them so that the spirals are visible and the tree should start to balance standing.

Next, give each student a small block of wood for the base of the sculpture, have them sand it down and use hot glue to attach their trees to the wood.  Have students put their names on the bottom of the wood.  Using gold spray paint, paint the trees and wood completely, and let dry.  Last, have students use Sharpie Markers to draw on their Klimt style patterns onto the block of wood.

!!!B CR8IV!!!

Friday, November 11, 2011

Chihuly Seaforms

Artist Dale Chihuly makes amazing and beautiful abstract forms out of glass.  This project mimics his series of Seaforms.  I use expandable wire mesh from Dick Blick Art Supplies  and have students cut a circle from the mesh or pre-cut your circles for younger students.  Then you can stretch, bend and shape the mesh into your seaform. 

Next students tear up small bits of tissue paper in the colors of their choice, then dip them lightly in watered down white glue and started wrapping it around the wire forms. If the paper gets too soaked, it will start to fall apart and can be really frustrating to work with, but if its just wet enough to make it stick, it should go on smoothly.  Make sure that students cover every area of the wire mesh and that the tissue paper is flattened smooth against the form; a brush can be helpful with that. It can get a bit tricky and sticky, so I always have a damp rag for each student to wipe off their fingers.  I also find that its best to cover one side of the form and let it dry and then come back for the second side.  As the glue dries, the shape will stiffen.  When the entire form is covered I have students paint a thick coat of Modpodge over the surface to seal the paper and to give a bit of gloss to the surface.  When finished the seaforms with be semi-translucent if displayed in the window.  These pieces could also be displayed for an art show hung from the ceiling like Chihuly ceiling at the Bellagio Hotel

!!!B CR8IV!!!

Wednesday, November 9, 2011

Octopus Gardens

These mini coral reefs are easy to build and filled with interesting texture.  Start by building the reef base out of a pinch pot.  So make a sphere of clay, push your thumb into it and squeeze around the sides to make a bowl shape.  Then flip it over, you can dent it in or push it out in areas or even push a hole through the side so you have a cave in your reef.  Next break off small pieces of clay and roll out 8 cone shapes for your octopus' legs.  Scratch the wide end of each of the legs and scratch the top of your reef and attach each of the legs on, its a good idea to put on hand underneath the reef as you push the legs on so that you don't collapse the reef in.  Take your time blending the legs together and shaping them.  Next roll a small sphere for the head of your octopus, scratch-to-attach it on top of where you attached the legs and blend it in with your finger or a tool.  You can add eyes or a face onto your octopus if you'd like too. 

Next we'll start building the coral and reef creatures to add on.  I encourage students to add on at least five different elements and to cover the entire surface with texture.  I also give students lots of images of coral reefs to inspire ideas.  Besides interestingly shaped and textured corals and seaweeds, students like to add on crabs or eels, sometimes a baby octopus or little fish.  Make sure that all the elements you build are scratched-to-attached on to the reef well.  You can also move the octopus' arms to wrap around the items that you add on.  Encourage students to continue to turn their sculptures around and view them from all sides, making sure that they have interesting elements from every point of view.  Once glazed, these sculptures are safe to put into a fish tank as handmade decoration if you'd like! 

!!!B CR8IV!!!

Friday, October 28, 2011

Wire Trees

These copper wire trees are simple and beautiful. Start with at least 15 strands of wire (or more!) all the same length (at least 6" long), this will be the height of your tree.  Bundle all the wires together and twist tightly in the middle to create the trunk.  Little hands may need help with this part, you can also use pliers to help twist.  Next we'll build the roots, so decide which end is the bottom of your tree and divide up the 15 strands into groups of 3 or 4 wires.  Twist each of those groups a little bit and then divide them into groups of 1 or 2 strands.  The single strands can be left alone and the double strands can be twisted a little more.  Then separate them into single strands so that it appears your roots are thicker towards the trunk and thinner towards the tips.  The same process is repeated for the branches.  Bend the branches and roots to simulate natural tree shapes and to balance the tree on its roots.  You could also find a small stone to wrap the roots around and anchor the base of it.
Next I used small seed beads on the tips of the branches and bent the end of the single wire strands to hold the beads in place.  The beads could be a lesson in color theory using on warm or cool color beads.  Or you could have students pick out colored beads for the birth stone of each family member and make these family trees.  Or use pink and white beads for cherry blossom trees.  Or celebrate Arbor Day with these wire bonsai trees!  So many options....

!!B CR8IV!!

Friday, April 22, 2011

Nature Fossils

These fossils are made from plaster poured into a clay mold and then finished with watercolor paints and bees wax. This is a two day process to allow the plaster to dry throughly.

First I have students choose a selection of natural objects, we may go on a walk to find these pieces.  Shells, leaves, twigs etc. all work great for this project.  I also let them choose from some plastic toy bugs, frogs or dinosaurs I have in the studio.  All of these pieces are pushed into a slab of clay so that they leave a texture and fairly deep indent in the clay.  This is a great opportunity to discuss negative and positive space in art. 

Next students build a wall around the sides of their slab, attaching it on so that there are no holes or weak spots on the edges where plaster may leak out.  Then I mix up the plaster, I don't generally measure the plaster to water ratio, but try to get a consistancy similar to pudding.  If I have a large class, the plaster is mixed in batches (maybe 5 students at a time).  I then pour the plaster into their mold filling it so that the plaster is about 2 inches deep.  Students are asked to gently tap the sides of their mold and the top of the plaster to wiggle out any air bubbles that may have gotten trapped.  Once the plaster has started to hold its shape but it still soft a wire loop can be placed in so that the fossil can be hung on the wall when finished.  The plaster takes about 20 minutes to set but 24 hours to cure completely.  Once the plaster has set, the clay can gently be removed from the sides and the "rock" of plaster can be flipped over to remove the clay from the bottom.  This will reveal the positive shapes of all the nature items that were pushed into the clay.  Write students names on their plaster and let cure until the following day. 

Once the plaster is cured you can paint it will any type of paint, I like to use watercolors for this project.  This is a great opportunity to pull out your handy-dandy color wheel and discuss warm and cool colors.  I usually let students choose which they'd like to use and then challange them to mix up 10 colors that are either warm or cool to use on their project.  Once painted, the plaster will dry rather quickly as it sucks the water out of the paint and then I like to use a bees wax furniture polish to seal the surface.  It also gives the surface a semi-gloss sheen to it.  If you've included a wire hanging loop on the back of your plaster, you fossil can be hung up for display!

!!!B CR8IV!!!