Showing posts with label emotions. Show all posts

Wednesday, May 30, 2012

Mad Hatter Tea Cups

Inspired by Alice in Wonderland's the Mad Hatter's Tea Party, these cups are also a lesson in texture.  Students needed to create 3 different textures one for each of their cups, they could push texture in, add texture on or a combination of both.  I give lots of examples of texture before we start building.  


To make the cups, start by rolling out a slab of clay that is about 10" x 5" long and about 3/8th's of an inch thick.  You can give students a template for cutting out the basic rectangle or let them decide on the size. For these smaller cups, I cut out an arced rectangle that is about 8" long on the high side and 6" long on the bottom side x 2" tall.  The short edges of the rectangle need to be scratched and then it is wrapped up into a cylinder, attaching the edges together.  To create the bottom, you'll need another slab of clay.  If you have enough clay left over from your rectangle, use that, if not re-roll out all of your scrap pieces of clay.  Then take the cylinder and put it on top of the slab of clay and using a pointy tool or a knife, trace around the perimeter of the cylinder to get the exact size needed for the cup.  Once it's cut out, go ahead and scratch-to-attach it on, I find it's easier to do this when the cup is upside down or if you put on hand on the inside of the cylinder and connect it with the other hand on the outside.  HINT: Make sure that you don't leave any holes when your attaching the parts of the cylinder together--your tea will leak out!!  This creates a basic cup shape which could be used for a variety of projects but since we're making tea cups, the next step is to add a handle.  

Using the extra clay that you have, roll out a coil of clay that is about as thick as a pencil.  Fold the top of the coil over so that from the side it looks like half of a heart shape.  Scratch-to-attach the top and bottom of the heart shape and the top and bottom of your cup.  Press the handle on using your fingers on the inside and outside of your cup making sure it's secure. (Don't pick it up by the handle until its fired!!)   

Your cup is complete and you're ready to decorate with textures.  You can use the extra pieces of clay to create strips or polka dots to add on (remember to scratch-to-attach!) or you can use tools to push in the texture. Be sure to cover the entire surface of your cups.  


!!!B CR8IV!!!

Friday, March 30, 2012

Gargoyle Masks

Creating these masks are fun for students and a great lesson of the historical use of gargoyles in architecture.  I show students lots of examples of gargoyle sculptures and start the project by having them choose an emotion for their gargoyle.  This usually helps to dictate the shape, structure and features that their mask will have.

Start with a large slab of clay and cut out the general shape of the face, this could be round, oval, square; whatever the students chooses.  Then use some crumbled up newspaper to create a "pillow" and lay your slab of clay on top of the pillow, rounding the clay around the edges of the pillow.  This will help give the mask a more 3-D quality to it.  Next I have students push in features like the eye sockets, mouth and the hollows of the cheeks using their fingers and tools to get some general features started.  Then I have them add on the eyes, nose, horns, ears, warts, teeth, fangs--whatever they can think of and scratch-to-attach them onto the face. They can blend the features as needed, add texture and shape the mask to get the desired emotion to show through.  When students are finished building, I put a high temperature wire loop into the back of the mask so that when they are finished, they can be easily hung on the wall. Let the clay dry on the newspaper and  when dry pull out the newspaper carefully, bisque fire, then glaze ( I liked using a stony grey color on mine, but that's up to you!) and fire again.  You can display all of your students masks on the wall and have some Gothic looking architecture in your classroom!

!!! B CR8IV!!!

Wednesday, January 4, 2012

Self Portrait Busts


These cute self-portrait busts are a great way for students to learn about basic human face proportions.  Take time to show them the proportions on a paper drawing or paired up with a partner that they can stare at.  I usually divide this project up into two sessions.  Students will start with building the base shapes and then add on the details of their faces.  You can also offer mirrors to your students for help with the details in Part II.
PART I
Start by giving students a piece of clay the size of a grapefruit plus a little bit of extra clay.  Cut that piece in half and then cut one of those pieces in half, they should have 3 pieces (two small ones of equal size and 1 larger one).  Make spheres out of each of the pieces and form them into pinch pots.  The larger pinch pot will be for the shoulders, squeeze it so its a little bit oval shaped and then place it upside down on the table. HINT: Its helpful to stuff a little bit of newspaper into the shoulders to help it keep its shape.  Scratch-to-attach the two smaller ones together to create a hollow sphere, this will be the head shape- it may look more like a potato, so have students take their time to shape it and make it more egg shaped.  Use a little bit of extra clay to roll out a snake of clay that is about as thick as your finger and wrap it into a cylinder shape, this will be used for the neck.  
To attach all three of the parts together, (shoulders, neck and head) position them where you think that they will look best to make your bust, then scratch-to-attach all of the connection spots well.  I like to attach the neck onto the shoulder and blend the coil of clay into the shoulders, then place the head onto the shoulders and blend those two together well.  Next use a tool to poke through from under the shoulders, through the neck and into the hollow space in the head, so that they don't explode in the kiln.  You can also write students names on the inside of the shoulders while you have them flipped over.  If you've used newspaper here, just pull it out to make the hole and then replace it.  This is usually where I will stop the first session, so if you need to stop here too, wrap up all of your students work in plastic until your next session.  
PART II
Now have students use a pointy tool or a pencil to lightly draw onto the clay the center line of the face, the eye line, the nose line and the mouth line.  This should help students give placement for all of the features.  Using a small amount of extra clay, shape each of the features in clay using tools and their hands.  Make sure that each part is scratched-to-attached on well.  HINT: A great way to make eyes that are the same size is to make one the size you like and then trace it onto another piece of clay.  HINT: A great way to make ears the same size is to make a flat pancake of clay and cut it in half, each half is an ear.  Hair can be added onto the head in flat pieces, coils or texturing the clay, depending on the style and type of hair they are trying to create. Once all the features are attached, erase the lines with a finger or smoothing tool. Have students think about clothing or other items they might want to add on to the shoulders (like a parrot or a pocket!).  Encourage students to turn their sculptures around and look at them from all sides before letting them dry.  

!!!B CR8IV!!!

Friday, May 20, 2011

Mugs with Mugs

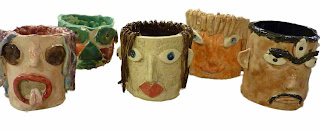
Start by rolling out a slab of clay that is about 10" x 5" long and about 3/8th's of an inch thick.  You can give students a template for cutting out the basic rectangle or let them decide on the size. For this smaller mug, I cut out a rectangle that is about 9 x 4.  The short edges of the rectangle need to be scratched and then it is wrapped up into a cylinder, attaching the edges together.  To create the bottom, you'll need another slab of clay.  If you have enough clay left over from your rectangle, use that, if not re-roll out all of your scrap pieces of clay.  Then take the cylinder and put it on top of the slab of clay and using a pointy tool or a knife, trace around the perimeter of the cylinder to get the exact size needed for the mug.  Once it's cut out, go ahead and scratch-to-attach it on, I find it's easier to do this when the mug is upside down or if you put on hand on the inside of the cylinder and connect it with the other hand on the outside.  HINT: Make sure that you don't leave any holes when your attaching the parts of the cylinder together--your hot chocolate will leak out!!  This creates a basic cup shape which could be used for a variety of projects but since we're making mugs, the next step is to add a handle. 

Using the extra clay that you have, cut out a long thin rectangle, about a inch wide by 4" long.  Fold the top of the rectangle over so that from the side it looks like half of a heart shape.  Scratch-to-attach the top and bottom of the heart shape and the top and bottom of your mug.  Press the handle on using your fingers on the inside and outside of your mug making sure it's secure. (Don't pick it up by the handle until its fired!!)  

Your mug is complete and you're ready to decorate with the faces.  I like to make 6 spheres, flatten them into a pancake shape and scratch-to-attach them onto the mug.  Then using clay tools and some examples of different emotions, I challenge students to come up with 6 different emotions using just dots and lines.  This challenge helps keep the faces simple and helps students focus on just the expression. Sometimes students like to put a face on the inside bottom of their mugs so that when you drink, you get a surprise face at the bottom!   ; ) 

!!! B CR8IV!!!

Friday, January 21, 2011

Pinch Pot Monsters


One of my talented students thought up this clever idea to create a sculpture from a basic pinch pot.  Start by cutting about 1/2 pound block of clay in half.
 
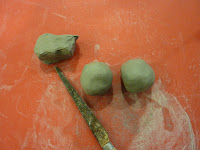
Take one piece and roll it into a sphere.


Push your thumb into the sphere and squeeze around the sides to create a pinch pot.


This pinch pot becomes the mouth of your monster, so shape it however you'd like the mouth to be positioned to show an emotion.  Mine's going to be wide mouthed and yelling!


Now its time to add on your monsters parts.  I've created five spheres for eyes. 


Don't forget to use a scoring tool to scratch-to-attach all of your parts on!


You can use a tool to add details like pupils for the eyes.

I rolled out a coil of clay and then flattened it to create a tongue. 


Feet can be made by rolling out a coil of clay and flattening just the foot, then use a knife to cut individual toes.  You can also use a small tool to push in toenail shapes too. 


It is better to attach the feet to a wide surface rather than edge to edge, they are less likely to break off this way.  Gently flip your monster over and scratch-to-attach the bottom of your pinch pot and the feet, then blend together.  The tongue can be attached the same way inside of the mouth. 


The tail is made by rolling out a coil of clay so that it is thinner at one end and thicker at the other.  Scratch-to attach the thicker end and blend it into the body shape when you attach it on, this will be fragile so make sure that it is securely attached before you start moving your sculpture around.  


Small cone shapes can be made and added onto the tail to create spikes.


Spiky teeth can be added inside the mouth as well. 
 
The back of a tool can be used to add texture to your monsters skin. 


B Cr8iv with all of the varieties of pinch pot monsters you can make!


Friday, August 13, 2010

Clay Planter Heads

Clay Planter Heads Project
To create these expressive planter heads we started by talking about 3-D shapes and discussed how to build a cylinder from a flat piece of clay.  Students rolled out their clay in an even and large flat slabs using rolling pins or a slab roller if you have one then they cut out a large rectangle. You can use a paper template for them to trace and help make a uniform size (they can be large or mini pots).  Next wrap up the rectangles into a cylinder and scratch-to-attach the edges together.  To make the bottom of the planters, students trace their cylinder onto another slab of clay, cut it out and scratch it onto the bottom.  Now for the creative building!  Students were encouraged to be creative and use their extra clay pieces to add on facial parts, hair and accessories. Think about the entire piece (not just the face), turn your sculpture around and make sure that it is interesting to look at from all sides.   Remember that anything added on needs to be scratched on so it doesn't fall off when the clay dries.  You can use this project to discuss human facial proportions or mask making.  Once the pieces are dried, fired, glazed and fired again they can be planted to have grassy hair or a spiky cactus growing out the tops of them.  
B CR8IV!! 

Tuesday, July 6, 2010

Clay Emotion Heads

Create a human head expressing any emotion you'd like using the pinch pot method of building and scratching-to-attach your parts on.

Sessions: One 30 min - 1 hour session

Age: Kinder and up

Materials:

Low Fire Clay
A Variety of Clay Tools
Photo examples of different human expressions
Low Fire Glazes & Brushes
Kiln

Steps:

1. Cut off a piece of clay that is about as big as a baseball.


2.  Cut it into 3 equal pieces, two will be for the head and one for adding on parts.


3.  Make two of the pieces into spheres by rolling them in your hands. 
Put the 3rd piece aside for now. 


4.  Push your thumb into each sphere and start to squeeze around the side to create a small pinch pot, repeat this with the other sphere. 


5.  Using a scratching tool, "scratch-to attach" the edges of both pinch pots so they will stay connected together.  Anytime we attach two pieces of clay together, we'll be using scratch-to-attach techniques. 


6.  Gently press both halves together and blend the seam until the shape is smooth, be careful not to dent in the sphere as you smooth.  You can shape the sphere to be more head shaped but make sure that you are keeping a hollow space inside the clay--if it is squeezed to the point where its a solid piece of clay, it can explode in the kiln.  HINT:  You can use steps 1-6 to build a base for building a lot of projects.


7.  Now its time to be creative and start adding on your human head parts using that 3rd piece of clay we put aside in the beginning.  Just break off small pieces to start shaping eyes, ears, nose etc.... 


8. Remember that any parts you add on must be scratched-to-attached on--think velcro!!


9.  Use your tools to help you create a lot of emotion in your face. 


10.  Add unexpected elements, like this bee on the nose of the clay head to create a story about what is going on with your sculpture.


11.  Adding hair, hats or other items to the back of a head can make the whole sculpture more interesting to look at by adding an element of texture.


12.  Once all of the parts are added on,the last thing you need is to make sure that there is a hole into the hollow space of your head (in this case the mouth is the hole), you can use a pointy tool and just poke a hole through in the bottom of your piece.  HINT: If you forget this step, there is a really good chance your project will explode in the kiln because you are trapping air!!  Let your piece dry completely, fire it in the kiln and then use glazes to enhance your sculpture and finally fire it again to complete your piece.
 
 
ENJOY!!!