Showing posts with label pinch pot. Show all posts

Friday, June 15, 2012

Ice Cream Cones


Claes Oldenburg "Floor Burger"

The Pop Art style food sculptures of Claes Oldenburg inspired these fun ice cream cone wall sculptures. This is also a great project to discuss 3-D shapes with students.  Have students roll out a slab of clay that is about 3/8th of an inch thick.  I give students a paper template that will make a cone shape when wrapped up, this will also determine how large you want your ice cream cones to be (this one is about 15" tall).  Have students trace the template and cut it out, then wrap up the clay into a cone shape.  Scratch-to-attach the edges together well and let the cone rest wide part down while they add any cone texture they'd like with tools.

Next, using another piece of clay, students will make a sphere about the size of an orange, then make that sphere into a pinch pot by pushing their thumbs into the middle and squeezing around the sides.  This will make the ice cream scoop on top.  Its OK if the pinch pot has lumps or dents on it, it will make it look like a realistic scoop of ice cream.  Advanced students can make a double or triple scoop of ice cream, but be sure to put a hole between each of the scoops so that you are not trapping air (this will make the sculpture explode in the kiln!)

Scratch-to-attach the edges of the cone and the edges of the pinch pot so that they can attach them together.  HINT This part can be a little tricky especially if you are working fairly large.  Use some crumbled up newspaper stuffed inside the cone and pinch pot to help keep the shape while you blend the two together-it will burn out when you fire it in the kiln.  Have students take their time blending both parts together and make sure they are well attached.  The sculpture can be laying flat on the table now.  Have students choose the type of ice cream flavor they want and any extras like a cherry on top or sprinkles and scratch-to-attach them onto the ice cream.  When they are finished building, roll the sculptures over gently so that you can put a hole into the back of them, this will give you something to hang it by when you are finished and it will also prevent it from exploding in the kiln. Fire the pieces and then glaze them will the appropriate colors for the flavor of ice cream!

!!!B CR8IV!!!

Wednesday, May 2, 2012

Peacocks


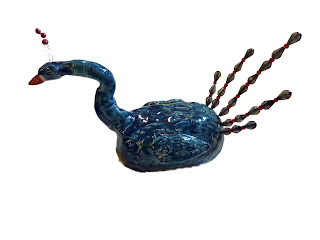
For this project we build the body of the peacocks the same way we have built our fish sculptures.  Using 2 pinch pots that are scratched together and smoothed over to make a hollow egg shape.  The neck is a rolled out snake or coil of clay with one end thicker to attach to the chest of the bird, use your fingers to pinch the thinner end into a pointy beak and use tools to create the nostrils, mouth and eye details.  Wings are also scratched onto the the sides of the body, then texture is applied to give the bird a feathery look.  The tail and head feathers are done using high temperature wire in different gauges.  The high temperature wire (sometimes called kanthal wire) can be put into the clay when it is wet and fired in the clay.  I used a thicker gauge on the tail feathers and a very thin gauge for the head feathers.  The head feathers have small spheres of clay added on to the tips of the wire, while the tail feather wires are left empty.  The pieces are fired and glazed and fired again.  For the final step, I offered my students a selection of beads to put onto their tailfeather wires, we discussed using patterns and also using warm colors or cool colors depending on what they had choosen to glaze their birds.  The final top bead got a drop of glue in it to keep them all from sliding off the wire.  Once the glue dries the peacocks are ready.  

!B CR8IV!   

Wednesday, April 25, 2012

Wonderland Flowers


Just in time for Mother's Day, these Wonderland Flowers bloom year round and don't require watering!  These images show several styles of flowers and you should b cr8iv with the shapes, textures and designs of your flowers, but the directions below will give you a basic idea of how to get started.

Start by making a pinch pot (roll a sphere of clay, push in your thumb, pinch around the sides) that is the general size you want your flower to be.  Scratch the entire inside of the pinch pot bowl with a tool.  Now start making your petals with your extra clay.  You can flatten small slabs of clay and cut them into your petal shape, you can roll coils of clay to create more spiny petals or you can slap small pieces of clay onto the table to stretch them into a petal shape--it's up to you, experiment and see what works best!  Now scratch the backs of each of your  petals and attach them into the pinch pot, layering them around as you go.  You can continue to layer them all the way into the center or you can create a small pinch pot and scratch-to-attach it on upside down to create the center of your flower.  Don't forget to experiment with different textures, sizes and shapes for your flowers. When you're finished building them, you'll need to put a hole in the bottom that is slightly larger than the rod you'll attach later.  I use 3/8th" steel rods for my flowers.  Let your flowers rest in bowls to help them  keep their shape as they dry.  Once you have bisque fired, glazed and glaze fired your pieces, you'll want to attach them to your "stems".  Choose your metal rods and clean them well, they will probably have a greasy residue that will need to be cleaned for your adhesive to stick.  I like to use a  putty epoxy for attaching the flower to the rod. It comes in two parts that you knead together, attach to your piece and it hardens in place.  It can be sanded, drilled and painted, so its a great choice for attaching the flowers to the stems.  I like to make a sphere of the putty and push it onto the tip of the rod, then push that into the hollow space of the flower, then I make a coil of the putty and wrap it around where the two come together and blend it in just like its clay.  Let the putty set up and then you can paint it to match your flowers.  You can make a perennial garden where no two flowers are alike!

!!!B CR8IV!!!


Wednesday, April 11, 2012

Chicken & Egg

 
Which came first, the chicken or the egg??

This is a two part multimedia project that can be applied to any egg laying animal if you're looking to accompany a curriculum based idea (I've had students make platypus' with this project too!)

The Egg:
You'll need a round balloon, newspaper, flour and water (to make paper mache) for each student.  This can be messy, so just be prepared, cover your tables, and stay calm! Start by blowing up your balloon, I recommend not to full capacity though- they tend to pop if stretched to thin. Then take a piece of masking tape and tape the tail of the balloon to the table your working at, this helps keep it from rolling away on you.  Prep your paper mache area by having a small container to put your mixture in and have all of your newspaper ripped up into strips and ready to go once your hands get all sticky.  Lots of people have very fancy paper mache recipes and techniques, here's a good one if you want to try: RECIPE but I just go with plain ol' flour and water mixed really really well to the consistency of pancake batter.  Once mixed, give each student some in their personal containers.  Dip a strip of newspaper into the paper mache mix, make sure its covered and then wipe off all the excess (I like to pinch it between my first two fingers and slide them down the stripe to pull off any excess), sometimes the paper will get too wet too quickly and it will rip, just put it to the side and try with another one.  It's always good to demo all of this for your students before you start to avoid the emotional melt downs!  Then layer the newspaper strips around your balloon until you have an even cover over the whole surface.  Let them dry completely, (about 24 hours) and repeat the whole process again and then again!  Now that you have a dry and strong egg, cut the egg in half to give it a cracked edge, I did this part for my students using a knife and scissors.  Once cracked open, you should be able to pull out the balloon remnants.  I gave my students  acrylic paints to decorate their eggs, inside and out.  You may want to spray the eggs with a coat of white spray paint to give them a base layer, as the newspaper print will show through on the lighter colored paints. Let the eggs dry while you move onto building the chickens!  HINT: Alternatively, you can do this whole process with plaster gauze instead of paper mache which is simpler, stronger and less messy--but way more expensive a material than flour, water and newspaper.

The Chicken:  These chickens (or whatever egg laying creature you've decided to make!) are made from simple pinch pots.  Start with two equal spheres of clay and make them into pinch pots by pushing your thumb into the center of the sphere and squeezing around the sides until you have a small bowl shape. Do the same to both spheres.  Take your scratching tool (wire tool, fork, comb...) and scratch-to-attach the edges of the bowls.  Then gently push them together and smooth out the seam with your fingers.  This creates the body of your chicken.  Now make one smaller pinch pot and turn it upside down onto the top of your body to create the head.  Scratch-to-attach it on and blend it in well to the shoulders of the chicken.  

Now using some extra clay, create your comb, eyes, beak, wings and legs. For the legs, roll out two coils of clay that are about the same size and thickness, scratch the end of each coil and scratch the body where you want to attach them on, blend them in well with your fingers.  You can push bend the ends up to create feet and then use a knife to cut some toes. The comb can be made by attaching a small coil of clay to the top of the head and then squeezing it thinner; mohawk style.  The beak is a small triangle and the eyes are two spheres with a smaller dot pushed into them. The wings can be two coils of clay that are equal in size and then flattened or two equal slabs of clay in the shape of wings, then scratch-to-attach them on.  Before letting your chicken dry, take a long pointy tool and make a hole from the bottom of the chicken up into the head to allow the trapped air to escape while its firing, if you forget this step--your chicken may blow up in the kiln! : (
Dry, bisque fire, glaze and then glaze fire your chicken.  Display your chicken and egg together!


!!!B CR8IV!!!

Sunday, March 25, 2012

Textured Pods

This is a great classroom challenge project for working with texture.  You can also make this as small or as large of a challenge as is appropriate for your classroom.  This can also be done over the course of a few sessions if needed too.  First I discuss texture with my class; what it is and how it can be created by pushing into clay and by adding onto clay or a combination of both techniques.  We look at shells, pine cones, stones etc...  We also doodle with a little bit of clay to think of different ways we can add on texture or what objects we can use to push into the clay to create unique textures.

Then the challenge:
Create 5 hollow pod forms (two pinch pots scratched-to-attached together) that are all a different shape.
Push in two unique textures on 2 of the forms.
Add on two unique textures on 2 of the forms.
Use a combination of push in and add on for the last form.
HINT: Adjust the numbers on this to fit your students level

Next create a tray or bowl (this could be a simple slab or a large pinch pot) to hold all of your textured pods but don't scratch-to-attach them to the container.  Be sure to poke a hole into the hollow space of each of your pods so that they don't explode in the kiln and then let all of your parts dry well and bisque fire them.  When glazing allow your students to paint the entire surface of each form and the surface of the container for them.  When they are in the glaze firing the pods will fuse to the container you have made to hold them and will create an interesting piece of abstract art.  Be inspired by natures forms, textures and colors for this project.

!!!B CR8IV!!!

Wednesday, March 14, 2012

Bears


These bears are made from simple pinch pots and can be made realistic or cute little teddy bears.  Start with two equal spheres of clay and make them into pinch pots by pushing your thumb into the center of the sphere and squeezing around the sides until you have a small bowl shape. Do the same to both spheres.  Take your scratching tool (wire tool, fork, comb...) and scratch-to-attach the edges of the bowls.  Then gently push them together and smooth out the seam with your fingers.  This creates the body of your bear.  Now make one smaller pinch pot and turn it upside down onto the top of your body to create the head.  Scratch-to-attach it on and blend it in well to the shoulders of the bear.  

Now using some extra clay, create your ears, eyes, nose, arms and legs. For the arms and legs, roll out four coils of clay that are about the same size and thickness, scratch the end of each coil and scratch the body where you want to attach them on, blend them in well with your fingers.  You can push a small round tool into the ends of the coils to make paw prints.   The ears are easy to make by flattening a small sphere of clay and cutting it in half making two equal ears.  The nose is a small triangle and the eyes are two spheres with a smaller dot pushed into them.  You can also add details like a honey pot, clothes or make your bear catching a salmon in the river.  Remember that all of your bears' parts need to be scratched-to-attached on! 

You can also give your bear a furry texture by scoring the clay with your scratching tool.  HINT:  Don't forget to poke a hole into the hollow space of your bear that goes through the body and all the way into the air that you've trapped in the head so that it doesn't explode in the kiln!!!  Let them dry, bisque fire, glaze and glaze fire them. 


!!!B CR8IV!!!

Friday, March 2, 2012

Nesting Bowls

Pinch pots are simple to make, but nesting them is a great challenge for students to get them just right!  I ask students to create 6 nested bowls in whatever shape they'd like (hearts, circles ovals etc..) using just the pinch pot technique to create them.

Have students start by making 6 spheres of clay that gradually get smaller and smaller (the first one can be about the size of a grapefruit). Starting with the largest sphere, have students stick their thumbs into the sphere and squeeze around the sides until all the clay is stretched out into a bowl shape.  Form the bowl into the desired shape and start on the next one, as each bowl is stretched out test it for fitting into the larger one.  Once they are all nested let them dry and bisque fire them.  I gave a color theory lesson on tones and tints for students to think about when painting their bowls.  You could also have students create a pattern of colors or use only warm/cool colors when glazing.
!!! B CR8IV!!! 

Wednesday, February 22, 2012

Georgia O'Keeffe Flowers

Georgia O'Keeffe is known for her over sized flower paintings and this project can be used to introduce her work to your students.  Show lots of images of her work and different types of flowers to your students before you start or bring real flowers into the classroom for students to examine.  Also, you'll need to pick up some sturdy plastic reusable picnic plates for this project, one for each student to build their flower on.

Roll out a large slab of clay that is about 3/8ths of an inch thick and lay it over the plastic plate so that its completely covered.  Use a tool to cut off the excess around the edges of the plate.  Now use your excess clay to start shaping petals for your flower, start attaching them to the base piece from the outside edge working towards the middle.  Don't forget to scratch-to-attach them on well.  Keep layering in your petals until you have filled your plate and add texture or details on them as desired.  Next cut a circular hole in the middle of your flower and remove that piece of clay.  Now make a small pinch pot, turn it upside down and scratch-to attach it over the hole. You can add texture to the center of your flower.  HINT: If you don't remove the circular piece of clay from the base of your flower and you attach the pinch pot over the top, your flower can explode in the kiln because you are trapping air!  So don't forget that step!!  Also, you can hang your flower on the wall using that hole to hang on a nail.  Let your flower dry on the plate for support, it will shrink away from the plate and release as it dries. Then bisque fire, glaze and fire again to finish.

To display these flowers, I painted stems and leaves on the wall and hung the flowers above the stems, you can create a garden that never needs to be watered for your classroom this way!

!!!B CR8IV!!!

Friday, February 10, 2012

Flamingos

The girls that made these cute sculptures insisted that they were flamingos without legs, not purple swans!  But if you wanted to build a swan, you could build it the exact same way!    

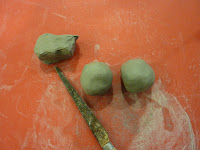
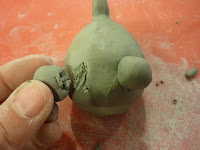
Start with two equal pieces of clay about the size of a ping pong ball and make them both into spheres.  Use your thumb to push into the center of the sphere and then squeeze around the sides to create a pinch pot.  Do this to both spheres.  Next scratch the rim of each of the pinch pots and attach them together, smoothing out the seam as you go.  This will create the hollow body of your flamingo.  Take your time to shape it or smooth it if its a little bit lumpy.  Pinch one end of the body with your fingers to create the pointier tail end of your flamingo.  Using another piece of clay, roll out a small snake or coil of clay to create the neck and head, I like to keep the ends of the coil a little bit thicker than the middle for this.  Scratch-to-attach on the base of the coil to the body, blend it in well and then position the neck as desired.  Use your fingers to round out the head, then add on a small cone shape of clay for the beak.  You can add a flat oval shape to each side of the body if you want to add on wings.  Then finish it off by adding on details to the face or some feather textures to the wings and body using your tools.  Dry, bisque fire, glaze and fire again to finish.....remember that your flamingo can be what ever color you want!  
!!! B CR8IV!!!

Wednesday, January 4, 2012

Self Portrait Busts


These cute self-portrait busts are a great way for students to learn about basic human face proportions.  Take time to show them the proportions on a paper drawing or paired up with a partner that they can stare at.  I usually divide this project up into two sessions.  Students will start with building the base shapes and then add on the details of their faces.  You can also offer mirrors to your students for help with the details in Part II.
PART I
Start by giving students a piece of clay the size of a grapefruit plus a little bit of extra clay.  Cut that piece in half and then cut one of those pieces in half, they should have 3 pieces (two small ones of equal size and 1 larger one).  Make spheres out of each of the pieces and form them into pinch pots.  The larger pinch pot will be for the shoulders, squeeze it so its a little bit oval shaped and then place it upside down on the table. HINT: Its helpful to stuff a little bit of newspaper into the shoulders to help it keep its shape.  Scratch-to-attach the two smaller ones together to create a hollow sphere, this will be the head shape- it may look more like a potato, so have students take their time to shape it and make it more egg shaped.  Use a little bit of extra clay to roll out a snake of clay that is about as thick as your finger and wrap it into a cylinder shape, this will be used for the neck.  
To attach all three of the parts together, (shoulders, neck and head) position them where you think that they will look best to make your bust, then scratch-to-attach all of the connection spots well.  I like to attach the neck onto the shoulder and blend the coil of clay into the shoulders, then place the head onto the shoulders and blend those two together well.  Next use a tool to poke through from under the shoulders, through the neck and into the hollow space in the head, so that they don't explode in the kiln.  You can also write students names on the inside of the shoulders while you have them flipped over.  If you've used newspaper here, just pull it out to make the hole and then replace it.  This is usually where I will stop the first session, so if you need to stop here too, wrap up all of your students work in plastic until your next session.  
PART II
Now have students use a pointy tool or a pencil to lightly draw onto the clay the center line of the face, the eye line, the nose line and the mouth line.  This should help students give placement for all of the features.  Using a small amount of extra clay, shape each of the features in clay using tools and their hands.  Make sure that each part is scratched-to-attached on well.  HINT: A great way to make eyes that are the same size is to make one the size you like and then trace it onto another piece of clay.  HINT: A great way to make ears the same size is to make a flat pancake of clay and cut it in half, each half is an ear.  Hair can be added onto the head in flat pieces, coils or texturing the clay, depending on the style and type of hair they are trying to create. Once all the features are attached, erase the lines with a finger or smoothing tool. Have students think about clothing or other items they might want to add on to the shoulders (like a parrot or a pocket!).  Encourage students to turn their sculptures around and look at them from all sides before letting them dry.  

!!!B CR8IV!!!

Wednesday, December 28, 2011

Pool People

Dreaming of Summer....this amazing piece was made by one of my students and it won Honorable Mention in the National K-12 Ceramic Exhibition! Yahoo!
These pool people are created by starting with a basic pinch pot for the pool, students are encouraged to play with the shape and texture of the pool, especially the exterior.  Next have students roll a log of clay the height that they want their person to be and about 2" thick.  With a knife slice into the bottom of the log to create 2 legs and then cut 2 diagonal cuts for the arms.  Squeeze the neck and round out the head with your fingers.  This should give you the basic body parts, next you can add details like a bathing suit, hair (we used a garlic press), fingers, toes and don't forget pool toys too!  Lastly, have students position their people into the pool, but don't attach them to the pool.  This girl is just relaxing on the side, but remember they can be doing a handstand or floating on their backs etc...  Once you are finished building, let the pieces dry and then bisque fire them.  Glaze all of the parts and position your person and their pool toys into the pinch pot.  Before loading the pieces in the kiln add in some pieces of glass (colored, clear or marbles).  You don't need a lot of glass to give the effect of water once it melts in the kiln.  The people and items will be attached to the pool after the firing on a permanent summer vacation!
!!!B CR8IV!!!

Friday, December 16, 2011

Ice Cream Cones

Claes Oldenburg "Floor Burger"
The Pop Art style food sculptures of Claes Oldenburg inspired these fun ice cream cone wall sculptures. This is also a great project to discuss 3-D shapes with students.  Have students roll out a slab of clay that is about 3/8th of an inch thick.  I give students a paper template that will make a cone shape when wrapped up, this will also determine how large you want your ice cream cones to be (this one is about 15" tall).  Have students trace the template and cut it out, then wrap up the clay into a cone shape.  Scratch-to-attach the edges together well and let the cone rest wide part down while they add any cone texture they'd like with tools.

Next, using another piece of clay, students will make a sphere about the size of an orange, then make that sphere into a pinch pot by pushing their thumbs into the middle and squeezing around the sides.  This will make the ice cream scoop on top.  Its OK if the pinch pot has lumps or dents on it, it will make it look like a realistic scoop of ice cream.  Advanced students can make a double or triple scoop of ice cream, but be sure to put a hole between each of the scoops so that you are not trapping air (this will make the sculpture explode in the kiln!)

Scratch-to-attach the edges of the cone and the edges of the pinch pot so that they can attach them together.  HINT:  This part can be a little tricky especially if you are working fairly large.  Use some crumbled up newspaper stuffed inside the cone and pinch pot to help keep the shape while you blend the two together-it will burn out when you fire it in the kiln.  Have students take their time blending both parts together and make sure they are well attached.  The sculpture can be laying flat on the table now.  Have students choose the type of ice cream flavor they want and any extras like a cherry on top or sprinkles and scratch-to-attach them onto the ice cream.  When they are finished building, roll the sculptures over gently so that you can put a hole into the back of them, this will give you something to hang it by when you are finished and it will also prevent it from exploding in the kiln. Fire the pieces and then glaze them will the appropriate colors for the flavor of ice cream!

!!!B CR8IV!!!

Wednesday, November 9, 2011

Octopus Gardens

These mini coral reefs are easy to build and filled with interesting texture.  Start by building the reef base out of a pinch pot.  So make a sphere of clay, push your thumb into it and squeeze around the sides to make a bowl shape.  Then flip it over, you can dent it in or push it out in areas or even push a hole through the side so you have a cave in your reef.  Next break off small pieces of clay and roll out 8 cone shapes for your octopus' legs.  Scratch the wide end of each of the legs and scratch the top of your reef and attach each of the legs on, its a good idea to put on hand underneath the reef as you push the legs on so that you don't collapse the reef in.  Take your time blending the legs together and shaping them.  Next roll a small sphere for the head of your octopus, scratch-to-attach it on top of where you attached the legs and blend it in with your finger or a tool.  You can add eyes or a face onto your octopus if you'd like too. 

Next we'll start building the coral and reef creatures to add on.  I encourage students to add on at least five different elements and to cover the entire surface with texture.  I also give students lots of images of coral reefs to inspire ideas.  Besides interestingly shaped and textured corals and seaweeds, students like to add on crabs or eels, sometimes a baby octopus or little fish.  Make sure that all the elements you build are scratched-to-attached on to the reef well.  You can also move the octopus' arms to wrap around the items that you add on.  Encourage students to continue to turn their sculptures around and view them from all sides, making sure that they have interesting elements from every point of view.  Once glazed, these sculptures are safe to put into a fish tank as handmade decoration if you'd like! 

!!!B CR8IV!!!

Saturday, April 16, 2011

When Pigs Fly...

I love to show David Wiesner's book Tuesday to my students when we create this project.  His amazing illustrations of flying frogs are a great jumping off point for students to start their own flying pig projects.  We talk about all the ways that a pig could fly...superman capes, jet packs and wings are some of the most popular ideas.  The pigs' bodies are made from simple pinch pots. Start with two equal spheres of clay and make them into pinch pots by pushing your thumb into the center of the sphere and squeezing around the sides until you have a small bowl shape. Do the same to both spheres. Take your scratching tool (wire tool, fork, comb...) and scratch-to-attach the edges of the bowls. Then gently push them together and smooth out the seam with your fingers. This hollow shape creates the body of your pig.


Now using some extra clay, create your snout, legs, tail, eyes and ears, plus of course your mode of flying. If you're making wings like I did, roll out two small coils of clay and gently press them flat, scratch the end of each shape and scratch the back of your pigs' body and attach them on, you can also add feathery texture to them with a tool. You can make legs by rolling out snakes or coils of clay and then scratch-to-attach them onto the body, think about the position you want your pig to be in, mine are attached in "superman" pose.  I also used a knife to cut the toes of my  pig.  To make the snout I make a "mini-marshmellow" shape or a short cylinder and use a poking tool to create the nostrils.  The eyes are small spheres that are flattened and also poked to create pupils.  To make the ears I flatten a small pancake shape of clay and then cut out two equal triangles.  The tail can be tricky to roll out a thin coil of clay and then wrap it up into a spiral, I recommend using extra soft clay to do this.  Remember that all of your pigs' parts need to be scratched-to-attached on!  This is a great project to talk about the difference between realistic art and abstracted art with your students.  I like to show them how to build parts and let their imagination take over....I also allow them to make their pig blue with yellow spots if they want too as another form of abstraction! 
 
!!!B CR8IV!!!

Wednesday, April 13, 2011

Owls

These owls are made from simple pinch pots and can be made small or large enough to sit in the garden.  Start with two equal spheres of clay and make them into pinch pots by pushing your thumb into the center of the sphere and squeezing around the sides until you have a small bowl shape. Do the same to both spheres.  Take your scratching tool (wire tool, fork, comb...) and scratch-to-attach the edges of the bowls.  Then gently push them together and smooth out the seam with your fingers.  This creates the body of your owl.

Now using some extra clay, create your beak, wings, feet, eyes and ear tufts.  For the wings, roll out two small coils of clay and gently press them flat, scratch the end of each shape and scratch the shoulder of your owls body and attach them on. You can make feet the same way but scratch-to-attach them onto the bottom of the body and then use a knife to cut the toes.  I like to squeeze the clay with my pincher fingers to create the ear tufts but you could also roll out small cone shapes of clay and attach them on.  The beak is a small triangle and the eyes are two spheres with a smaller dot pushed into them.  Remember that all of your owls' parts need to be scratched-to-attached on! 

You can also give your owl a feathery texture by scoring the clay with your scratching tool.  HINT:  Don't forget to poke a hole into the hollow space of your owl so that it doesn't explode in the kiln!!!  Let them dry, bisque fire, glaze and glaze fire them.  OPTION:  If your students make a few small owls or other birds, hot glue them onto an interesting piece of driftwood so they appear to be sitting on a branch.

!!!B CR8IV!!!


Friday, January 21, 2011

Pinch Pot Monsters


One of my talented students thought up this clever idea to create a sculpture from a basic pinch pot.  Start by cutting about 1/2 pound block of clay in half.
 
Take one piece and roll it into a sphere.


Push your thumb into the sphere and squeeze around the sides to create a pinch pot.


This pinch pot becomes the mouth of your monster, so shape it however you'd like the mouth to be positioned to show an emotion.  Mine's going to be wide mouthed and yelling!


Now its time to add on your monsters parts.  I've created five spheres for eyes. 


Don't forget to use a scoring tool to scratch-to-attach all of your parts on!


You can use a tool to add details like pupils for the eyes.

I rolled out a coil of clay and then flattened it to create a tongue. 


Feet can be made by rolling out a coil of clay and flattening just the foot, then use a knife to cut individual toes.  You can also use a small tool to push in toenail shapes too. 


It is better to attach the feet to a wide surface rather than edge to edge, they are less likely to break off this way.  Gently flip your monster over and scratch-to-attach the bottom of your pinch pot and the feet, then blend together.  The tongue can be attached the same way inside of the mouth. 


The tail is made by rolling out a coil of clay so that it is thinner at one end and thicker at the other.  Scratch-to attach the thicker end and blend it into the body shape when you attach it on, this will be fragile so make sure that it is securely attached before you start moving your sculpture around.  


Small cone shapes can be made and added onto the tail to create spikes.


Spiky teeth can be added inside the mouth as well. 
 
The back of a tool can be used to add texture to your monsters skin. 


B Cr8iv with all of the varieties of pinch pot monsters you can make!


Tuesday, December 21, 2010

Peacocks


For this project we build the body of the peacocks the same way we have built our fish sculptures.  Using 2 pinch pots that are scratched together and smoothed over to make a hollow egg shape.  The neck is a rolled out snake or coil of clay with one end thicker to attach to the chest of the bird, use your fingers to pinch the thinner end into a pointy beak and use tools to create the nostrils, mouth and eye details.  Wings are also scratched onto the the sides of the body, then texture is applied to give the bird a feathery look.  The tail and head feathers are done using high temperature wire in different gauges.  The high temperature wire (sometimes called kanthal wire) can be put into the clay when it is wet and fired in the clay.  I used a thicker gauge on the tail feathers and a very thin gauge for the head feathers.  The head feathers have small spheres of clay added on to the tips of the wire, while the tail feather wires are left empty.  The pieces are fired and glazed and fired again.  For the final step, I offered my students a selection of beads to put onto their tailfeather wires, we discussed using patterns and also using warm colors or cool colors depending on what they had choosen to glaze their birds.  The final top bead got a drop of glue in it to keep them all from sliding off the wire.  Once the glue dries the peacocks are ready.  

!B CR8IV!   

Friday, September 24, 2010

Fish Sculptures

Create a fun fish sculpture using the pinch pot method of building and scratching-to-attach your parts on.  Choose to create a realistic looking fish or an abstracted one.  Experiment with your tools to create a variety of textures.

Sessions: One 1 hour session to build

Age: Kinder and up

Materials:
Low Fire Clay
A Variety of Clay Tools
Low Fire Glazes & Brushes
Kiln

Steps:

1. Cut off a piece of clay that is about as big as a baseball.


2. Cut it into 3 equal pieces, two will be for the body of the fish and one for adding on parts.


3. Make two of the pieces into spheres by rolling them in your hands. Put the 3rd piece aside for now.


4. Push your thumb into each sphere and start to squeeze around the side to create a small pinch pot, repeat this with the other sphere.


5. Using a scratching tool, "scratch-to attach" the edges of both pinch pots so they will stay connected together. Anytime we attach two pieces of clay together, we'll be using scratch-to-attach techniques.


6. Gently press both halves together and blend the seam until the shape is smooth, be careful not to dent in the sphere as you smooth. You can shape the sphere to be more egg shaped for the body of your fish but make sure that you are keeping a hollow space inside the clay--if it is squeezed to the point where its a solid piece of clay, it can explode in the kiln. HINT: You can use steps 1-6 to use as a base for building a lot of projects.


7.  Now you are ready to start adding on your fish parts using your extra piece of clay that we put to the side.  Start with the tail rolling out a hot dog shape of clay and bend it into a cresent moon shape, then scratch-to-attach it on to one end of the body.  Then blend it into the body using your fingers and squeeze the tail thinner by pinching it and shaping it.


8.  Next, add on two large spheres for bulging eyes and use a tool (or the back of a tool) to push in a pupil. 


9.  You can use a knife to cut the mouth open or just draw a mouth on, squeezing the cheeks gently will make the mouth open wider.


10.  To add the dorsal fin, roll out a small hotdog shape and scratch-to-attach it on to the back of your fish.  Then you can squeeze it thinner and shape it to be a little wavy with your fingers. 


11.  To make the side fins, start with a hot dog shape, flatten it gently and cut it in half with a knife, then scratch-to-attach one on each side of your fish. 


12. Using a small loop tool you can gently press into the body of your fish to create a scale texture.  You can also add different textures to the fins, tail and belly of your fish by using different tools. 


13.  You also have the choice of abstracting your fish by adding on other parts, like a hat, skateboard or making it hold something in its fins.  Some of my students have made their fish wearing jetpacks, skiing or wearing a tutu! Let your finished fish dry before you bisque fire them and they are ready to glaze and fire again. 

B CR8IV!!