Showing posts with label mixed media. Show all posts

Wednesday, June 6, 2012

Hand Soapdishes


These hand soap dishes are a two part project that will teach students the concept of positive and negative space.  You'll want to cover your tables with newspaper to make clean up easier.  To make the hands, each student needs to hold a small amount of plaster in their hand until it hardens.  I recommend doing only one hand since they have to sit still for 10 min while it hardens.  

Once students are ready, mix up a small batch of plaster and put it into palm of the students hands, make sure to cover the entire top surface but DO NOT get plaster underneath the hand or their hand will be trapped in the hardened plaster!  Once their hand is full, have them hold still until the plaster hardens (about 10 min).  The stiller they can be holding the plaster, the less chances of major cracking or breakage off the mold.  While the plaster starts to harden I explain to students how this will be the negative space of their hands and that we will use it like a stamp to create the positive space of their hand in clay.  You can show examples of positive and negative space in art too.

HINT: You may need to mix up multiple batches depending on the size of your class, try not to mix up to much at one time or it will harden before you get to pour it into their hand.  If you have never worked with plaster before, I recommend trying it out on your own before attempting with a class--it's a very manageable classroom material if you know what to expect!  

Once the plaster is hard, have students remove their hand slowly, small pieces will break off of the edges.  Write their name on the plaster and put aside to dry completely (12- 24 hours).  All of the crumbles of plaster should be wrapped up in the newspaper that you used to cover the tables and thrown away.  Make sure students wash their hands in a bucket not at the sink --plaster will clog up your sink!

For step two, you'll use the students plaster hand molds as a stamp and press clay into the mold.  I have students flatten out a piece of clay about the size of a large hamburger and lay that over the plaster mold.  Press the clay gently but firmly into every contour of the mold and then gently peel the clay away.  You should have a perfect positive of the mold with every detail showing.  You can use tools to trim and clean up the edges, make sure that you write each students name on the bottom of the clay hand (they will all look alike!)  Let them dry, bisque fire, glaze with a translucent glaze and glaze fire.  These hands make great soap holders or business card holders and make great Mother's and Father's Day gifts too!

!!! B CR8IV!!!  


Friday, May 25, 2012

Backgammon Game Board

Making your own game board and pieces in clay can be really fun.  This student chose to make a backgammon board but you could make checkers, chess, monopoly etc.

To make these game boards, start by rolling out a flat slab of clay that is about 3/8ths of an inch thick and the size that you would like your game board to be.  Next scratch up the entire surface of the clay with a fork or scoring tool.  Now start cutting out the shapes for your board pieces from the extra scraps of clay.  Scratch the backs of your shapes with a tool and begin attaching them onto the surface.  If you have large empty area, you can cut small shapes and attach them to fill those areas as a design rather than a playing area of the board.  Be sure to keep the thickness of your clay even as you attach them onto the base piece. Once all the spaces have been filled with shapes, let the game dry on a flat surface.  Now you have to build the pieces for your game, depending on what game you've chosen, they may need to be unique for each player or all similar as in checkers and backgammon.  Next, bisque fire all the pieces and board, then have students glaze only the surface of each of the shapes and the outside edge of the board NOT the spaces in-between, the grout will not stick to a glazed surface.  They should also glaze the pieces keeping color in mind if they need two teams of color or all the same.  Once the glaze firing is finished, mix up some grout in any color you'd like according to the package's instructions.  Be careful about not adding too much water to your grout, a little goes a long way!  Spread out some newspaper and give out plastic gloves to students--this will be messy!  I give students a handful of the grout and let them start pushing it into all of the spaces, I usually have to help everyone out a little bit to make sure they've packed it in tight and filled all the spaces.  Then have them rub the grout off of the tops of all of their shapes using just their hands to start with or a wooden clay tool can be helpful, then use a dry paper towel to start to wipe the surfaces clean.  Once the grout has dried a bit, you can go over the surface with a damp sponge to get any residual grout off. Let the grout dry for 24 hours before using your game.


!!!B CR8IV!!!

Wednesday, May 16, 2012

Henna Hands

Henna is a natural dye that is used to decorate the body especially the hands for special occasions such as weddings in many Asian cultures. The designs are intricate patterns of shapes, flowers, spirals, waves and lines.  For this project, I show my students lots of examples or patterns and designs, we also practice a few on paper first.

You may want to cover your tables with newspaper to make clean up easier.  To make the hands, each student needs a latex glove (be sure to use thick gloves NOT the thin food service type), then mix up a small batch of plaster and pour it into the glove while the student holds it open. Once their glove it full, have them pinch it closed and hold it up until the plaster hardens (about 10 min).  The stiller they can be holding the plaster, the less chances of fingers breaking off once its dry, I have my students tell jokes or riddles while they wait.   HINT: You may need to mix up multiple batches depending on the size of your class, try not to mix up to much at one time or it will harden before you get to pour it into the glove.  If you have never worked with plaster before, I recommend trying it out on your own before attempting with a class--it's a very manageable classroom material if you know what to expect!

When the plaster hardens you can lay the gloves down on the table and carefully cut the glove off with scissors.  You should have a perfect hand shape which may stand up if the bottom is flat enough ( you can sand it flat if its not!).  I let these dry completely over night.  To clean up any plaster disasters, let it harden and then break it up with a scraper and hammer, through the hardened chunks away.  If you want to get it out of the bucket you mixed it in, let it harden and then flex the plastic bucket to pop it off the sides.  DO NOT LET PLASTER GO DOWN THE SINK!!  I set up a 5 gallon bucket of water for students to wash their hands and any tools in, then just dump that water outside.

Once the plaster is set, use watercolor paints to paint the entire surface of the hands, the plaster will absorb the paint quickly.  You can use this as a time to tie in a color theory lesson explaining the differences between warm colors and cool colors or just give them primary colors and have them experiment mixing.  Once the paint is dry, give students a selection of fine and ultra-fine sharpie markers to start their henna patterns with.  I encourage students to do at least 10 different patterns and to cover the whole surface.  They can use the patterns they drew earlier as references on their final pieces.

HINT: If you have broken fingers, they can be fixed!  Take a small drill bit and drill about 1/2" into the finger that is broken and also into where it connects.  Cut an inch long (or shorter) dowel of wood, such as a shish kabob skewer, dip the ends into glue and fit it into the drilled holes.  You can also add a little bit of glue to the plaster surfaces, push the broken pieces together gently and let dry!  


!!! B CR8IV!!!

Wednesday, May 9, 2012

Baby Bugs

These cute little bugs are easy to build and your students can make a bunch in a short period of time.  Start with a small sphere of clay, about the size of a large marble and elongate it into an oval for the body.  Roll out a coil of clay and flatten it gently with your hands, scratch to attach it onto the body to create the wings.  You can add on big bulgy eyes or a stinger tail at this point too.  Next I used nichrome wire (this is high temperature wire--do not use any other type of wire in the kiln!) and cut short lengths of it to create the legs, push the pieces into the clay and let dry, you could also add antennae this way.  HINT: You may need to let the baby bugs dry on their backs until they are strong enough to stand on their wire legs.  You can also make a small wire loop to push into the back of the bugs, so that you could hang them and create a mobile of flying bugs after they are finished.  If you want to tie this project into your classroom curriculum, have students make each section of their insects anatomy realistic (head, thorax, abdomen, legs, wings & antennae).  HINT: If they are standing on their wire legs in the kiln for glaze firing, you can glaze the entire surface of the bugs without risking them sticking to the kiln shelf!

!!! B CR8IV!!!

Wednesday, May 2, 2012

Peacocks


For this project we build the body of the peacocks the same way we have built our fish sculptures.  Using 2 pinch pots that are scratched together and smoothed over to make a hollow egg shape.  The neck is a rolled out snake or coil of clay with one end thicker to attach to the chest of the bird, use your fingers to pinch the thinner end into a pointy beak and use tools to create the nostrils, mouth and eye details.  Wings are also scratched onto the the sides of the body, then texture is applied to give the bird a feathery look.  The tail and head feathers are done using high temperature wire in different gauges.  The high temperature wire (sometimes called kanthal wire) can be put into the clay when it is wet and fired in the clay.  I used a thicker gauge on the tail feathers and a very thin gauge for the head feathers.  The head feathers have small spheres of clay added on to the tips of the wire, while the tail feather wires are left empty.  The pieces are fired and glazed and fired again.  For the final step, I offered my students a selection of beads to put onto their tailfeather wires, we discussed using patterns and also using warm colors or cool colors depending on what they had choosen to glaze their birds.  The final top bead got a drop of glue in it to keep them all from sliding off the wire.  Once the glue dries the peacocks are ready.  

!B CR8IV!   

Wednesday, April 25, 2012

Wonderland Flowers


Just in time for Mother's Day, these Wonderland Flowers bloom year round and don't require watering!  These images show several styles of flowers and you should b cr8iv with the shapes, textures and designs of your flowers, but the directions below will give you a basic idea of how to get started.

Start by making a pinch pot (roll a sphere of clay, push in your thumb, pinch around the sides) that is the general size you want your flower to be.  Scratch the entire inside of the pinch pot bowl with a tool.  Now start making your petals with your extra clay.  You can flatten small slabs of clay and cut them into your petal shape, you can roll coils of clay to create more spiny petals or you can slap small pieces of clay onto the table to stretch them into a petal shape--it's up to you, experiment and see what works best!  Now scratch the backs of each of your  petals and attach them into the pinch pot, layering them around as you go.  You can continue to layer them all the way into the center or you can create a small pinch pot and scratch-to-attach it on upside down to create the center of your flower.  Don't forget to experiment with different textures, sizes and shapes for your flowers. When you're finished building them, you'll need to put a hole in the bottom that is slightly larger than the rod you'll attach later.  I use 3/8th" steel rods for my flowers.  Let your flowers rest in bowls to help them  keep their shape as they dry.  Once you have bisque fired, glazed and glaze fired your pieces, you'll want to attach them to your "stems".  Choose your metal rods and clean them well, they will probably have a greasy residue that will need to be cleaned for your adhesive to stick.  I like to use a  putty epoxy for attaching the flower to the rod. It comes in two parts that you knead together, attach to your piece and it hardens in place.  It can be sanded, drilled and painted, so its a great choice for attaching the flowers to the stems.  I like to make a sphere of the putty and push it onto the tip of the rod, then push that into the hollow space of the flower, then I make a coil of the putty and wrap it around where the two come together and blend it in just like its clay.  Let the putty set up and then you can paint it to match your flowers.  You can make a perennial garden where no two flowers are alike!

!!!B CR8IV!!!


Wednesday, April 18, 2012

Paper Bead Necklaces

In a tent city called Delmas 33 in Port au Prince Haiti, workers were busy creating beads from garbage papers they had found.  On a recent trip there, HOPE Art was lucky enough to learn how to make them and watch as they turned trash into necklaces, bracelets and earrings to be sold in the states which would in turn provide income and employment to Haitians.  I made the ones in the picture using a combination of magazines, postcards and food packaging.  


Collect your materials and  cut them into long skinny triangles.  The widest width of the triangle will be how wide your bead is and the length will determine thickness of your beads.  The thickness of the material you're using will also change the thickness of the bead.  Experiment with a few different sizes to gauge what kind of beads you want to make.  Next using a skewer, start to wrap the paper around the skewer tightly, starting with the widest part of the triangle.  When you get to the end, use a bit of glue to keep the bead from unwrapping.  Continue making your beads this way, you can keep them on the skewer if that's easier.  Once you have all your beads made you'll want to coat them with a clear lacquer to protect the paper, you can use clear spray paint, clear nail polish, modpodge, what ever you've got on hand.  You'll probably want to do a few coats and just keep the beads on the skewer the whole time until they dry.  Once dry, use some fishing line and other colorful beads to assemble your found art jewelry.   


!!!B CR8IV!!!

Friday, April 13, 2012

Foam Carved Animals

The cute animals are made from floral foam --the stuff florists stick in the bottom of arrangements to make the flower stems stay in place.  Its a great material for students to practice the art of carving with a very soft material.  I have to warn you though, this is not an easy project and there have been a few tears shed over lost legs and ears etc...so be prepared!  Before I start this project, I let my students know the drawback to this material is how much the very fine dust sticks to your hands and if you touch your face with your hands after you've started carving, it can be really painful to get in the eyes, so make sure students wash their hands thoroughly before they scratch an itch!  I also like to prep students for this project by showing them a lot of Michelangelo's carvings and we talk about the process of carving (taking away vs adding on).

I find that I have the best results on this project when I do it with my students; step by step.  Everyone should start with one block of floral foam that is about 4" x 4" x 2", yours maybe larger or smaller depending on the brand you buy.  And a few clay tools are helpful, a knife, pointy tool and a few sizes of carving tools.  (Make sure you wash your tools before using them in clay again!) These drawings may help students visualize what parts they need to remove in each step.  Step one removes the foam to create the basic head and body shape, rounding out the back end and removing under the neck and front of the legs.  Step two removes the foam so that you have front and back legs, students will also need to carve between each pair of legs to create 4 individual legs.  HINT: Remind students that its better to carve away a little bit at a time, rather than one big chunk because you can easily break off a leg unintentionally here.  Step three removes the back of the back legs to shape a tail and it also shapes the snout, head, ears and neck.  This is a generic shape that may need to change depending on what animal you are making.  I find that once my students get to this point, they feel comfortable with adding in the details like noses, eyes, toes etc on their own carving intuition. I have my students paint them with acrylic paints and these are glued onto driftwood bases.  You could also add wire to create hair and longer tails, like we did here to create some lion manes.  HINT: If you do break a part off while carving, have the students keep their parts and just glue them on later with a strong craft glue.   Dick Blick Art Supplies has a great similar lesson plan to create Inuit Bears if you're looking to tie this project in with your curriculum.

!!!B CR8IV!!!

Wednesday, April 11, 2012

Chicken & Egg

 
Which came first, the chicken or the egg??

This is a two part multimedia project that can be applied to any egg laying animal if you're looking to accompany a curriculum based idea (I've had students make platypus' with this project too!)

The Egg:
You'll need a round balloon, newspaper, flour and water (to make paper mache) for each student.  This can be messy, so just be prepared, cover your tables, and stay calm! Start by blowing up your balloon, I recommend not to full capacity though- they tend to pop if stretched to thin. Then take a piece of masking tape and tape the tail of the balloon to the table your working at, this helps keep it from rolling away on you.  Prep your paper mache area by having a small container to put your mixture in and have all of your newspaper ripped up into strips and ready to go once your hands get all sticky.  Lots of people have very fancy paper mache recipes and techniques, here's a good one if you want to try: RECIPE but I just go with plain ol' flour and water mixed really really well to the consistency of pancake batter.  Once mixed, give each student some in their personal containers.  Dip a strip of newspaper into the paper mache mix, make sure its covered and then wipe off all the excess (I like to pinch it between my first two fingers and slide them down the stripe to pull off any excess), sometimes the paper will get too wet too quickly and it will rip, just put it to the side and try with another one.  It's always good to demo all of this for your students before you start to avoid the emotional melt downs!  Then layer the newspaper strips around your balloon until you have an even cover over the whole surface.  Let them dry completely, (about 24 hours) and repeat the whole process again and then again!  Now that you have a dry and strong egg, cut the egg in half to give it a cracked edge, I did this part for my students using a knife and scissors.  Once cracked open, you should be able to pull out the balloon remnants.  I gave my students  acrylic paints to decorate their eggs, inside and out.  You may want to spray the eggs with a coat of white spray paint to give them a base layer, as the newspaper print will show through on the lighter colored paints. Let the eggs dry while you move onto building the chickens!  HINT: Alternatively, you can do this whole process with plaster gauze instead of paper mache which is simpler, stronger and less messy--but way more expensive a material than flour, water and newspaper.

The Chicken:  These chickens (or whatever egg laying creature you've decided to make!) are made from simple pinch pots.  Start with two equal spheres of clay and make them into pinch pots by pushing your thumb into the center of the sphere and squeezing around the sides until you have a small bowl shape. Do the same to both spheres.  Take your scratching tool (wire tool, fork, comb...) and scratch-to-attach the edges of the bowls.  Then gently push them together and smooth out the seam with your fingers.  This creates the body of your chicken.  Now make one smaller pinch pot and turn it upside down onto the top of your body to create the head.  Scratch-to-attach it on and blend it in well to the shoulders of the chicken.  

Now using some extra clay, create your comb, eyes, beak, wings and legs. For the legs, roll out two coils of clay that are about the same size and thickness, scratch the end of each coil and scratch the body where you want to attach them on, blend them in well with your fingers.  You can push bend the ends up to create feet and then use a knife to cut some toes. The comb can be made by attaching a small coil of clay to the top of the head and then squeezing it thinner; mohawk style.  The beak is a small triangle and the eyes are two spheres with a smaller dot pushed into them. The wings can be two coils of clay that are equal in size and then flattened or two equal slabs of clay in the shape of wings, then scratch-to-attach them on.  Before letting your chicken dry, take a long pointy tool and make a hole from the bottom of the chicken up into the head to allow the trapped air to escape while its firing, if you forget this step--your chicken may blow up in the kiln! : (
Dry, bisque fire, glaze and then glaze fire your chicken.  Display your chicken and egg together!


!!!B CR8IV!!!

Friday, March 23, 2012

Masking Tape People


I created this project when I accidentally ordered too many rolls of masking tape and I didn't know what to do with all of it. I had more than enough for each student to have their own roll, so the masking tape people came to be!  You will need a roll of masking tape, 9 pipe cleaners, a stack of newspaper and scissors for each student in your class to do this project.  This will also happen over the course of several sessions depending on how much detail is added to your projects.  I created my examples ahead of time so that students could see how much detail could be created with just newspaper and tape, it keeps them inspired to push for more details on their own projects.

This is also a simple anatomy project for students, the pipe cleaners are the bones, the newspaper is the muscle and the tape is the skin.  To start making the bone structure, you need 9 pipe cleaner wires (color doesn't matter here).  Loop the first one into a circle for a head that is about 1 1/2" wide, twist the pipe cleaner to itself so that you have a lollipop looking form.  Then bend the pipe cleaner over the loop the opposite direction so that it looks like a basketball and twist the ends together so that becomes the neck.  Take the next pipe cleaner and twist it to the neck of the first one.  Now make the shoulders from the second one by bending it out to one shoulder and then all the way back to the second shoulder and then back to the neck again (basically the shape of a hanger) then twist to connect the end.  Connect the third pipe cleaner to the middle of the shoulders by twisting it around on the end and let it be straight down for a spine then make hip bones the same way we made the shoulders.  Add the forth pipe cleaner for the arm by looping it through the shoulder and folding it in half, then give it a twist at the elbow and wrist joint.  Do the same with the fifth pipe cleaner for the other arm.  Now loop the sixth pipe cleaner through the hip joint and fold it into thirds to make the thigh bones, twist the ends to make it stay.  Do the same for the seventh one to make the other thigh.  The eighth pipe cleaner gets looped through the bottom of the thigh, at the knee and folded in half, give it a twist at the ankle and bend forward to create the foot.  Do the same with the ninth pipe cleaner for the other shin bone and foot.  Check out the photo above if you get confused on this.


Now you need to start tearing and crumbling up newspaper into pieces to start building your muscles. You'll need the tape to hold the newspaper in place so I like to have students tear off (or cut with scissors) a whole bunch of pieces of tape and stick them to the edge of the table so that they can grab them with one hand easily when they need them.  Start with a ball of newspaper that you can fit into the basketball shape of the skull and then tape around to hold it in place.  Then crumble up and large puffy triangle shape to fill out the torso and tape that into place.  Sometimes its good to take strips of newspaper and twist them and wrap them around the legs and arm muscles.  Have students really think about where the bigger muscles are and what shape they are, then use the newspaper to build that shape.  You can continue adding on newspaper muscles until you are satisfied with your person's build.  Remember that the tape will stiffen the overall form, so position your body they way that you'd like to as you continue to tape.  Make sure that all of the surfaces are covered with the tape. Then you can create details like clothes, hair and accessories out of the newspaper and tape.  The newspaper lady at the top has a skirt, shirt, jacket, shoes, a hat, a bag with a book, wallet and water bottle in it and she's reading the paper.  The skydiver has pants, a shirt, helmet, goggles and of course a parachute. If you'd like to make your person standing, you can take bamboo skewers and push them through the newspaper up into the legs leaving just a tiny bit poking out of the bottom of the feet.  Then find a wooden base (sand and paint the base) and drill two holes the size of the skewer where the feet will be positioned put a little wood glue in there and stick in the end of the skewers.  You can also add support by staple gunning the feet to the wooden base and taping over the staples so they don't show.  Masking tape people should be painted with at least a coat or two of clear spray paint to keep the glue on the tape from drying out and peeling off, but you can also give students acrylics and paint them completely with color.

!!!B CR8IV!!!


Friday, February 24, 2012

Paper Roller Coaster Sculptures


These roller coaster sculptures are super fun to make and a way to teach the art of  line to any age level.  You'll need a lot of drywall shims, they are available at hardware stores and are basically thin strips of cardboard that are about 2 inches wide by about 4 feet long.  The bonus is they're cheap too!

I start by giving examples of lines found in artwork both 2-D & 3-D, we may practice a few on paper as well.  Next I give students at least 3 cardboard strips and a selection of oil pastels.  You can use markers or paint here, but I like the brightness of the oil pastels on the dull cardboard surface and I don't have to wait for paint to dry.  Another option is giving them a coat of white paint first and then painting or drawing on them with your chosen material, if you have the time.  Have students use the oil pastels to color in the strips with 6 different types of lines (one for each side of the 3 cardboard strips), using lots of colors and experimenting with lines.  Once all of the strips are colored, let students experiment with 3-D lines by bending, twisting and folding the strips.  Eventually connect them with a stapler.  You'll need at least 2 well positioned staples at each connection point, maybe more.  Some of the younger students need help with this part, but I've done this with kindergarten and it worked just fine.  Encourage students to look at how they are connecting them together and what their overall sculptural form is becoming.  Have them play with what is the bottom of their sculpture, sometimes they look more interesting turned upside down.

HINT: Some of the little guys like to turn these into sculptural hats by making a loop in the strip that fits their head, it's a little crazy looking but fun!
HINT:  You can have students connect all of their individual sculptures together to create a group classroom sculpture and they are light enough to hang from the ceiling if you need the space.

!!!BCR8IV!!! 

Friday, February 17, 2012

Twine Bird

I created these hollow bird forms with my students as a way to express line and volume.  The artists Christo and Jeanne Claude would be great examples to introduce with this project too.

We started with two balloons, one for the body (about the size of a grapefruit) and a smaller one for the head.  I have students tape the balloons together with masking tape.  They can position the balloons so that the knot is where the beak will be on the head.  HINT: I also have students tape the knot of the body balloon to the table, it really helps to keep the balloons from rolling all over the place.

Once the basic form is ready, we took long lengths of twine and dipped them into fabric starch. HINT: Any natural fiber string will work for this!   The twine was then wrapped around the balloons and thought was given to the pattern of the wrapping while still maintaining the shape of the bird.  Some students let strings hang off of the back of the birds body in loops to create a tail, you could also do wings the same way.  Once wrapped, they were left to dry overnight.  As they dry the balloons should start wilting and peeling away from the string, if not you can pop the balloon.  Pull out all of your tape and balloons through one of the holes.  You can leave your bird with the natural string color or spray paint it.  Nests and eggs can be made the same way if you want to take it to the next step!

!!!B CR8IV!!!

Wednesday, February 15, 2012

Recycled Reef Fish

Upcycling old plastic bottles and containers into a recycled reef is a fun way for students to learn about cleaning up the oceans and protecting the earth.  Have students bring in lots of plastic bottles and encourage different shapes and thicknesses of plastic. Rinse out the insides and peel off labels first.  Then from your collection of bottles have students choose one that they will use for the body of their fish.  The water bottle in this photo works well for a small shark, but a large laundry soap bottle might work better for a puffer fish.  Have students plan out where eyes, mouths, fins and tails might go on their bottle.

Next students used flat plastic pieces to cut out their fish parts.  Scissors will work well for most of the work but you may want to have a few utility knives or x-acto knives on hand for adult use too.  As they worked on the details, I worked with each student to attach on the fins and tails.  Make a slice with a utility knife into the body of the fish and slide in the fin, they will stay pretty well if the cut isn't to large, but I also reinforced the attachment with a little hot glue.  Next, I let students choose what color they wanted their fish and I spray painted each bottle completely.  Once the main spray painted color dried, I gave students a plethora of different colored sharpie markers  to color in different parts of the fish, making scales, faces, details etc. HINT: Most plastics don't take paint well, but if you want to avoid the spray painting aspect of this project:  build your fish as described and then cover them in a layer of paper mache and then let students use acrylic paints to decorate their fish.

To display our reef, I hole punched a hole in the top fin of each of our fish and attached a string to hang them.  If you set them up at different levels they will look like they are swimming!

!!! B CR8IV!!!

Friday, February 3, 2012

Art Hearts

These simple and fun clay art hearts make the perfect gift for Valentine's Day.  Start with a sphere of clay about the size of a ping pong ball. Pinch the bottom of it into a point and push the middle of the top down with your fingers.  Then use your fingertips to smooth out the shape of the heart.  To make each heart unique, I add on wings, banners, polka dots etc... You can also use rubber stamps to add words, and tools for texture and design on your hearts.  When you are finished making your hearts, use a tool to poke a hole in the bottom of the heart. HINT: Remember that clay shrinks when it's fired, so make the hole a little larger than you think that you need.  Once you have bisque fired, glazed and then fired your hearts, use a two part epoxy to glue in your wooden or metal dowel.  These hearts look great in a bouquet so you can share your love CR8IVLY!! 


Jenni Ward's Art Hearts are available for purchase.

Friday, January 6, 2012

Mosaic Mandalas


My students loved making these mosaic mandalas, especially the messy grouting part!  I showed my students lots of examples of mandalas and we discussed using symmetry in art before starting in clay.  The rules of the project are simple; any shape is allowed but the overall design must be symmetrical and the shapes can only have a little bubble room around them (not huge gaps), other than that--b cr8iv!

Start by giving each student a plastic plate (paper ones will get too wet and loose their shape).  Next roll out a large slab of clay that is about 3/8th of an inch thick and lay it over the plate and press it into the plates shape gently. Use a knife to cut off any extra clay around the edges and save the scraps of flat clay.

Next scratch up the entire surface of the clay with a fork or scoring tool.  Now start cutting out your shapes from the extra scraps of clay.  Scratch the backs of your shapes with a tool and begin attaching them onto the surface in a symmetrical design.  I encouraged students to work from the middle out to the edges.  HINT: If you have younger students you can use cookie cutters for this part to ensure symmetry!  Be sure to keep the thickness of your clay even as you attach them onto the base piece. Once all the spaces have been filled with shapes, let the mandala dry on the plate, they will pop apart from the plastic plates as they dry and shrink.  HINT: If you want to be able to hang these on the wall when they're finished, cut a small length of high temperature wire and bend it into a loop, then stick it halfway into the clay before it is dry to use as a hanger once the clay is fired.

Bisque fire the mandalas and then have students glaze only the surface of each of the shapes and the outside edge of the plate NOT the spaces in-between, the grout will not stick to a glazed surface.  You can make this a color wheel or color theory lesson with the glazing if you'd like too.  Be sure to keep the colors symmetrical too.

Once the glaze firing is finished, mix up some grout in any color you'd like according to the package's instructions.  Be careful about not adding too much water to your grout, a little goes a long way!  Spread out some newspaper and give out plastic gloves to students--this will be messy!  I give students a handful of the grout and let them start pushing it into all of the spaces, I usually have to help everyone out a little bit to make sure they've packed it in tight and filled all the spaces.  Then have them rub the grout off of the tops of all of their shapes using just their hands to start with or a wooden clay tool can be helpful, then use a dry paper towel to start to wipe the surfaces clean.  Once the grout has dried a bit, you can go over the surface with a damp sponge to get any residual grout off. Let the grout dry for 24 hours before hanging it up on the wall.

!!! B CR8IV!!!

Wednesday, December 28, 2011

Pool People

Dreaming of Summer....this amazing piece was made by one of my students and it won Honorable Mention in the National K-12 Ceramic Exhibition! Yahoo!
These pool people are created by starting with a basic pinch pot for the pool, students are encouraged to play with the shape and texture of the pool, especially the exterior.  Next have students roll a log of clay the height that they want their person to be and about 2" thick.  With a knife slice into the bottom of the log to create 2 legs and then cut 2 diagonal cuts for the arms.  Squeeze the neck and round out the head with your fingers.  This should give you the basic body parts, next you can add details like a bathing suit, hair (we used a garlic press), fingers, toes and don't forget pool toys too!  Lastly, have students position their people into the pool, but don't attach them to the pool.  This girl is just relaxing on the side, but remember they can be doing a handstand or floating on their backs etc...  Once you are finished building, let the pieces dry and then bisque fire them.  Glaze all of the parts and position your person and their pool toys into the pinch pot.  Before loading the pieces in the kiln add in some pieces of glass (colored, clear or marbles).  You don't need a lot of glass to give the effect of water once it melts in the kiln.  The people and items will be attached to the pool after the firing on a permanent summer vacation!
!!!B CR8IV!!!

Friday, December 23, 2011

Photo Collage

OK, so I know this isn't a clay project, so what is it doing on my blog you ask??  Well, it is a mixed media project and it could become a 3-D sculpture if you kept adding the boards together or created a cube out of multiple boards.  But the real reason I'm sharing this project is, I'll be creating these photo collages with my little artists in Haiti with Project HOPE Art in less than 2 weeks and I just wanted to share one of the projects we'll be doing there with the girls of OJFA (Young Girls In Action-in French).  If you'd like to donate to this amazing project click here: DONATE NOW!  Thank you and Happy Holidays!!

So here's how you do it!  Start by selecting and printing out a black and white photo of your choice onto plain white paper.  Use scissors or preferably an x-acto knife (if your students are old enough) to cut out the portions you are interested in using.  Think about the placement of the photo and glue it down onto a board (I used some scrap pieces of matte board I got for free at a framing shop).  Use a regular pencil to lightly sketch out what else you'd like to include in your piece and then use colored pencils to color the photo and enhance the area around the photo. Use your creativity to place the photo in a unique landscape or setting.


!!B CR8IV!!

Wednesday, December 21, 2011

Totem Poles

Native Americans of the Pacific Northwest have been carving totem poles for generations, this clay project exposes students to the traditional techniques and symbolism used by the carvers.  Start by showing students examples of totem poles and the symbolism of the animals used in the poles.  Generally the animals in the poles tell a pictorial story, this can be a way to incorporate a writing project with an art project in your classroom.  Once students have chosen their story or their choice of symbols and animals, its time to build.

Start by giving students 6-8 ping pong sized spheres of clay (one for each animal).  Have students break off a little bit of the clay and start by shaping the body of the animal, typically it will be round or oval shaped, then use the extra clay to make the body parts such as legs, arms, wings, tails, facial features etc... don't forget to scratch to attach on all the parts well.  Use tools to create details like scales on a fish or claws on a bear.  Once each animal is built, you will need to cut a hole from the top to the bottom of each animal, I used a thin wooden dowel.  The top animal of the totem pole only needs the hole to go in about halfway so that you don't see the dowel poking out the top of the totem.  Be sure to make the hole slightly larger than you think you'll need because clay shrinks when it dries and is fired.  Next, fire all the pieces, glaze them and fire them again.

Once all of the pieces are finished, its time to assemble them.  I use cut blocks of 2x4's for the bases, it's good to pre-cut these then have students write their name on the bottom and sand them smooth with sand paper.  I also pre-drill a hole into the center of the base the same size as the dowel that you'll be using to stack your totem.  Squeeze a little wood glue into the drilled hole and slide in the dowel.  While the glue is drying, have students wipe the sawdust off the bases and then paint them.  I used a black acrylic paint, but you can use any color you'd like or have students use markers to color them in so you don't have to wait for the paint to dry.  Once your base is ready, start sliding the animals onto the dowel, hopefully you've made the holes large enough and they all fit easily.  If you have trouble with fit, you can either use a smaller dowel or use a Dremel tool with a grinder bit and grind the hole in the animal larger (this can take some time!).  When you add the last animal on the top of the totem pole, put a little glue into the hole and fit it on snugly.  If the dowel is too long, just cut it to the correct height with garden shears, then glue on the top piece.  Have students share their totem story with the class!
!!!B CR8IV!!!

Friday, December 9, 2011

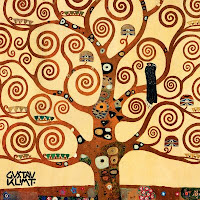
Gustav Klimt's Tree of Life


Begin by showing Gustav Klimt's Tree of Life mural and some of other his other paintings to students and discuss his repeated use of gold and patterns in his work.  Have students find patterns in his work and practice drawing them with markers on paper.

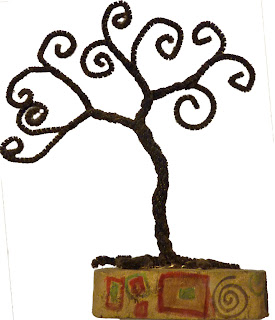
To build the tree, give each student at least 10 pipe cleaners that are about 12" long (color doesn't matter here).  Have students stack the wires in a bundle and twist them together in the middle of the bundle to create the trunk of the tree. Leave some wires splayed out at the bottom for roots and about 5" of wire left for the branches -little hands may need help with this.

For the roots, divide the 10 wires into small groups of 2 -3 wires, twist those and then divide them up into groups of 1-2 wires and twist the groups of 2 until you have just little wire ends left.  The idea is to have the roots look like they are going from thick to thinner and thinner pieces.  The branches will be created the same way, separate the wires into small groups and twist, separate them in to groups again and twist.  When you get to the end of the tree branches, use a pencil to wrap the end of the wire around to create the spiral that is used frequently in Klimt's paintings.  One all of the branches have been formed, take the time to arrange them so that the spirals are visible and the tree should start to balance standing.

Next, give each student a small block of wood for the base of the sculpture, have them sand it down and use hot glue to attach their trees to the wood.  Have students put their names on the bottom of the wood.  Using gold spray paint, paint the trees and wood completely, and let dry.  Last, have students use Sharpie Markers to draw on their Klimt style patterns onto the block of wood.

!!!B CR8IV!!!

Wednesday, December 7, 2011

Word Magnets

Clay word magnets can be inspirational and educational!
 Have students roll out a slab of clay that is about 3/8" thick.  Then use rubber alphabet and number stamps to create words on the slab of clay.  Use a clay knife to cut around the edge of the word or cut into a shape similar to the word (ie: C-L-O-U-D cut into a cloud shape).  Dry slowly and with a board weighted down on top of the pieces-they tend to curl on the edges and warp if they dry to fast. When they are dry, bisque fire the pieces. When glazing the letters, use a brush to fill the letters with color, then use a damp sponge to wipe away any excess glaze around the edges of the letter.  This will increase the contrast between the letters and the background so they are easy to read.  Glaze fire the pieces and when they are finished glue high strength magnets onto the back of the clay, some may need more that one magnet depending on the size.
!!! B CR8IV!!!