Showing posts with label wire. Show all posts

Friday, May 11, 2012

Long Bugs


 Well, we started off this week with Baby Bugs and we've moved onto our Long Bugs!  You'll need a rolling pin or large dowel for each student to support your bug as it dries for this project.  If you want to make this an art & literacy project, you could tie this to Eric Carle's book "The Very Hungry Caterpillar" for fun with your students.

To begin, give each student a rolling pin or dowel and a baseball size piece of clay.  Break off a small piece of clay and roll it into a coil that is about 3-4" long, drape it over the dowel- this will make one pair of legs.  Continue rolling out coils and draping them over the dowel to make 8, 10 or 20 legs for your Long Bug.  Scratch the tops of all the pairs of legs and put to the side while we make the body.  Take a larger piece of clay and roll it out to a thick coil, about as thick as a hot dog and as long as you want your bug to be.  Scratch the bottom of the larger coil and lay it on top of the scratched parts of the legs.  Use your fingers to blend the body to the legs well.  Shape one end to be the head and the other to be the tail.  You can add on eyes, a mouth, a snout, spikes and antennae (I used high temperature wire or Nichrome wire for my antennae). Textures and designs can be added on now as well.  When you've finished building your Long Bug, let it dry on the dowel.  Once it's dry, carefully slide the dowel out and your bug should stand on its own.  Bisque fire, glaze and glaze fire your bugs.  Find your critter a good place to hide in the garden!

!!!B CR8IV!!!

Wednesday, May 9, 2012

Baby Bugs

These cute little bugs are easy to build and your students can make a bunch in a short period of time.  Start with a small sphere of clay, about the size of a large marble and elongate it into an oval for the body.  Roll out a coil of clay and flatten it gently with your hands, scratch to attach it onto the body to create the wings.  You can add on big bulgy eyes or a stinger tail at this point too.  Next I used nichrome wire (this is high temperature wire--do not use any other type of wire in the kiln!) and cut short lengths of it to create the legs, push the pieces into the clay and let dry, you could also add antennae this way.  HINT: You may need to let the baby bugs dry on their backs until they are strong enough to stand on their wire legs.  You can also make a small wire loop to push into the back of the bugs, so that you could hang them and create a mobile of flying bugs after they are finished.  If you want to tie this project into your classroom curriculum, have students make each section of their insects anatomy realistic (head, thorax, abdomen, legs, wings & antennae).  HINT: If they are standing on their wire legs in the kiln for glaze firing, you can glaze the entire surface of the bugs without risking them sticking to the kiln shelf!

!!! B CR8IV!!!

Wednesday, May 2, 2012

Peacocks


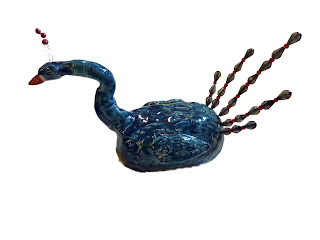
For this project we build the body of the peacocks the same way we have built our fish sculptures.  Using 2 pinch pots that are scratched together and smoothed over to make a hollow egg shape.  The neck is a rolled out snake or coil of clay with one end thicker to attach to the chest of the bird, use your fingers to pinch the thinner end into a pointy beak and use tools to create the nostrils, mouth and eye details.  Wings are also scratched onto the the sides of the body, then texture is applied to give the bird a feathery look.  The tail and head feathers are done using high temperature wire in different gauges.  The high temperature wire (sometimes called kanthal wire) can be put into the clay when it is wet and fired in the clay.  I used a thicker gauge on the tail feathers and a very thin gauge for the head feathers.  The head feathers have small spheres of clay added on to the tips of the wire, while the tail feather wires are left empty.  The pieces are fired and glazed and fired again.  For the final step, I offered my students a selection of beads to put onto their tailfeather wires, we discussed using patterns and also using warm colors or cool colors depending on what they had choosen to glaze their birds.  The final top bead got a drop of glue in it to keep them all from sliding off the wire.  Once the glue dries the peacocks are ready.  

!B CR8IV!   

Friday, April 13, 2012

Foam Carved Animals

The cute animals are made from floral foam --the stuff florists stick in the bottom of arrangements to make the flower stems stay in place.  Its a great material for students to practice the art of carving with a very soft material.  I have to warn you though, this is not an easy project and there have been a few tears shed over lost legs and ears etc...so be prepared!  Before I start this project, I let my students know the drawback to this material is how much the very fine dust sticks to your hands and if you touch your face with your hands after you've started carving, it can be really painful to get in the eyes, so make sure students wash their hands thoroughly before they scratch an itch!  I also like to prep students for this project by showing them a lot of Michelangelo's carvings and we talk about the process of carving (taking away vs adding on).

I find that I have the best results on this project when I do it with my students; step by step.  Everyone should start with one block of floral foam that is about 4" x 4" x 2", yours maybe larger or smaller depending on the brand you buy.  And a few clay tools are helpful, a knife, pointy tool and a few sizes of carving tools.  (Make sure you wash your tools before using them in clay again!) These drawings may help students visualize what parts they need to remove in each step.  Step one removes the foam to create the basic head and body shape, rounding out the back end and removing under the neck and front of the legs.  Step two removes the foam so that you have front and back legs, students will also need to carve between each pair of legs to create 4 individual legs.  HINT: Remind students that its better to carve away a little bit at a time, rather than one big chunk because you can easily break off a leg unintentionally here.  Step three removes the back of the back legs to shape a tail and it also shapes the snout, head, ears and neck.  This is a generic shape that may need to change depending on what animal you are making.  I find that once my students get to this point, they feel comfortable with adding in the details like noses, eyes, toes etc on their own carving intuition. I have my students paint them with acrylic paints and these are glued onto driftwood bases.  You could also add wire to create hair and longer tails, like we did here to create some lion manes.  HINT: If you do break a part off while carving, have the students keep their parts and just glue them on later with a strong craft glue.   Dick Blick Art Supplies has a great similar lesson plan to create Inuit Bears if you're looking to tie this project in with your curriculum.

!!!B CR8IV!!!

Wednesday, February 15, 2012

Recycled Reef Fish

Upcycling old plastic bottles and containers into a recycled reef is a fun way for students to learn about cleaning up the oceans and protecting the earth.  Have students bring in lots of plastic bottles and encourage different shapes and thicknesses of plastic. Rinse out the insides and peel off labels first.  Then from your collection of bottles have students choose one that they will use for the body of their fish.  The water bottle in this photo works well for a small shark, but a large laundry soap bottle might work better for a puffer fish.  Have students plan out where eyes, mouths, fins and tails might go on their bottle.

Next students used flat plastic pieces to cut out their fish parts.  Scissors will work well for most of the work but you may want to have a few utility knives or x-acto knives on hand for adult use too.  As they worked on the details, I worked with each student to attach on the fins and tails.  Make a slice with a utility knife into the body of the fish and slide in the fin, they will stay pretty well if the cut isn't to large, but I also reinforced the attachment with a little hot glue.  Next, I let students choose what color they wanted their fish and I spray painted each bottle completely.  Once the main spray painted color dried, I gave students a plethora of different colored sharpie markers  to color in different parts of the fish, making scales, faces, details etc. HINT: Most plastics don't take paint well, but if you want to avoid the spray painting aspect of this project:  build your fish as described and then cover them in a layer of paper mache and then let students use acrylic paints to decorate their fish.

To display our reef, I hole punched a hole in the top fin of each of our fish and attached a string to hang them.  If you set them up at different levels they will look like they are swimming!

!!! B CR8IV!!!

Friday, December 9, 2011

Gustav Klimt's Tree of Life


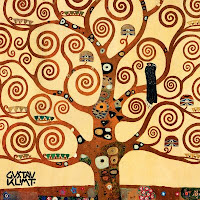
Begin by showing Gustav Klimt's Tree of Life mural and some of other his other paintings to students and discuss his repeated use of gold and patterns in his work.  Have students find patterns in his work and practice drawing them with markers on paper.

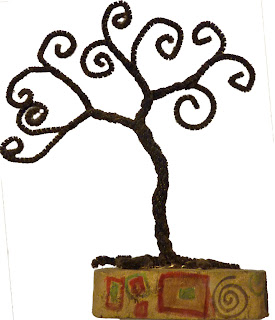
To build the tree, give each student at least 10 pipe cleaners that are about 12" long (color doesn't matter here).  Have students stack the wires in a bundle and twist them together in the middle of the bundle to create the trunk of the tree. Leave some wires splayed out at the bottom for roots and about 5" of wire left for the branches -little hands may need help with this.

For the roots, divide the 10 wires into small groups of 2 -3 wires, twist those and then divide them up into groups of 1-2 wires and twist the groups of 2 until you have just little wire ends left.  The idea is to have the roots look like they are going from thick to thinner and thinner pieces.  The branches will be created the same way, separate the wires into small groups and twist, separate them in to groups again and twist.  When you get to the end of the tree branches, use a pencil to wrap the end of the wire around to create the spiral that is used frequently in Klimt's paintings.  One all of the branches have been formed, take the time to arrange them so that the spirals are visible and the tree should start to balance standing.

Next, give each student a small block of wood for the base of the sculpture, have them sand it down and use hot glue to attach their trees to the wood.  Have students put their names on the bottom of the wood.  Using gold spray paint, paint the trees and wood completely, and let dry.  Last, have students use Sharpie Markers to draw on their Klimt style patterns onto the block of wood.

!!!B CR8IV!!!

Friday, November 11, 2011

Chihuly Seaforms

Artist Dale Chihuly makes amazing and beautiful abstract forms out of glass.  This project mimics his series of Seaforms.  I use expandable wire mesh from Dick Blick Art Supplies  and have students cut a circle from the mesh or pre-cut your circles for younger students.  Then you can stretch, bend and shape the mesh into your seaform. 

Next students tear up small bits of tissue paper in the colors of their choice, then dip them lightly in watered down white glue and started wrapping it around the wire forms. If the paper gets too soaked, it will start to fall apart and can be really frustrating to work with, but if its just wet enough to make it stick, it should go on smoothly.  Make sure that students cover every area of the wire mesh and that the tissue paper is flattened smooth against the form; a brush can be helpful with that. It can get a bit tricky and sticky, so I always have a damp rag for each student to wipe off their fingers.  I also find that its best to cover one side of the form and let it dry and then come back for the second side.  As the glue dries, the shape will stiffen.  When the entire form is covered I have students paint a thick coat of Modpodge over the surface to seal the paper and to give a bit of gloss to the surface.  When finished the seaforms with be semi-translucent if displayed in the window.  These pieces could also be displayed for an art show hung from the ceiling like Chihuly ceiling at the Bellagio Hotel

!!!B CR8IV!!!

Friday, October 28, 2011

Wire Trees

These copper wire trees are simple and beautiful. Start with at least 15 strands of wire (or more!) all the same length (at least 6" long), this will be the height of your tree.  Bundle all the wires together and twist tightly in the middle to create the trunk.  Little hands may need help with this part, you can also use pliers to help twist.  Next we'll build the roots, so decide which end is the bottom of your tree and divide up the 15 strands into groups of 3 or 4 wires.  Twist each of those groups a little bit and then divide them into groups of 1 or 2 strands.  The single strands can be left alone and the double strands can be twisted a little more.  Then separate them into single strands so that it appears your roots are thicker towards the trunk and thinner towards the tips.  The same process is repeated for the branches.  Bend the branches and roots to simulate natural tree shapes and to balance the tree on its roots.  You could also find a small stone to wrap the roots around and anchor the base of it.
Next I used small seed beads on the tips of the branches and bent the end of the single wire strands to hold the beads in place.  The beads could be a lesson in color theory using on warm or cool color beads.  Or you could have students pick out colored beads for the birth stone of each family member and make these family trees.  Or use pink and white beads for cherry blossom trees.  Or celebrate Arbor Day with these wire bonsai trees!  So many options....

!!B CR8IV!!

Tuesday, February 1, 2011

Clay & Copper Sun


This summer sun is a great project to build in two stages.  The face of the sun is built with clay while the rays are made of a thick copper foil.  I had my students cut out the shape of their sun's face and then we talked about 3-D shapes that we could add on for the features (spheres for eyes, pyramid for the nose and a cylinder for the mouth), we also created texture with the clay tools on the surface of the face.  I also added a kanthal wire loop in the top of the clay so that it could be hung later.  The clay pieces were fired and then in this case I had students use watercolor paints to add color to the clay, they could be glazed just as easily.  We looked at a color wheel and discusses the various names for the different colors.  I had students use a palette of warm or cool colors to paint their sun faces with.  For the rays of the sun, each student was give a retangle shaped piece of thick copper foil, a stack of newspaper and a dull pencil.  If you use the dull pencil and push into the foil using the newspaper as a cushion underneath, you can tool the foil with a variety of patterns and designs.  I have my students divide up their rectangle into 5 or 6 different shapes and then each shape is filled with a different pattern.  The result is a textured surface on the opposite side of the foil.  Once the entire piece is covered with designs, student will cut up the foil into their rays.  PLEASE NOTE: The foil can have sharp edges when cutting, younger children will need help with this part.  Each ray is glued onto the back of the sun using a hot glue gun and a ribbon can be looped through the wire loop at the top to hang your clay and copper sun!
!!!B CR8IV!!!

Tuesday, December 21, 2010

Peacocks


For this project we build the body of the peacocks the same way we have built our fish sculptures.  Using 2 pinch pots that are scratched together and smoothed over to make a hollow egg shape.  The neck is a rolled out snake or coil of clay with one end thicker to attach to the chest of the bird, use your fingers to pinch the thinner end into a pointy beak and use tools to create the nostrils, mouth and eye details.  Wings are also scratched onto the the sides of the body, then texture is applied to give the bird a feathery look.  The tail and head feathers are done using high temperature wire in different gauges.  The high temperature wire (sometimes called kanthal wire) can be put into the clay when it is wet and fired in the clay.  I used a thicker gauge on the tail feathers and a very thin gauge for the head feathers.  The head feathers have small spheres of clay added on to the tips of the wire, while the tail feather wires are left empty.  The pieces are fired and glazed and fired again.  For the final step, I offered my students a selection of beads to put onto their tailfeather wires, we discussed using patterns and also using warm colors or cool colors depending on what they had choosen to glaze their birds.  The final top bead got a drop of glue in it to keep them all from sliding off the wire.  Once the glue dries the peacocks are ready.  

!B CR8IV!   

Friday, June 4, 2010

Create a Bottle Bug!

You can recycle and make a great looking insect for your garden!
Check out these step by step directions...


Description: Create an imaginary insect using a recycled glass bottle that is decorated with colorful patterns and designs using glass paints. Add wings, legs, antennae and stingers using a variety of wires.

Sessions: 2-3 One hour sessions to complete

Ages: Grade 3 and up

Materials:

Glass bottle

Variety of wires: steel, brass, copper in a variety of gauges

Glass Paints

Brushes, Water Containers and Paint Rags

Pliers

Variety of mixed media materials for insect accessories (beads, washers, springs…)

Steps:


1. Choose a bottle; look at the shape, color, size and texture of it. Try to imagine where the head, tail, wings, legs etc will go on your bottle.

2. Clean and remove the labels from your bottle using warm soapy water and let dry completely.


 3.  Using glass paints, create designs on the bottle that you want your bug body to have.  For example, polka dots, stripes or swirls.  Leave some areas of glass still showing.  Use the glass paint outliner, which has a thicker texture to enhance your designs or create smaller details.  Try not to smudge your designs as you work around the sides of the bottle.  Let your paint dry for 24 hours. 


4. Bake your painted bottles in the oven at 300 degrees for 35 min or according to the directions on the glass paints you use. Once baked the paints are permanently on the glass. (Dishwasher safe too!)


5. Using an 18 -20 gauge wire, create 3 rings; use your pliers to twist the ends together tightly. One ring should fit slightly loose around the neck of the bottle and two should fit loosely around the body of your bottle.


6. Cut 3 lengths of wire (the same as you used in the rings or a different wire) longer than the length of your bottle and twist the ends of the each of the lengths around the neck ring spaced out evenly. Slide the neck ring with the 3 lengths attached over the neck of your bottle and loop each length around the rings created for the body of your bottle. Then pull all 3 lengths tight at the opposite end of your bottle and twist together tightly; use pliers as needed. You will use these wires to connect all of your parts onto your bug.


7. To create the wings, bend a long length of wire into shape and twist to hold it there, use the loose ends to attach it to the body wires.


8. Cut two lengths of a thick gauge wire to make 4 legs (add as many legs as you want too!) slide the wire under the body wires and use smaller gauge wire to twist around and hold in place. Shape the legs as desired; knees, feet or add beads etc…


9. Be creative finding spare hardware parts to create eyes and antennae, use small gauge wire to connect and twist it into place. Add on colored wires, screen or other decorative items to enhance your bottle bug, and then find him a good spot in the garden to hide!