Showing posts with label coils. Show all posts

Friday, May 11, 2012

Long Bugs


 Well, we started off this week with Baby Bugs and we've moved onto our Long Bugs!  You'll need a rolling pin or large dowel for each student to support your bug as it dries for this project.  If you want to make this an art & literacy project, you could tie this to Eric Carle's book "The Very Hungry Caterpillar" for fun with your students.

To begin, give each student a rolling pin or dowel and a baseball size piece of clay.  Break off a small piece of clay and roll it into a coil that is about 3-4" long, drape it over the dowel- this will make one pair of legs.  Continue rolling out coils and draping them over the dowel to make 8, 10 or 20 legs for your Long Bug.  Scratch the tops of all the pairs of legs and put to the side while we make the body.  Take a larger piece of clay and roll it out to a thick coil, about as thick as a hot dog and as long as you want your bug to be.  Scratch the bottom of the larger coil and lay it on top of the scratched parts of the legs.  Use your fingers to blend the body to the legs well.  Shape one end to be the head and the other to be the tail.  You can add on eyes, a mouth, a snout, spikes and antennae (I used high temperature wire or Nichrome wire for my antennae). Textures and designs can be added on now as well.  When you've finished building your Long Bug, let it dry on the dowel.  Once it's dry, carefully slide the dowel out and your bug should stand on its own.  Bisque fire, glaze and glaze fire your bugs.  Find your critter a good place to hide in the garden!

!!!B CR8IV!!!

Friday, May 4, 2012

Monet's Water Lilies

To introduce this water lily project, I start by showing my students Claude Monet's paintings and talking with them about the Impressionists.  We also look at photos of real water lilies so that they can see the density of the petals and the beauty of their form.  Then rather that recreating the paintings, we build three dimensional water lilies in clay.  This also gives students the ability to play with the textures that Monet achieved through his paintings.

Start by rolling out at slab of clay and cut out your lily pad shape, remind students that the size and shape are up to them and that they should not be perfect.  Using tools, create the veins in the lily pad or add texture to the leaf.  To start the flower, I have students cut out a many pointed star shape.  Scratch to attach the center of the star to the lily pad, then squeeze the points of the star thinner with their fingers, it should start to resemble a flower at this point.  Scratch the center of the star and start to add on more petals.  I like to roll small coils of clay and then flatten them into petals, some of my students prefer to roll out a thin slab and then cut them out.  Keep layering the petals until the lily is filled, making sure to scratch-to-attach each one on.  Students can also add on frogs, beetles, turtles, dragonflies...whatever swampy creature they'd like.  Let them dry, bisque fire, glaze and then glaze fire them, then they will be ready to display in your garden.

!!!B CR8IV!!!

Wednesday, May 2, 2012

Peacocks


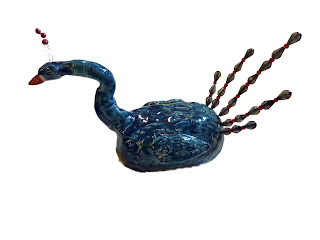
For this project we build the body of the peacocks the same way we have built our fish sculptures.  Using 2 pinch pots that are scratched together and smoothed over to make a hollow egg shape.  The neck is a rolled out snake or coil of clay with one end thicker to attach to the chest of the bird, use your fingers to pinch the thinner end into a pointy beak and use tools to create the nostrils, mouth and eye details.  Wings are also scratched onto the the sides of the body, then texture is applied to give the bird a feathery look.  The tail and head feathers are done using high temperature wire in different gauges.  The high temperature wire (sometimes called kanthal wire) can be put into the clay when it is wet and fired in the clay.  I used a thicker gauge on the tail feathers and a very thin gauge for the head feathers.  The head feathers have small spheres of clay added on to the tips of the wire, while the tail feather wires are left empty.  The pieces are fired and glazed and fired again.  For the final step, I offered my students a selection of beads to put onto their tailfeather wires, we discussed using patterns and also using warm colors or cool colors depending on what they had choosen to glaze their birds.  The final top bead got a drop of glue in it to keep them all from sliding off the wire.  Once the glue dries the peacocks are ready.  

!B CR8IV!   

Friday, April 20, 2012

Coil Pot Challenge

I challenge my students to make the tallest coil pot in one class period as a fun way to show off their skills.  This student thought big spirals attached vertically would get them there faster, I'm not sure if that's true, but it did make a very nice design on the finished piece.

All students start by rolling out a coil of clay that is about as thick as a marker and about 10" long.  Scratch the length of that coil and then wrap it up like a snail shell and blend in the end.  This piece will become the bottom of the coil pot.  Roll out your next coil of clay, same thickness but however long you want.  Scratch around the edge of the bottom piece and scratch the length of the coil you made. Start attaching the coil of clay to the base piece, gently pushing it down as you wrap around the bottom.  When you make a full circle, continue wrapping the clay on top of the previous one until you run out.  Roll out your next coil, scratch it, scratch the top of the last coil you attached and start wrapping it around.  Continue this process until you get as tall as you want to go.  You can gently shape and squeeze the cylinder as it gets taller and more wobbly.  You can also challenge your students to create a design of sprials and "S" curves as a part of their cylinder too.  HINT: If you have a small kiln, make sure your students work will fit!  Good Luck on the Challenge!!

!!!B CR8IV!!!

Friday, April 6, 2012

Dog Pound

I find that my own dogs offer lots of inspiration for this project!  These cute puppies are simple to make and I encourage my students to build at least 3 completely different dogs to create their dog pound.  I use rolling pins to help support the legs of the dogs until they dry, but you could also use cardboard paper towel rolls or newspaper too, just make sure you have one for each student.

Start by rolling out a coil of clay that is about as thick as a Sharpie marker.  Cut two pieces from this coil that are equal size and about 4 " long.  Drape these pieces over the rolling pin to create two arches for the legs of your dog.  If you want your dogs to have shorter or longer legs, just adjust the length of the coils.  Next, roll out a slightly thicker coil of clay for the body.  Roll one end of that coil thinner for the tail and cut the coil for the length of body that you want.  Scratch-to-attach the body onto the top of the legs and blend them together with your finger.  To make the head of your dog, roll out a small sphere and pinch one end pointier for the snout so the overall shape is more like an egg on its side.  Scratch-to-attach the head onto the body and blend it in.  Remember that you don't have to have the head facing straight on, maybe he's watching a ball fly by him!  Next cut the mouth open with a knife, you can add teeth or a tongue or a bone in its mouth if you want.  Scratch-to-attach on the ears, eyes and nose.  Then you're ready for details, like toes, furry texture or adding accessories (collar, toys or a food bowl).  Let your dogs dry on their support structure and carefully slide them off when they are dry enough to support their own weight.  Dry them completely, bisque fire, glaze and glaze fire.

!!B CR8IV!!

Wednesday, April 4, 2012

Textured Turtles

These turtles are a great lesson in texture and pattern.  Start by rolling out a long snake or coil of clay, about 15-18 inches long and about as thick as a pencil.  Scratch the entire length of the coil and then wrap it up into a spiral shape blending in the end piece.  You can smooth out the spiral design or leave it there, this piece will be the turtle shell.  Next roll out another snake of clay the same thickness but only about 6-8 inches long.  Cut this snake of clay up into 6 pieces; 4 for the legs, 1 for the head and 1 for the tail.  You can shape them with your hands as needed.  Scratch the ends of each of your pieces and the belly of the turtle shell and attach them on.  HINT:  Make sure to overlap the pieces when you attach them on to have a larger surface area of attaching, so don't attach them edge to edge, they'll be more likely to break off when you move them in and out of the kiln.  You can now add on a face to your turtle and start to decorate the back of the shell with a pattern using tools. This is a perfect ocean week lesson! You'll need to dry, bisque fire, glaze and glaze fire all the pieces for them to be finished.  

Wednesday, February 8, 2012

Turtle Tower

I like to make these turtle towers a classroom challenge project, challenging students to see who can make the most or the smallest turtles.  I also challenge students to create a different texture/pattern on each of the turtle shells, giving examples of different designs can be helpful for sparking ideas here.  This project can of course be completed by making just one turtle per student.

Start by rolling out a long snake or coil of clay, about 15-18 inches long and about as thick as a pencil.  Scratch the entire length of the coil and then wrap it up into a spiral shape blending in the end piece.  You can smooth out the spiral design or leave it there, this piece will be the turtle shell.  Next roll out another snake of clay the same thickness but only about 6-8 inches long.  Cut this snake of clay up into 6 pieces; 4 for the legs, 1 for the head and 1 for the tail.  You can shape them with your hands as needed.  Scratch the ends of each of your pieces and the belly of the turtle shell and attach them on.  HINT:  Make sure to overlap the pieces when you attach them on to have a larger surface area of attaching, so don't attach them edge to edge, they'll be more likely to break off when you move them in and out of the kiln.  You can now add on a face to your turtle and start to decorate the back of the shell with a pattern using tools.  The smaller turtles will be built in exactly the same way, just using shorter lengths of coils to build them.  HINT:  I have my students stack up their turtles without scratching-to attaching them on. This way, when they glaze them it's easier to make each turtle a different color.  When they are finished glazing they re-stack them and in the kiln the glaze melts and fuses them into a tower.  You can also play with color theory on the glazing and have them make primary and secondary colored turtles or paint them in rainbow order.  You'll need to dry, bisque fire, glaze and glaze fire all the pieces for them to be finished.  
!!!B CR8IV!!!

Wednesday, January 4, 2012

Self Portrait Busts


These cute self-portrait busts are a great way for students to learn about basic human face proportions.  Take time to show them the proportions on a paper drawing or paired up with a partner that they can stare at.  I usually divide this project up into two sessions.  Students will start with building the base shapes and then add on the details of their faces.  You can also offer mirrors to your students for help with the details in Part II.
PART I
Start by giving students a piece of clay the size of a grapefruit plus a little bit of extra clay.  Cut that piece in half and then cut one of those pieces in half, they should have 3 pieces (two small ones of equal size and 1 larger one).  Make spheres out of each of the pieces and form them into pinch pots.  The larger pinch pot will be for the shoulders, squeeze it so its a little bit oval shaped and then place it upside down on the table. HINT: Its helpful to stuff a little bit of newspaper into the shoulders to help it keep its shape.  Scratch-to-attach the two smaller ones together to create a hollow sphere, this will be the head shape- it may look more like a potato, so have students take their time to shape it and make it more egg shaped.  Use a little bit of extra clay to roll out a snake of clay that is about as thick as your finger and wrap it into a cylinder shape, this will be used for the neck.  
To attach all three of the parts together, (shoulders, neck and head) position them where you think that they will look best to make your bust, then scratch-to-attach all of the connection spots well.  I like to attach the neck onto the shoulder and blend the coil of clay into the shoulders, then place the head onto the shoulders and blend those two together well.  Next use a tool to poke through from under the shoulders, through the neck and into the hollow space in the head, so that they don't explode in the kiln.  You can also write students names on the inside of the shoulders while you have them flipped over.  If you've used newspaper here, just pull it out to make the hole and then replace it.  This is usually where I will stop the first session, so if you need to stop here too, wrap up all of your students work in plastic until your next session.  
PART II
Now have students use a pointy tool or a pencil to lightly draw onto the clay the center line of the face, the eye line, the nose line and the mouth line.  This should help students give placement for all of the features.  Using a small amount of extra clay, shape each of the features in clay using tools and their hands.  Make sure that each part is scratched-to-attached on well.  HINT: A great way to make eyes that are the same size is to make one the size you like and then trace it onto another piece of clay.  HINT: A great way to make ears the same size is to make a flat pancake of clay and cut it in half, each half is an ear.  Hair can be added onto the head in flat pieces, coils or texturing the clay, depending on the style and type of hair they are trying to create. Once all the features are attached, erase the lines with a finger or smoothing tool. Have students think about clothing or other items they might want to add on to the shoulders (like a parrot or a pocket!).  Encourage students to turn their sculptures around and look at them from all sides before letting them dry.  

!!!B CR8IV!!!

Friday, October 21, 2011

Tea Bowls

The Japanese have mastered the art of the tea bowl, which can range in style from a perfectly symmetrical shape or an exquisitely organic form.  This is a great project to talk about the anatomy of a pot with your students; the lip, body and foot are all essential elements to the parts of a tea bowl.  There are a few options to build the body of the bowl, one is to make a pinch-pot with high sides to it, or if you have access to a potters wheel, throwing a bowl is an option, the other choice which I have done here is to use a slab of clay.  I rolled out my clay flat and used a paper template to cut a small cylindrical shape, you can cut out rectangular paper templates for your students too.  Once the shape is cut out, its rolled into a cylinder and the edges are scratched-to-attached together.  The bottom is made narrower by cutting 4 V-shaped notches or darts, one on each side.  Then scratch the inside edge of those V-shaped cuts and fold them in together.  This may leave a small square hole in the very bottom of your tea bowl, if it does, just cut a small flat square to scratch-to-attach on and cover the hole.  This procedure is a little bit tricky but it shapes the body of your tea bowl to be wider towards the top and narrower towards the foot, which is the traditional shape of a tea bowl.  Design and pattern can be added to the outside now using tools or stamps and the lip of the bowl should be smoothed out with your finger.  Next, roll out a coil of clay and wrap it up to make a small donut shape that will fit onto the bottom of your tea bowl to create the foot.  Make sure to scratch-to-attach both parts together and also add some surface decoration to the foot.  To learn more about the tradition of tea bowls and the Japanese Tea Ceremony, click here.  

!!!B CR8IV!!!

Saturday, April 16, 2011

When Pigs Fly...

I love to show David Wiesner's book Tuesday to my students when we create this project.  His amazing illustrations of flying frogs are a great jumping off point for students to start their own flying pig projects.  We talk about all the ways that a pig could fly...superman capes, jet packs and wings are some of the most popular ideas.  The pigs' bodies are made from simple pinch pots. Start with two equal spheres of clay and make them into pinch pots by pushing your thumb into the center of the sphere and squeezing around the sides until you have a small bowl shape. Do the same to both spheres. Take your scratching tool (wire tool, fork, comb...) and scratch-to-attach the edges of the bowls. Then gently push them together and smooth out the seam with your fingers. This hollow shape creates the body of your pig.


Now using some extra clay, create your snout, legs, tail, eyes and ears, plus of course your mode of flying. If you're making wings like I did, roll out two small coils of clay and gently press them flat, scratch the end of each shape and scratch the back of your pigs' body and attach them on, you can also add feathery texture to them with a tool. You can make legs by rolling out snakes or coils of clay and then scratch-to-attach them onto the body, think about the position you want your pig to be in, mine are attached in "superman" pose.  I also used a knife to cut the toes of my  pig.  To make the snout I make a "mini-marshmellow" shape or a short cylinder and use a poking tool to create the nostrils.  The eyes are small spheres that are flattened and also poked to create pupils.  To make the ears I flatten a small pancake shape of clay and then cut out two equal triangles.  The tail can be tricky to roll out a thin coil of clay and then wrap it up into a spiral, I recommend using extra soft clay to do this.  Remember that all of your pigs' parts need to be scratched-to-attached on!  This is a great project to talk about the difference between realistic art and abstracted art with your students.  I like to show them how to build parts and let their imagination take over....I also allow them to make their pig blue with yellow spots if they want too as another form of abstraction! 
 
!!!B CR8IV!!!

Wednesday, April 13, 2011

Owls

These owls are made from simple pinch pots and can be made small or large enough to sit in the garden.  Start with two equal spheres of clay and make them into pinch pots by pushing your thumb into the center of the sphere and squeezing around the sides until you have a small bowl shape. Do the same to both spheres.  Take your scratching tool (wire tool, fork, comb...) and scratch-to-attach the edges of the bowls.  Then gently push them together and smooth out the seam with your fingers.  This creates the body of your owl.

Now using some extra clay, create your beak, wings, feet, eyes and ear tufts.  For the wings, roll out two small coils of clay and gently press them flat, scratch the end of each shape and scratch the shoulder of your owls body and attach them on. You can make feet the same way but scratch-to-attach them onto the bottom of the body and then use a knife to cut the toes.  I like to squeeze the clay with my pincher fingers to create the ear tufts but you could also roll out small cone shapes of clay and attach them on.  The beak is a small triangle and the eyes are two spheres with a smaller dot pushed into them.  Remember that all of your owls' parts need to be scratched-to-attached on! 

You can also give your owl a feathery texture by scoring the clay with your scratching tool.  HINT:  Don't forget to poke a hole into the hollow space of your owl so that it doesn't explode in the kiln!!!  Let them dry, bisque fire, glaze and glaze fire them.  OPTION:  If your students make a few small owls or other birds, hot glue them onto an interesting piece of driftwood so they appear to be sitting on a branch.

!!!B CR8IV!!!


Friday, January 21, 2011

Pinch Pot Monsters


One of my talented students thought up this clever idea to create a sculpture from a basic pinch pot.  Start by cutting about 1/2 pound block of clay in half.
 
Take one piece and roll it into a sphere.


Push your thumb into the sphere and squeeze around the sides to create a pinch pot.


This pinch pot becomes the mouth of your monster, so shape it however you'd like the mouth to be positioned to show an emotion.  Mine's going to be wide mouthed and yelling!


Now its time to add on your monsters parts.  I've created five spheres for eyes. 


Don't forget to use a scoring tool to scratch-to-attach all of your parts on!


You can use a tool to add details like pupils for the eyes.

I rolled out a coil of clay and then flattened it to create a tongue. 


Feet can be made by rolling out a coil of clay and flattening just the foot, then use a knife to cut individual toes.  You can also use a small tool to push in toenail shapes too. 


It is better to attach the feet to a wide surface rather than edge to edge, they are less likely to break off this way.  Gently flip your monster over and scratch-to-attach the bottom of your pinch pot and the feet, then blend together.  The tongue can be attached the same way inside of the mouth. 


The tail is made by rolling out a coil of clay so that it is thinner at one end and thicker at the other.  Scratch-to attach the thicker end and blend it into the body shape when you attach it on, this will be fragile so make sure that it is securely attached before you start moving your sculpture around.  


Small cone shapes can be made and added onto the tail to create spikes.


Spiky teeth can be added inside the mouth as well. 
 
The back of a tool can be used to add texture to your monsters skin. 


B Cr8iv with all of the varieties of pinch pot monsters you can make!


Tuesday, December 21, 2010

Peacocks


For this project we build the body of the peacocks the same way we have built our fish sculptures.  Using 2 pinch pots that are scratched together and smoothed over to make a hollow egg shape.  The neck is a rolled out snake or coil of clay with one end thicker to attach to the chest of the bird, use your fingers to pinch the thinner end into a pointy beak and use tools to create the nostrils, mouth and eye details.  Wings are also scratched onto the the sides of the body, then texture is applied to give the bird a feathery look.  The tail and head feathers are done using high temperature wire in different gauges.  The high temperature wire (sometimes called kanthal wire) can be put into the clay when it is wet and fired in the clay.  I used a thicker gauge on the tail feathers and a very thin gauge for the head feathers.  The head feathers have small spheres of clay added on to the tips of the wire, while the tail feather wires are left empty.  The pieces are fired and glazed and fired again.  For the final step, I offered my students a selection of beads to put onto their tailfeather wires, we discussed using patterns and also using warm colors or cool colors depending on what they had choosen to glaze their birds.  The final top bead got a drop of glue in it to keep them all from sliding off the wire.  Once the glue dries the peacocks are ready.  

!B CR8IV!