Showing posts with label pattern. Show all posts

Wednesday, June 13, 2012

Textured Box


These sweet and simple boxes are a great way to introduce texture to young artists.  I love using the textured rubbing plates from Dick Blick Art Supplies for this project.

Start by rolling out a flat piece of clay that is about 3/8ths of an inch thick (or about as thick as a pancake), then make sure that the surface is smooth.  Next choose your textured rubbing plate and lay it on top starting at one end of your clay.  Using a rolling pin, roll over the texture plate pushing down evenly as you go.  You can peel up one corner to check if you have pushed hard enough, if not roll some more, if it looks good peel up the rubbing plate.  If your clay is larger than your rubbing plate, you'll need to lay the rubbing plate down again in the blank clay area and roll in the texture again until the entire piece of clay is covered with your texture.

Next have your students cut out one square of clay (you can give paper templates for this if you think they need them).  Once they have one square cut out, have them lay it down on top of their clay in a new area and trace the first square so that the second one is exactly the same size.  Continue doing this until each student has 6 squares. If you run out of room on your clay to continue cutting out squares, squish all the small scrap pieces together, roll it out flat again and put the texture in again.  Now its time to assemble the box.

Pick one square that will be the lid and put it to the side.  Pick the square that will be the bottom and use a scratching tool to scratch all the edges, then scratch 3 sides of the remaining 4 squares.  Now that everything is scratched,  pick the first wall and attach it to the bottom of the box- it may be a little wobbly at first.  Next, attach the second wall to the bottom square and then squeeze the corners together being careful to not smooth out your textures.  Continue until all the walls are up.  Using your extra clay, create a knob for the lid and scratch-to-attach it on top.  You can also cut out a smaller square and attach it to the bottom of your lid so that it won't slid off the box.  These boxes make great gifts and are ready to hold special treasures!
!!!B CR8IV!!!

Friday, May 25, 2012

Backgammon Game Board

Making your own game board and pieces in clay can be really fun.  This student chose to make a backgammon board but you could make checkers, chess, monopoly etc.

To make these game boards, start by rolling out a flat slab of clay that is about 3/8ths of an inch thick and the size that you would like your game board to be.  Next scratch up the entire surface of the clay with a fork or scoring tool.  Now start cutting out the shapes for your board pieces from the extra scraps of clay.  Scratch the backs of your shapes with a tool and begin attaching them onto the surface.  If you have large empty area, you can cut small shapes and attach them to fill those areas as a design rather than a playing area of the board.  Be sure to keep the thickness of your clay even as you attach them onto the base piece. Once all the spaces have been filled with shapes, let the game dry on a flat surface.  Now you have to build the pieces for your game, depending on what game you've chosen, they may need to be unique for each player or all similar as in checkers and backgammon.  Next, bisque fire all the pieces and board, then have students glaze only the surface of each of the shapes and the outside edge of the board NOT the spaces in-between, the grout will not stick to a glazed surface.  They should also glaze the pieces keeping color in mind if they need two teams of color or all the same.  Once the glaze firing is finished, mix up some grout in any color you'd like according to the package's instructions.  Be careful about not adding too much water to your grout, a little goes a long way!  Spread out some newspaper and give out plastic gloves to students--this will be messy!  I give students a handful of the grout and let them start pushing it into all of the spaces, I usually have to help everyone out a little bit to make sure they've packed it in tight and filled all the spaces.  Then have them rub the grout off of the tops of all of their shapes using just their hands to start with or a wooden clay tool can be helpful, then use a dry paper towel to start to wipe the surfaces clean.  Once the grout has dried a bit, you can go over the surface with a damp sponge to get any residual grout off. Let the grout dry for 24 hours before using your game.


!!!B CR8IV!!!

Wednesday, May 16, 2012

Henna Hands

Henna is a natural dye that is used to decorate the body especially the hands for special occasions such as weddings in many Asian cultures. The designs are intricate patterns of shapes, flowers, spirals, waves and lines.  For this project, I show my students lots of examples or patterns and designs, we also practice a few on paper first.

You may want to cover your tables with newspaper to make clean up easier.  To make the hands, each student needs a latex glove (be sure to use thick gloves NOT the thin food service type), then mix up a small batch of plaster and pour it into the glove while the student holds it open. Once their glove it full, have them pinch it closed and hold it up until the plaster hardens (about 10 min).  The stiller they can be holding the plaster, the less chances of fingers breaking off once its dry, I have my students tell jokes or riddles while they wait.   HINT: You may need to mix up multiple batches depending on the size of your class, try not to mix up to much at one time or it will harden before you get to pour it into the glove.  If you have never worked with plaster before, I recommend trying it out on your own before attempting with a class--it's a very manageable classroom material if you know what to expect!

When the plaster hardens you can lay the gloves down on the table and carefully cut the glove off with scissors.  You should have a perfect hand shape which may stand up if the bottom is flat enough ( you can sand it flat if its not!).  I let these dry completely over night.  To clean up any plaster disasters, let it harden and then break it up with a scraper and hammer, through the hardened chunks away.  If you want to get it out of the bucket you mixed it in, let it harden and then flex the plastic bucket to pop it off the sides.  DO NOT LET PLASTER GO DOWN THE SINK!!  I set up a 5 gallon bucket of water for students to wash their hands and any tools in, then just dump that water outside.

Once the plaster is set, use watercolor paints to paint the entire surface of the hands, the plaster will absorb the paint quickly.  You can use this as a time to tie in a color theory lesson explaining the differences between warm colors and cool colors or just give them primary colors and have them experiment mixing.  Once the paint is dry, give students a selection of fine and ultra-fine sharpie markers to start their henna patterns with.  I encourage students to do at least 10 different patterns and to cover the whole surface.  They can use the patterns they drew earlier as references on their final pieces.

HINT: If you have broken fingers, they can be fixed!  Take a small drill bit and drill about 1/2" into the finger that is broken and also into where it connects.  Cut an inch long (or shorter) dowel of wood, such as a shish kabob skewer, dip the ends into glue and fit it into the drilled holes.  You can also add a little bit of glue to the plaster surfaces, push the broken pieces together gently and let dry!  


!!! B CR8IV!!!

Wednesday, May 2, 2012

Peacocks


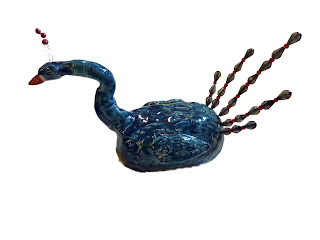
For this project we build the body of the peacocks the same way we have built our fish sculptures.  Using 2 pinch pots that are scratched together and smoothed over to make a hollow egg shape.  The neck is a rolled out snake or coil of clay with one end thicker to attach to the chest of the bird, use your fingers to pinch the thinner end into a pointy beak and use tools to create the nostrils, mouth and eye details.  Wings are also scratched onto the the sides of the body, then texture is applied to give the bird a feathery look.  The tail and head feathers are done using high temperature wire in different gauges.  The high temperature wire (sometimes called kanthal wire) can be put into the clay when it is wet and fired in the clay.  I used a thicker gauge on the tail feathers and a very thin gauge for the head feathers.  The head feathers have small spheres of clay added on to the tips of the wire, while the tail feather wires are left empty.  The pieces are fired and glazed and fired again.  For the final step, I offered my students a selection of beads to put onto their tailfeather wires, we discussed using patterns and also using warm colors or cool colors depending on what they had choosen to glaze their birds.  The final top bead got a drop of glue in it to keep them all from sliding off the wire.  Once the glue dries the peacocks are ready.  

!B CR8IV!   

Wednesday, April 4, 2012

Textured Turtles

These turtles are a great lesson in texture and pattern.  Start by rolling out a long snake or coil of clay, about 15-18 inches long and about as thick as a pencil.  Scratch the entire length of the coil and then wrap it up into a spiral shape blending in the end piece.  You can smooth out the spiral design or leave it there, this piece will be the turtle shell.  Next roll out another snake of clay the same thickness but only about 6-8 inches long.  Cut this snake of clay up into 6 pieces; 4 for the legs, 1 for the head and 1 for the tail.  You can shape them with your hands as needed.  Scratch the ends of each of your pieces and the belly of the turtle shell and attach them on.  HINT:  Make sure to overlap the pieces when you attach them on to have a larger surface area of attaching, so don't attach them edge to edge, they'll be more likely to break off when you move them in and out of the kiln.  You can now add on a face to your turtle and start to decorate the back of the shell with a pattern using tools. This is a perfect ocean week lesson! You'll need to dry, bisque fire, glaze and glaze fire all the pieces for them to be finished.  

Friday, March 9, 2012

Tiki Heads

These fun tiki heads are a perfect lesson in symmetry for students. I show my students lots of examples of symmetry in art and nature before we start this project.  I also have them sketch out a plan on paper of what shapes they will use to create their clay tiki head.

Start by rolling out a 3/8ths of an inch slab of clay and cut out a rectangle that is about 5" x 10".  Wrap the rectangle up into a cylinder and scratch-to-attach the edges together.  Trace the bottom of the cylinder onto another slab of clay and scratch-to-attach the circle onto the bottom of the cylinder. Now its time to start building the tiki face.

Take your scrap flat pieces of clay and roll them out a little thinner with a rolling pin.  Use a knife to cut out each of the shapes that you need to build the face and scratch-to-attach them onto the cylinder.  I challenged my students to choose at least 6 completely different shapes and to use at least 15 pieces to build their tiki faces.  I also challenged them to create two unique faces, one on each side of the cylinder.  You can adjust the challenge for your students ability and age level.  Dry your pieces, bisque fire them and then glaze.  You can also challenge students to use at least 10 different colors on their pieces if you'd like to get some super rainbow tiki heads! Once they are fired you can also put plants in your tiki heads to make them grow hair!

!!! B CR8IV!!!

Friday, February 24, 2012

Paper Roller Coaster Sculptures


These roller coaster sculptures are super fun to make and a way to teach the art of  line to any age level.  You'll need a lot of drywall shims, they are available at hardware stores and are basically thin strips of cardboard that are about 2 inches wide by about 4 feet long.  The bonus is they're cheap too!

I start by giving examples of lines found in artwork both 2-D & 3-D, we may practice a few on paper as well.  Next I give students at least 3 cardboard strips and a selection of oil pastels.  You can use markers or paint here, but I like the brightness of the oil pastels on the dull cardboard surface and I don't have to wait for paint to dry.  Another option is giving them a coat of white paint first and then painting or drawing on them with your chosen material, if you have the time.  Have students use the oil pastels to color in the strips with 6 different types of lines (one for each side of the 3 cardboard strips), using lots of colors and experimenting with lines.  Once all of the strips are colored, let students experiment with 3-D lines by bending, twisting and folding the strips.  Eventually connect them with a stapler.  You'll need at least 2 well positioned staples at each connection point, maybe more.  Some of the younger students need help with this part, but I've done this with kindergarten and it worked just fine.  Encourage students to look at how they are connecting them together and what their overall sculptural form is becoming.  Have them play with what is the bottom of their sculpture, sometimes they look more interesting turned upside down.

HINT: Some of the little guys like to turn these into sculptural hats by making a loop in the strip that fits their head, it's a little crazy looking but fun!
HINT:  You can have students connect all of their individual sculptures together to create a group classroom sculpture and they are light enough to hang from the ceiling if you need the space.

!!!BCR8IV!!! 

Wednesday, February 8, 2012

Turtle Tower

I like to make these turtle towers a classroom challenge project, challenging students to see who can make the most or the smallest turtles.  I also challenge students to create a different texture/pattern on each of the turtle shells, giving examples of different designs can be helpful for sparking ideas here.  This project can of course be completed by making just one turtle per student.

Start by rolling out a long snake or coil of clay, about 15-18 inches long and about as thick as a pencil.  Scratch the entire length of the coil and then wrap it up into a spiral shape blending in the end piece.  You can smooth out the spiral design or leave it there, this piece will be the turtle shell.  Next roll out another snake of clay the same thickness but only about 6-8 inches long.  Cut this snake of clay up into 6 pieces; 4 for the legs, 1 for the head and 1 for the tail.  You can shape them with your hands as needed.  Scratch the ends of each of your pieces and the belly of the turtle shell and attach them on.  HINT:  Make sure to overlap the pieces when you attach them on to have a larger surface area of attaching, so don't attach them edge to edge, they'll be more likely to break off when you move them in and out of the kiln.  You can now add on a face to your turtle and start to decorate the back of the shell with a pattern using tools.  The smaller turtles will be built in exactly the same way, just using shorter lengths of coils to build them.  HINT:  I have my students stack up their turtles without scratching-to attaching them on. This way, when they glaze them it's easier to make each turtle a different color.  When they are finished glazing they re-stack them and in the kiln the glaze melts and fuses them into a tower.  You can also play with color theory on the glazing and have them make primary and secondary colored turtles or paint them in rainbow order.  You'll need to dry, bisque fire, glaze and glaze fire all the pieces for them to be finished.  
!!!B CR8IV!!!

Wednesday, February 1, 2012

Heart Boxes

A fun Valentine's gift and easy to make!  Start by rolling out a slab of clay that is about 3/8ths of an inch thick and cut out two identical hearts, one will be the lid and one will be the bottom.  HINT: I let my younger students use cookie cutters.  Next cut a strip of clay that will become the wall of the box, I used a ruler and cut down both sides to create a strip of clay that is even and about 1.5 inches thick.  Then scratch to attach the edge of one of the hearts and one edge of the strip of clay and attach them together.  Use a tool or your finger along the inside of the box to smooth out the connection.   Now decorate your heart box using tools, stamps and textures.  If you add any parts on, be sure to scratch to attach them on well.  These are great to fill with candy and give to the one you love on Valentine's Day!
!!!B CR8IV!!!

Friday, January 6, 2012

Mosaic Mandalas


My students loved making these mosaic mandalas, especially the messy grouting part!  I showed my students lots of examples of mandalas and we discussed using symmetry in art before starting in clay.  The rules of the project are simple; any shape is allowed but the overall design must be symmetrical and the shapes can only have a little bubble room around them (not huge gaps), other than that--b cr8iv!

Start by giving each student a plastic plate (paper ones will get too wet and loose their shape).  Next roll out a large slab of clay that is about 3/8th of an inch thick and lay it over the plate and press it into the plates shape gently. Use a knife to cut off any extra clay around the edges and save the scraps of flat clay.

Next scratch up the entire surface of the clay with a fork or scoring tool.  Now start cutting out your shapes from the extra scraps of clay.  Scratch the backs of your shapes with a tool and begin attaching them onto the surface in a symmetrical design.  I encouraged students to work from the middle out to the edges.  HINT: If you have younger students you can use cookie cutters for this part to ensure symmetry!  Be sure to keep the thickness of your clay even as you attach them onto the base piece. Once all the spaces have been filled with shapes, let the mandala dry on the plate, they will pop apart from the plastic plates as they dry and shrink.  HINT: If you want to be able to hang these on the wall when they're finished, cut a small length of high temperature wire and bend it into a loop, then stick it halfway into the clay before it is dry to use as a hanger once the clay is fired.

Bisque fire the mandalas and then have students glaze only the surface of each of the shapes and the outside edge of the plate NOT the spaces in-between, the grout will not stick to a glazed surface.  You can make this a color wheel or color theory lesson with the glazing if you'd like too.  Be sure to keep the colors symmetrical too.

Once the glaze firing is finished, mix up some grout in any color you'd like according to the package's instructions.  Be careful about not adding too much water to your grout, a little goes a long way!  Spread out some newspaper and give out plastic gloves to students--this will be messy!  I give students a handful of the grout and let them start pushing it into all of the spaces, I usually have to help everyone out a little bit to make sure they've packed it in tight and filled all the spaces.  Then have them rub the grout off of the tops of all of their shapes using just their hands to start with or a wooden clay tool can be helpful, then use a dry paper towel to start to wipe the surfaces clean.  Once the grout has dried a bit, you can go over the surface with a damp sponge to get any residual grout off. Let the grout dry for 24 hours before hanging it up on the wall.

!!! B CR8IV!!!

Friday, December 9, 2011

Gustav Klimt's Tree of Life


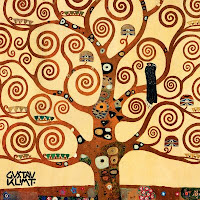
Begin by showing Gustav Klimt's Tree of Life mural and some of other his other paintings to students and discuss his repeated use of gold and patterns in his work.  Have students find patterns in his work and practice drawing them with markers on paper.

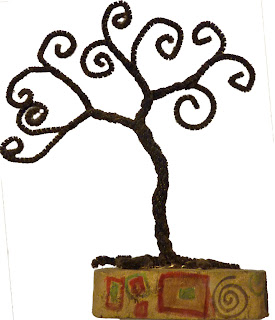
To build the tree, give each student at least 10 pipe cleaners that are about 12" long (color doesn't matter here).  Have students stack the wires in a bundle and twist them together in the middle of the bundle to create the trunk of the tree. Leave some wires splayed out at the bottom for roots and about 5" of wire left for the branches -little hands may need help with this.

For the roots, divide the 10 wires into small groups of 2 -3 wires, twist those and then divide them up into groups of 1-2 wires and twist the groups of 2 until you have just little wire ends left.  The idea is to have the roots look like they are going from thick to thinner and thinner pieces.  The branches will be created the same way, separate the wires into small groups and twist, separate them in to groups again and twist.  When you get to the end of the tree branches, use a pencil to wrap the end of the wire around to create the spiral that is used frequently in Klimt's paintings.  One all of the branches have been formed, take the time to arrange them so that the spirals are visible and the tree should start to balance standing.

Next, give each student a small block of wood for the base of the sculpture, have them sand it down and use hot glue to attach their trees to the wood.  Have students put their names on the bottom of the wood.  Using gold spray paint, paint the trees and wood completely, and let dry.  Last, have students use Sharpie Markers to draw on their Klimt style patterns onto the block of wood.

!!!B CR8IV!!!

Friday, November 4, 2011

Textured Box

These sweet and simple boxes are a great way to introduce texture to young artists.  I love using the textured rubbing plates from Dick Blick Art Supplies for this project. 

Start by rolling out a flat piece of clay that is about 3/8ths of an inch thick (or about as thick as a pancake), then make sure that the surface is smooth.  Next choose your textured rubbing plate and lay it on top starting at one end of your clay.  Using a rolling pin, roll over the texture plate pushing down evenly as you go.  You can peel up one corner to check if you have pushed hard enough, if not roll some more, if it looks good peel up the rubbing plate.  If your clay is larger than your rubbing plate, you'll need to lay the rubbing plate down again in the blank clay area and roll in the texture again until the entire piece of clay is covered with your texture. 

Next have your students cut out one square of clay (you can give paper templates for this if you think they need them).  Once they have one square cut out, have them lay it down on top of their clay in a new area and trace the first square so that the second one is exactly the same size.  Continue doing this until each student has 6 squares. If you run out of room on your clay to continue cutting out squares, squish all the small scrap pieces together, roll it out flat again and put the texture in again.  Now its time to assemble the box. 

Pick one square that will be the lid and put it to the side.  Pick the square that will be the bottom and use a scratching tool to scratch all the edges, then scratch 3 sides of the remaining 4 squares.  Now that everything is scratched,  pick the first wall and attach it to the bottom of the box- it may be a little wobbly at first.  Next, attach the second wall to the bottom square and then squeeze the corners together being careful to not smooth out your textures.  Continue until all the walls are up.  Using your extra clay, create a knob for the lid and scratch-to-attach it on top.  You can also cut out a smaller square and attach it to the bottom of your lid so that it won't slid off the box.  These boxes make great gifts and are ready to hold special treasures!
!!!B CR8IV!!!

Friday, October 21, 2011

Tea Bowls

The Japanese have mastered the art of the tea bowl, which can range in style from a perfectly symmetrical shape or an exquisitely organic form.  This is a great project to talk about the anatomy of a pot with your students; the lip, body and foot are all essential elements to the parts of a tea bowl.  There are a few options to build the body of the bowl, one is to make a pinch-pot with high sides to it, or if you have access to a potters wheel, throwing a bowl is an option, the other choice which I have done here is to use a slab of clay.  I rolled out my clay flat and used a paper template to cut a small cylindrical shape, you can cut out rectangular paper templates for your students too.  Once the shape is cut out, its rolled into a cylinder and the edges are scratched-to-attached together.  The bottom is made narrower by cutting 4 V-shaped notches or darts, one on each side.  Then scratch the inside edge of those V-shaped cuts and fold them in together.  This may leave a small square hole in the very bottom of your tea bowl, if it does, just cut a small flat square to scratch-to-attach on and cover the hole.  This procedure is a little bit tricky but it shapes the body of your tea bowl to be wider towards the top and narrower towards the foot, which is the traditional shape of a tea bowl.  Design and pattern can be added to the outside now using tools or stamps and the lip of the bowl should be smoothed out with your finger.  Next, roll out a coil of clay and wrap it up to make a small donut shape that will fit onto the bottom of your tea bowl to create the foot.  Make sure to scratch-to-attach both parts together and also add some surface decoration to the foot.  To learn more about the tradition of tea bowls and the Japanese Tea Ceremony, click here.  

!!!B CR8IV!!!

Friday, May 6, 2011

Patterned Pencil Holder

These slab-built pencil holders are easy for any age and make great gifts.  Start by rolling out a slab of clay that is about 3/8ths of an inch thick and about 5" wide by 9" long.  You can give students a rectangular paper template to help them cut out the right size.  Determining the size is a great opportunity to talk about the functional aspects of our pencil holders- too short or wide and the pencils will fall out, to tall and you won't be able to reach them.  Sometimes, I have students test their pieces with a pencil and if they don't pass the "pencil test", they need to rethink the size or shape of their pieces. 

Once you have the slab of clay the correct size, cut out your rectangle (about 5"x 9").  Wrap the rectangle into a cylinder and scratch-to-attach the edges together.  Next, use your extra clay to roll out another slab of clay (same thickness) so we can trace the cylinder to make the bottom.  If you trace the cylinder, you know that it will fit exactly onto the bottom.  Scratch-to-attach the bottom of the cylinder and the edge of the circle you've cut out.  I like to flip my whole cylinder over to attach on the bottom and blend in the edges.  You can also reach inside the cylinder with one hand and use the other on the outside to blend the two pieces together.  

Now you're ready to create your patterns!  I give students a lot of examples of patterns they could use on their pieces and I also encourage them to experiment with the clay tools, sometimes using the back of a tool will create an interesting shape in the clay.  Also using other objects such as pen caps, beads or natural materials will create an interesting mark too.  Encourage students to cover the surface of their clay in at least 5 different patterns.  Once they are finished, let the pencil holders dry completely, bisque fire them, glaze them and then glaze fire them.  
!!!B CR8IV!!! 

Friday, April 29, 2011

Carved Drywall Stamps and Textured Boxes


This project happens in two parts.  First you'll need a section of drywall (it's great to grab scraps from anyone who's doing a remodel project).  Then you need to get the paper off of one side of the drywall, if you soak it in a shallow container of water for about an hour, you should be able to peel the paper right off.  Next, you're ready for the carving.  I use clay tools to carve into the drywall and its rather easy to carve if its still wet from the soaking process.  HINT:  Make sure you clean your tools well before using them in clay again, plaster can make your clay explode in the kiln! 

Start by dividing up your drywall into sections so that that you have 6-8 different shaped areas, then choose a different texture to carve into each area.  When you've finished carving, let the drywall dry and if you get lots of little crumbs stuck from carving, use a paintbrush to clean them out. These carvings can be very interesting in their own right and can be painted with watercolors if you wish or you can use them as handmade texture stamps for clay.

Now for the second part, roll out a slab of clay that is about 3/8ths of an inch thick (about as thick as a pancake) and about 12"x 12" across. Lay your clay on top of your textured drywall and gently press the clay into the texture, if you need to move the clay to texture another area, just peel it off, move it and press again until your clay is completely textured.  This is when students will see the negative and postive shapes of their carving.  Any spot that they carved deep in the drywall will be popping out of their clay.  HINT:  The drywall may crack if you put uneven pressure on it but the paper backing will hold it together and your stamp will still work fine.  HINT:  If you see lots of pieces of plaster in your clay, you'll need to pick them out carefully with a tool, as they can make your clay explode in the kiln! 

I give students a paper template to trace and cut out the 4 walls for their textured box, this helps make sure that their walls will be straight.  The boxes that I'm showing here are about 6" tall by 3" wide, but you can make your box any shape you'd like. HINT:  Shorter cube shaped boxes are easier for small hands!  If you run out of room on your slab of clay to cut all your pieces, just combine all the little pieces together, roll out another slab, texture it and continue cutting the pieces.  Scratch-to-Attach all of the edges of your walls and carefully start to build them together making sure that the corners are attached really well here.  To make the bottom and the lid, trace the perimeter of your box on top of your slab and cut out one of these shapes for the bottom and one for the lid.  Scratch-to Attach the bottom on making sure that the edges are well attached.  Using your extra clay pieces create a handle for your lid (any shape or size you'd like) and scratch-to attach it onto the lid. 

Let the boxes completely dry, then bisque fire.  When you're ready to glaze, I like to put a glaze on and then use a sponge to wipe some of the glaze off of the surface which really enhances the texture.  The glaze will pool and be deeper colored in the texture and lighter on the surface.  
!!!B CR8IV!!!  

Wednesday, April 13, 2011

Textured Picture Frames

These textured picture frames are simple to build and make great gifts!  Start by rolling out a slab of clay that is about 3/8ths of an inch thick (about as thick as a pancake) and a little larger than you'd like your picture frame to be.

The next step is adding texture to the clay and there are so many choices!  You can use found objects such as leaves, buttons or shells.  Rubber stamps work great in clay and ABC stamps can help personalize a frame.  The bottom of shoes have great designs for texture and the kids love stepping on their clay!  This frame was textured with rubbing plates that were pushed into the surface with a rolling pin.  Blick Art Supplies has a huge selection of textured rubbing plates to choose from.  Once you've decided on your texture, cover your clay with it. 


Cut out the outside shape of your picture frame, this one is about 5" square.  Then cut the hole where your picture will show through, be careful not to cut to close to the outside edge, you want to keep at least an inch of thickness all the way around your frame.  Save the inside square that you've cut out!  Next, carefully turn your frame over to attach the stand onto the back.  Using the inside square that you saved, cut it diagonally into 2 triangles, then scratch-to-attach them onto the bottom sides of your frame. 

Let your frame dry laying down. Once dry, the triangle stands should support the frame upright.  Bisque fire, glaze, glaze fire, tape on your photo and you're all set to give out a great handmade gift!

!!!B CR8IV!!! 

Tuesday, February 1, 2011

Clay & Copper Sun


This summer sun is a great project to build in two stages.  The face of the sun is built with clay while the rays are made of a thick copper foil.  I had my students cut out the shape of their sun's face and then we talked about 3-D shapes that we could add on for the features (spheres for eyes, pyramid for the nose and a cylinder for the mouth), we also created texture with the clay tools on the surface of the face.  I also added a kanthal wire loop in the top of the clay so that it could be hung later.  The clay pieces were fired and then in this case I had students use watercolor paints to add color to the clay, they could be glazed just as easily.  We looked at a color wheel and discusses the various names for the different colors.  I had students use a palette of warm or cool colors to paint their sun faces with.  For the rays of the sun, each student was give a retangle shaped piece of thick copper foil, a stack of newspaper and a dull pencil.  If you use the dull pencil and push into the foil using the newspaper as a cushion underneath, you can tool the foil with a variety of patterns and designs.  I have my students divide up their rectangle into 5 or 6 different shapes and then each shape is filled with a different pattern.  The result is a textured surface on the opposite side of the foil.  Once the entire piece is covered with designs, student will cut up the foil into their rays.  PLEASE NOTE: The foil can have sharp edges when cutting, younger children will need help with this part.  Each ray is glued onto the back of the sun using a hot glue gun and a ribbon can be looped through the wire loop at the top to hang your clay and copper sun!
!!!B CR8IV!!!

Tuesday, December 21, 2010

Peacocks


For this project we build the body of the peacocks the same way we have built our fish sculptures.  Using 2 pinch pots that are scratched together and smoothed over to make a hollow egg shape.  The neck is a rolled out snake or coil of clay with one end thicker to attach to the chest of the bird, use your fingers to pinch the thinner end into a pointy beak and use tools to create the nostrils, mouth and eye details.  Wings are also scratched onto the the sides of the body, then texture is applied to give the bird a feathery look.  The tail and head feathers are done using high temperature wire in different gauges.  The high temperature wire (sometimes called kanthal wire) can be put into the clay when it is wet and fired in the clay.  I used a thicker gauge on the tail feathers and a very thin gauge for the head feathers.  The head feathers have small spheres of clay added on to the tips of the wire, while the tail feather wires are left empty.  The pieces are fired and glazed and fired again.  For the final step, I offered my students a selection of beads to put onto their tailfeather wires, we discussed using patterns and also using warm colors or cool colors depending on what they had choosen to glaze their birds.  The final top bead got a drop of glue in it to keep them all from sliding off the wire.  Once the glue dries the peacocks are ready.  

!B CR8IV!   

Tuesday, June 8, 2010

Ice Cream Bowls

This is a great basic clay project that anyone can enjoy!

Create your very own ice cream bowl using the pinch pot method of building, design patterns & textures and think about the functionality of your bowl; size, shape & texture. 

Sessions:  One 30 min - 1 hour session
Age: Kinder and up
Materials:
Low Fire Clay
A Variety of Clay Tools
Low Fire Glazes & Brushes
Kiln

Steps:

1.  Cut off a piece of clay that is about as big as a baseball. 


2.  Shape it into a sphere by hitting it with curved hands until all flat sides and points are rounded.


3.  Push your thumb into the sphere (be careful not to go all the way through).


4.  Start to squeeze the clay with your thumb on the inside and your fingers on the outside.  Squeeze and turn the clay so the hole that you made with your thumb is stretched out and starts to form a bowl.  This is called making a pinch pot because you are pinching your clay into the shape of a pot/bowl.  Keep squeezing and stretching the clay until it is stretched out to the size that you want your bowl to be.  Hint: If you stretch and squeeze it to much, you clay will become thin and fragile, try to keep it about as thick as a pancake.    


5.  Now you can change the shape of your bowl if you'd like.  It can be anything; oval, heart, triangle.... I'm going with a square shape for this bowl.  You can also use this time to smooth out any cracks or rough areas of clay--your fingers are a great tool for this!  Hint:   You can also use a spray bottle to keep your clay damp--don't overdo it though, your clay will become mush!
6. Now it's time to decorate your bowl, use your clay tools to add design, pattern and texture to your pieces. Experiment with different ideas, if you don't like them, you can always smooth them out and try something different.

7.  Sometimes finding tools that are not really for clay; such as this ballpoint pen, can create a really effective design. 

8.  I like to create the majority of my design and texture on the outside of the piece, this helps keep the bowl easy to clean, especially if its going to be used for food.  

9.  The finished design!

10.  This bowl will now need to dry completely, be fired in a kiln to cone 04 so that it is bisqued, then it will be glazed with a variety of colors and fired again.  Then all that you'll need is ice cream! 


ENJOY!!