Showing posts with label animals. Show all posts

Friday, May 11, 2012

Long Bugs


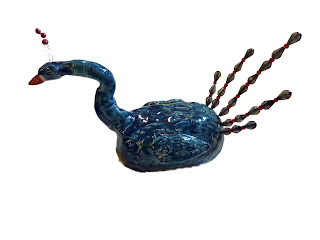
 Well, we started off this week with Baby Bugs and we've moved onto our Long Bugs!  You'll need a rolling pin or large dowel for each student to support your bug as it dries for this project.  If you want to make this an art & literacy project, you could tie this to Eric Carle's book "The Very Hungry Caterpillar" for fun with your students.

To begin, give each student a rolling pin or dowel and a baseball size piece of clay.  Break off a small piece of clay and roll it into a coil that is about 3-4" long, drape it over the dowel- this will make one pair of legs.  Continue rolling out coils and draping them over the dowel to make 8, 10 or 20 legs for your Long Bug.  Scratch the tops of all the pairs of legs and put to the side while we make the body.  Take a larger piece of clay and roll it out to a thick coil, about as thick as a hot dog and as long as you want your bug to be.  Scratch the bottom of the larger coil and lay it on top of the scratched parts of the legs.  Use your fingers to blend the body to the legs well.  Shape one end to be the head and the other to be the tail.  You can add on eyes, a mouth, a snout, spikes and antennae (I used high temperature wire or Nichrome wire for my antennae). Textures and designs can be added on now as well.  When you've finished building your Long Bug, let it dry on the dowel.  Once it's dry, carefully slide the dowel out and your bug should stand on its own.  Bisque fire, glaze and glaze fire your bugs.  Find your critter a good place to hide in the garden!

!!!B CR8IV!!!

Wednesday, May 2, 2012

Peacocks


For this project we build the body of the peacocks the same way we have built our fish sculptures.  Using 2 pinch pots that are scratched together and smoothed over to make a hollow egg shape.  The neck is a rolled out snake or coil of clay with one end thicker to attach to the chest of the bird, use your fingers to pinch the thinner end into a pointy beak and use tools to create the nostrils, mouth and eye details.  Wings are also scratched onto the the sides of the body, then texture is applied to give the bird a feathery look.  The tail and head feathers are done using high temperature wire in different gauges.  The high temperature wire (sometimes called kanthal wire) can be put into the clay when it is wet and fired in the clay.  I used a thicker gauge on the tail feathers and a very thin gauge for the head feathers.  The head feathers have small spheres of clay added on to the tips of the wire, while the tail feather wires are left empty.  The pieces are fired and glazed and fired again.  For the final step, I offered my students a selection of beads to put onto their tailfeather wires, we discussed using patterns and also using warm colors or cool colors depending on what they had choosen to glaze their birds.  The final top bead got a drop of glue in it to keep them all from sliding off the wire.  Once the glue dries the peacocks are ready.  

!B CR8IV!   

Friday, April 13, 2012

Foam Carved Animals

The cute animals are made from floral foam --the stuff florists stick in the bottom of arrangements to make the flower stems stay in place.  Its a great material for students to practice the art of carving with a very soft material.  I have to warn you though, this is not an easy project and there have been a few tears shed over lost legs and ears etc...so be prepared!  Before I start this project, I let my students know the drawback to this material is how much the very fine dust sticks to your hands and if you touch your face with your hands after you've started carving, it can be really painful to get in the eyes, so make sure students wash their hands thoroughly before they scratch an itch!  I also like to prep students for this project by showing them a lot of Michelangelo's carvings and we talk about the process of carving (taking away vs adding on).

I find that I have the best results on this project when I do it with my students; step by step.  Everyone should start with one block of floral foam that is about 4" x 4" x 2", yours maybe larger or smaller depending on the brand you buy.  And a few clay tools are helpful, a knife, pointy tool and a few sizes of carving tools.  (Make sure you wash your tools before using them in clay again!) These drawings may help students visualize what parts they need to remove in each step.  Step one removes the foam to create the basic head and body shape, rounding out the back end and removing under the neck and front of the legs.  Step two removes the foam so that you have front and back legs, students will also need to carve between each pair of legs to create 4 individual legs.  HINT: Remind students that its better to carve away a little bit at a time, rather than one big chunk because you can easily break off a leg unintentionally here.  Step three removes the back of the back legs to shape a tail and it also shapes the snout, head, ears and neck.  This is a generic shape that may need to change depending on what animal you are making.  I find that once my students get to this point, they feel comfortable with adding in the details like noses, eyes, toes etc on their own carving intuition. I have my students paint them with acrylic paints and these are glued onto driftwood bases.  You could also add wire to create hair and longer tails, like we did here to create some lion manes.  HINT: If you do break a part off while carving, have the students keep their parts and just glue them on later with a strong craft glue.   Dick Blick Art Supplies has a great similar lesson plan to create Inuit Bears if you're looking to tie this project in with your curriculum.

!!!B CR8IV!!!

Wednesday, April 11, 2012

Chicken & Egg

 
Which came first, the chicken or the egg??

This is a two part multimedia project that can be applied to any egg laying animal if you're looking to accompany a curriculum based idea (I've had students make platypus' with this project too!)

The Egg:
You'll need a round balloon, newspaper, flour and water (to make paper mache) for each student.  This can be messy, so just be prepared, cover your tables, and stay calm! Start by blowing up your balloon, I recommend not to full capacity though- they tend to pop if stretched to thin. Then take a piece of masking tape and tape the tail of the balloon to the table your working at, this helps keep it from rolling away on you.  Prep your paper mache area by having a small container to put your mixture in and have all of your newspaper ripped up into strips and ready to go once your hands get all sticky.  Lots of people have very fancy paper mache recipes and techniques, here's a good one if you want to try: RECIPE but I just go with plain ol' flour and water mixed really really well to the consistency of pancake batter.  Once mixed, give each student some in their personal containers.  Dip a strip of newspaper into the paper mache mix, make sure its covered and then wipe off all the excess (I like to pinch it between my first two fingers and slide them down the stripe to pull off any excess), sometimes the paper will get too wet too quickly and it will rip, just put it to the side and try with another one.  It's always good to demo all of this for your students before you start to avoid the emotional melt downs!  Then layer the newspaper strips around your balloon until you have an even cover over the whole surface.  Let them dry completely, (about 24 hours) and repeat the whole process again and then again!  Now that you have a dry and strong egg, cut the egg in half to give it a cracked edge, I did this part for my students using a knife and scissors.  Once cracked open, you should be able to pull out the balloon remnants.  I gave my students  acrylic paints to decorate their eggs, inside and out.  You may want to spray the eggs with a coat of white spray paint to give them a base layer, as the newspaper print will show through on the lighter colored paints. Let the eggs dry while you move onto building the chickens!  HINT: Alternatively, you can do this whole process with plaster gauze instead of paper mache which is simpler, stronger and less messy--but way more expensive a material than flour, water and newspaper.

The Chicken:  These chickens (or whatever egg laying creature you've decided to make!) are made from simple pinch pots.  Start with two equal spheres of clay and make them into pinch pots by pushing your thumb into the center of the sphere and squeezing around the sides until you have a small bowl shape. Do the same to both spheres.  Take your scratching tool (wire tool, fork, comb...) and scratch-to-attach the edges of the bowls.  Then gently push them together and smooth out the seam with your fingers.  This creates the body of your chicken.  Now make one smaller pinch pot and turn it upside down onto the top of your body to create the head.  Scratch-to-attach it on and blend it in well to the shoulders of the chicken.  

Now using some extra clay, create your comb, eyes, beak, wings and legs. For the legs, roll out two coils of clay that are about the same size and thickness, scratch the end of each coil and scratch the body where you want to attach them on, blend them in well with your fingers.  You can push bend the ends up to create feet and then use a knife to cut some toes. The comb can be made by attaching a small coil of clay to the top of the head and then squeezing it thinner; mohawk style.  The beak is a small triangle and the eyes are two spheres with a smaller dot pushed into them. The wings can be two coils of clay that are equal in size and then flattened or two equal slabs of clay in the shape of wings, then scratch-to-attach them on.  Before letting your chicken dry, take a long pointy tool and make a hole from the bottom of the chicken up into the head to allow the trapped air to escape while its firing, if you forget this step--your chicken may blow up in the kiln! : (
Dry, bisque fire, glaze and then glaze fire your chicken.  Display your chicken and egg together!


!!!B CR8IV!!!

Friday, April 6, 2012

Dog Pound

I find that my own dogs offer lots of inspiration for this project!  These cute puppies are simple to make and I encourage my students to build at least 3 completely different dogs to create their dog pound.  I use rolling pins to help support the legs of the dogs until they dry, but you could also use cardboard paper towel rolls or newspaper too, just make sure you have one for each student.

Start by rolling out a coil of clay that is about as thick as a Sharpie marker.  Cut two pieces from this coil that are equal size and about 4 " long.  Drape these pieces over the rolling pin to create two arches for the legs of your dog.  If you want your dogs to have shorter or longer legs, just adjust the length of the coils.  Next, roll out a slightly thicker coil of clay for the body.  Roll one end of that coil thinner for the tail and cut the coil for the length of body that you want.  Scratch-to-attach the body onto the top of the legs and blend them together with your finger.  To make the head of your dog, roll out a small sphere and pinch one end pointier for the snout so the overall shape is more like an egg on its side.  Scratch-to-attach the head onto the body and blend it in.  Remember that you don't have to have the head facing straight on, maybe he's watching a ball fly by him!  Next cut the mouth open with a knife, you can add teeth or a tongue or a bone in its mouth if you want.  Scratch-to-attach on the ears, eyes and nose.  Then you're ready for details, like toes, furry texture or adding accessories (collar, toys or a food bowl).  Let your dogs dry on their support structure and carefully slide them off when they are dry enough to support their own weight.  Dry them completely, bisque fire, glaze and glaze fire.

!!B CR8IV!!

Wednesday, April 4, 2012

Textured Turtles

These turtles are a great lesson in texture and pattern.  Start by rolling out a long snake or coil of clay, about 15-18 inches long and about as thick as a pencil.  Scratch the entire length of the coil and then wrap it up into a spiral shape blending in the end piece.  You can smooth out the spiral design or leave it there, this piece will be the turtle shell.  Next roll out another snake of clay the same thickness but only about 6-8 inches long.  Cut this snake of clay up into 6 pieces; 4 for the legs, 1 for the head and 1 for the tail.  You can shape them with your hands as needed.  Scratch the ends of each of your pieces and the belly of the turtle shell and attach them on.  HINT:  Make sure to overlap the pieces when you attach them on to have a larger surface area of attaching, so don't attach them edge to edge, they'll be more likely to break off when you move them in and out of the kiln.  You can now add on a face to your turtle and start to decorate the back of the shell with a pattern using tools. This is a perfect ocean week lesson! You'll need to dry, bisque fire, glaze and glaze fire all the pieces for them to be finished.  

Wednesday, March 14, 2012

Bears


These bears are made from simple pinch pots and can be made realistic or cute little teddy bears.  Start with two equal spheres of clay and make them into pinch pots by pushing your thumb into the center of the sphere and squeezing around the sides until you have a small bowl shape. Do the same to both spheres.  Take your scratching tool (wire tool, fork, comb...) and scratch-to-attach the edges of the bowls.  Then gently push them together and smooth out the seam with your fingers.  This creates the body of your bear.  Now make one smaller pinch pot and turn it upside down onto the top of your body to create the head.  Scratch-to-attach it on and blend it in well to the shoulders of the bear.  

Now using some extra clay, create your ears, eyes, nose, arms and legs. For the arms and legs, roll out four coils of clay that are about the same size and thickness, scratch the end of each coil and scratch the body where you want to attach them on, blend them in well with your fingers.  You can push a small round tool into the ends of the coils to make paw prints.   The ears are easy to make by flattening a small sphere of clay and cutting it in half making two equal ears.  The nose is a small triangle and the eyes are two spheres with a smaller dot pushed into them.  You can also add details like a honey pot, clothes or make your bear catching a salmon in the river.  Remember that all of your bears' parts need to be scratched-to-attached on! 

You can also give your bear a furry texture by scoring the clay with your scratching tool.  HINT:  Don't forget to poke a hole into the hollow space of your bear that goes through the body and all the way into the air that you've trapped in the head so that it doesn't explode in the kiln!!!  Let them dry, bisque fire, glaze and glaze fire them. 


!!!B CR8IV!!!

Friday, February 17, 2012

Twine Bird

I created these hollow bird forms with my students as a way to express line and volume.  The artists Christo and Jeanne Claude would be great examples to introduce with this project too.

We started with two balloons, one for the body (about the size of a grapefruit) and a smaller one for the head.  I have students tape the balloons together with masking tape.  They can position the balloons so that the knot is where the beak will be on the head.  HINT: I also have students tape the knot of the body balloon to the table, it really helps to keep the balloons from rolling all over the place.

Once the basic form is ready, we took long lengths of twine and dipped them into fabric starch. HINT: Any natural fiber string will work for this!   The twine was then wrapped around the balloons and thought was given to the pattern of the wrapping while still maintaining the shape of the bird.  Some students let strings hang off of the back of the birds body in loops to create a tail, you could also do wings the same way.  Once wrapped, they were left to dry overnight.  As they dry the balloons should start wilting and peeling away from the string, if not you can pop the balloon.  Pull out all of your tape and balloons through one of the holes.  You can leave your bird with the natural string color or spray paint it.  Nests and eggs can be made the same way if you want to take it to the next step!

!!!B CR8IV!!!

Friday, February 10, 2012

Flamingos

The girls that made these cute sculptures insisted that they were flamingos without legs, not purple swans!  But if you wanted to build a swan, you could build it the exact same way!    

Start with two equal pieces of clay about the size of a ping pong ball and make them both into spheres.  Use your thumb to push into the center of the sphere and then squeeze around the sides to create a pinch pot.  Do this to both spheres.  Next scratch the rim of each of the pinch pots and attach them together, smoothing out the seam as you go.  This will create the hollow body of your flamingo.  Take your time to shape it or smooth it if its a little bit lumpy.  Pinch one end of the body with your fingers to create the pointier tail end of your flamingo.  Using another piece of clay, roll out a small snake or coil of clay to create the neck and head, I like to keep the ends of the coil a little bit thicker than the middle for this.  Scratch-to-attach on the base of the coil to the body, blend it in well and then position the neck as desired.  Use your fingers to round out the head, then add on a small cone shape of clay for the beak.  You can add a flat oval shape to each side of the body if you want to add on wings.  Then finish it off by adding on details to the face or some feather textures to the wings and body using your tools.  Dry, bisque fire, glaze and fire again to finish.....remember that your flamingo can be what ever color you want!  
!!! B CR8IV!!!

Wednesday, February 8, 2012

Turtle Tower

I like to make these turtle towers a classroom challenge project, challenging students to see who can make the most or the smallest turtles.  I also challenge students to create a different texture/pattern on each of the turtle shells, giving examples of different designs can be helpful for sparking ideas here.  This project can of course be completed by making just one turtle per student.

Start by rolling out a long snake or coil of clay, about 15-18 inches long and about as thick as a pencil.  Scratch the entire length of the coil and then wrap it up into a spiral shape blending in the end piece.  You can smooth out the spiral design or leave it there, this piece will be the turtle shell.  Next roll out another snake of clay the same thickness but only about 6-8 inches long.  Cut this snake of clay up into 6 pieces; 4 for the legs, 1 for the head and 1 for the tail.  You can shape them with your hands as needed.  Scratch the ends of each of your pieces and the belly of the turtle shell and attach them on.  HINT:  Make sure to overlap the pieces when you attach them on to have a larger surface area of attaching, so don't attach them edge to edge, they'll be more likely to break off when you move them in and out of the kiln.  You can now add on a face to your turtle and start to decorate the back of the shell with a pattern using tools.  The smaller turtles will be built in exactly the same way, just using shorter lengths of coils to build them.  HINT:  I have my students stack up their turtles without scratching-to attaching them on. This way, when they glaze them it's easier to make each turtle a different color.  When they are finished glazing they re-stack them and in the kiln the glaze melts and fuses them into a tower.  You can also play with color theory on the glazing and have them make primary and secondary colored turtles or paint them in rainbow order.  You'll need to dry, bisque fire, glaze and glaze fire all the pieces for them to be finished.  
!!!B CR8IV!!!

Friday, December 30, 2011

Bunny Slippers

What is better than cozy pink bunny slippers? Well, maybe not cozy since they're built with clay, but still very cute!  Students started these by rolling out a slab of clay that was 3/8ths of an inch thick and traced their shoe onto the clay.  Next they used a half oval shaped slab of clay to create the rounded arch of the toe.  Each foot is a different size, so they'll have to estimate the size and then cut it to adjust for each foot.  Scratch-to-attach around the edges and use a little newspaper stuffed inside the arch to help support it while they add on other elements.  Two long triangles for ears and a small triangle for the nose are cut out of a slab of clay and attached on.  They can add a tail if they'd like and the eyes, mouth and whiskers can be drawn on with tools or added on with pieces of clay.  This student used high temperature wire pushed into the clay for whiskers.  They can also use tools to create a fuzzy texture on the surface of the clay.  Students signed their names on the slipper where the designers name would normally be.  Other animals would also make very cute slippers too!

!!!B CR8IV!!!  

Wednesday, December 21, 2011

Totem Poles

Native Americans of the Pacific Northwest have been carving totem poles for generations, this clay project exposes students to the traditional techniques and symbolism used by the carvers.  Start by showing students examples of totem poles and the symbolism of the animals used in the poles.  Generally the animals in the poles tell a pictorial story, this can be a way to incorporate a writing project with an art project in your classroom.  Once students have chosen their story or their choice of symbols and animals, its time to build.

Start by giving students 6-8 ping pong sized spheres of clay (one for each animal).  Have students break off a little bit of the clay and start by shaping the body of the animal, typically it will be round or oval shaped, then use the extra clay to make the body parts such as legs, arms, wings, tails, facial features etc... don't forget to scratch to attach on all the parts well.  Use tools to create details like scales on a fish or claws on a bear.  Once each animal is built, you will need to cut a hole from the top to the bottom of each animal, I used a thin wooden dowel.  The top animal of the totem pole only needs the hole to go in about halfway so that you don't see the dowel poking out the top of the totem.  Be sure to make the hole slightly larger than you think you'll need because clay shrinks when it dries and is fired.  Next, fire all the pieces, glaze them and fire them again.

Once all of the pieces are finished, its time to assemble them.  I use cut blocks of 2x4's for the bases, it's good to pre-cut these then have students write their name on the bottom and sand them smooth with sand paper.  I also pre-drill a hole into the center of the base the same size as the dowel that you'll be using to stack your totem.  Squeeze a little wood glue into the drilled hole and slide in the dowel.  While the glue is drying, have students wipe the sawdust off the bases and then paint them.  I used a black acrylic paint, but you can use any color you'd like or have students use markers to color them in so you don't have to wait for the paint to dry.  Once your base is ready, start sliding the animals onto the dowel, hopefully you've made the holes large enough and they all fit easily.  If you have trouble with fit, you can either use a smaller dowel or use a Dremel tool with a grinder bit and grind the hole in the animal larger (this can take some time!).  When you add the last animal on the top of the totem pole, put a little glue into the hole and fit it on snugly.  If the dowel is too long, just cut it to the correct height with garden shears, then glue on the top piece.  Have students share their totem story with the class!
!!!B CR8IV!!!

Wednesday, December 14, 2011

Cave Art

These primitive cave art slabs are a great way to teach students about the earliest forms of art.  Start by showing students images of early cave paintings and have them find common themes, such as bison, humans and horses.  It is a good idea to have students practice their cave paintings on paper before starting on their clay version.

You'll need to prep some materials before you begin.  This cave painting sculpture was made with a slab of clay for the base and was decorated using colored oxides made from raw pigments which is very similar to how cave paintings were originally made.  The colored oxides will need to be made in advance but are simple to do.  You'll have to make a trip to your local ceramic supply store to pick up small amounts of oxides and a flux to make them stick to the clay in the kiln, here I used red iron oxide, burnt umber, manganese dioxide and Gerstley Borate (GB) as my flux.  You can get oxides in almost any color that are commercially made they are called Mason Stains, but for this project, I chose to keep the color scheme more natural.  In individual containers mix 2 parts oxide to 1 part GB and mix well with water until you have a little thicker than watercolor paint consistency to your oxides. If you keep your oxides in containers with sealed lids, the pigment will settle to the bottom, but once stirred they can be used over and over on other clay projects and if they dry out, you can always add water to reconstitute them. Now you are ready to go!

Students will need to roll out their clay flat, I like to keep this in an abstract shape so that it represents a rock form.  I also have students make 2 holes at the top of their clay to be able to hang it up later.  Next students can use brushes to paint on their cave painting with the oxides that you made.  If they make a mistake with their painting, just use a clay scraping tool to wipe off the area and try again.  Encourage students to look at their practice drawings for shapes and ideas.  The final results should be primitive and rough looking.  I just bisque fire these pieces and don't use any glazes on them, but if you'd like to add some shine and clear glaze over the top of everything would work too.

!!!B CR8IV!!!

Wednesday, November 30, 2011

Birds in A Nest

This project is all about TEXTURE! I start by talking to students about how each of the items would feel in real life and how completely different the textures are- feathers, eggs & a nest.  Then we use tools to see how we can get our one material, to have 3 different textures based on how we treat the surface of the clay.
The nest is made first creating an over-sized pinch pot, just like we made for the Ice Cream Bowl Project and I used a fork to create the rough texture.  The bird is made using two small pinch pots and scratch-to-attaching them together, blending the seam and then adding all of the parts. I used a wooden knife to cut feathers into the surface and then smoothed the cut marks with my fingers.  Students can make as many eggs as they like for their nest.  Small eggs can be made by rolling spheres of clay and then pinching the tops to be slightly pointy, they can be smoothed with fingers.  I encourage students to experiment with tools to play with their textures and that it is more important to have 3 unique textures rather than the realistic texture of the object.

Wednesday, November 9, 2011

Octopus Gardens

These mini coral reefs are easy to build and filled with interesting texture.  Start by building the reef base out of a pinch pot.  So make a sphere of clay, push your thumb into it and squeeze around the sides to make a bowl shape.  Then flip it over, you can dent it in or push it out in areas or even push a hole through the side so you have a cave in your reef.  Next break off small pieces of clay and roll out 8 cone shapes for your octopus' legs.  Scratch the wide end of each of the legs and scratch the top of your reef and attach each of the legs on, its a good idea to put on hand underneath the reef as you push the legs on so that you don't collapse the reef in.  Take your time blending the legs together and shaping them.  Next roll a small sphere for the head of your octopus, scratch-to-attach it on top of where you attached the legs and blend it in with your finger or a tool.  You can add eyes or a face onto your octopus if you'd like too. 

Next we'll start building the coral and reef creatures to add on.  I encourage students to add on at least five different elements and to cover the entire surface with texture.  I also give students lots of images of coral reefs to inspire ideas.  Besides interestingly shaped and textured corals and seaweeds, students like to add on crabs or eels, sometimes a baby octopus or little fish.  Make sure that all the elements you build are scratched-to-attached on to the reef well.  You can also move the octopus' arms to wrap around the items that you add on.  Encourage students to continue to turn their sculptures around and view them from all sides, making sure that they have interesting elements from every point of view.  Once glazed, these sculptures are safe to put into a fish tank as handmade decoration if you'd like! 

!!!B CR8IV!!!

Saturday, April 16, 2011

When Pigs Fly...

I love to show David Wiesner's book Tuesday to my students when we create this project.  His amazing illustrations of flying frogs are a great jumping off point for students to start their own flying pig projects.  We talk about all the ways that a pig could fly...superman capes, jet packs and wings are some of the most popular ideas.  The pigs' bodies are made from simple pinch pots. Start with two equal spheres of clay and make them into pinch pots by pushing your thumb into the center of the sphere and squeezing around the sides until you have a small bowl shape. Do the same to both spheres. Take your scratching tool (wire tool, fork, comb...) and scratch-to-attach the edges of the bowls. Then gently push them together and smooth out the seam with your fingers. This hollow shape creates the body of your pig.


Now using some extra clay, create your snout, legs, tail, eyes and ears, plus of course your mode of flying. If you're making wings like I did, roll out two small coils of clay and gently press them flat, scratch the end of each shape and scratch the back of your pigs' body and attach them on, you can also add feathery texture to them with a tool. You can make legs by rolling out snakes or coils of clay and then scratch-to-attach them onto the body, think about the position you want your pig to be in, mine are attached in "superman" pose.  I also used a knife to cut the toes of my  pig.  To make the snout I make a "mini-marshmellow" shape or a short cylinder and use a poking tool to create the nostrils.  The eyes are small spheres that are flattened and also poked to create pupils.  To make the ears I flatten a small pancake shape of clay and then cut out two equal triangles.  The tail can be tricky to roll out a thin coil of clay and then wrap it up into a spiral, I recommend using extra soft clay to do this.  Remember that all of your pigs' parts need to be scratched-to-attached on!  This is a great project to talk about the difference between realistic art and abstracted art with your students.  I like to show them how to build parts and let their imagination take over....I also allow them to make their pig blue with yellow spots if they want too as another form of abstraction! 
 
!!!B CR8IV!!!

Wednesday, April 13, 2011

Owls

These owls are made from simple pinch pots and can be made small or large enough to sit in the garden.  Start with two equal spheres of clay and make them into pinch pots by pushing your thumb into the center of the sphere and squeezing around the sides until you have a small bowl shape. Do the same to both spheres.  Take your scratching tool (wire tool, fork, comb...) and scratch-to-attach the edges of the bowls.  Then gently push them together and smooth out the seam with your fingers.  This creates the body of your owl.

Now using some extra clay, create your beak, wings, feet, eyes and ear tufts.  For the wings, roll out two small coils of clay and gently press them flat, scratch the end of each shape and scratch the shoulder of your owls body and attach them on. You can make feet the same way but scratch-to-attach them onto the bottom of the body and then use a knife to cut the toes.  I like to squeeze the clay with my pincher fingers to create the ear tufts but you could also roll out small cone shapes of clay and attach them on.  The beak is a small triangle and the eyes are two spheres with a smaller dot pushed into them.  Remember that all of your owls' parts need to be scratched-to-attached on! 

You can also give your owl a feathery texture by scoring the clay with your scratching tool.  HINT:  Don't forget to poke a hole into the hollow space of your owl so that it doesn't explode in the kiln!!!  Let them dry, bisque fire, glaze and glaze fire them.  OPTION:  If your students make a few small owls or other birds, hot glue them onto an interesting piece of driftwood so they appear to be sitting on a branch.

!!!B CR8IV!!!


Tuesday, December 21, 2010

Peacocks


For this project we build the body of the peacocks the same way we have built our fish sculptures.  Using 2 pinch pots that are scratched together and smoothed over to make a hollow egg shape.  The neck is a rolled out snake or coil of clay with one end thicker to attach to the chest of the bird, use your fingers to pinch the thinner end into a pointy beak and use tools to create the nostrils, mouth and eye details.  Wings are also scratched onto the the sides of the body, then texture is applied to give the bird a feathery look.  The tail and head feathers are done using high temperature wire in different gauges.  The high temperature wire (sometimes called kanthal wire) can be put into the clay when it is wet and fired in the clay.  I used a thicker gauge on the tail feathers and a very thin gauge for the head feathers.  The head feathers have small spheres of clay added on to the tips of the wire, while the tail feather wires are left empty.  The pieces are fired and glazed and fired again.  For the final step, I offered my students a selection of beads to put onto their tailfeather wires, we discussed using patterns and also using warm colors or cool colors depending on what they had choosen to glaze their birds.  The final top bead got a drop of glue in it to keep them all from sliding off the wire.  Once the glue dries the peacocks are ready.  

!B CR8IV!