Showing posts with label fish. Show all posts

Wednesday, February 15, 2012

Recycled Reef Fish

Upcycling old plastic bottles and containers into a recycled reef is a fun way for students to learn about cleaning up the oceans and protecting the earth.  Have students bring in lots of plastic bottles and encourage different shapes and thicknesses of plastic. Rinse out the insides and peel off labels first.  Then from your collection of bottles have students choose one that they will use for the body of their fish.  The water bottle in this photo works well for a small shark, but a large laundry soap bottle might work better for a puffer fish.  Have students plan out where eyes, mouths, fins and tails might go on their bottle.

Next students used flat plastic pieces to cut out their fish parts.  Scissors will work well for most of the work but you may want to have a few utility knives or x-acto knives on hand for adult use too.  As they worked on the details, I worked with each student to attach on the fins and tails.  Make a slice with a utility knife into the body of the fish and slide in the fin, they will stay pretty well if the cut isn't to large, but I also reinforced the attachment with a little hot glue.  Next, I let students choose what color they wanted their fish and I spray painted each bottle completely.  Once the main spray painted color dried, I gave students a plethora of different colored sharpie markers  to color in different parts of the fish, making scales, faces, details etc. HINT: Most plastics don't take paint well, but if you want to avoid the spray painting aspect of this project:  build your fish as described and then cover them in a layer of paper mache and then let students use acrylic paints to decorate their fish.

To display our reef, I hole punched a hole in the top fin of each of our fish and attached a string to hang them.  If you set them up at different levels they will look like they are swimming!

!!! B CR8IV!!!

Wednesday, November 9, 2011

Octopus Gardens

These mini coral reefs are easy to build and filled with interesting texture.  Start by building the reef base out of a pinch pot.  So make a sphere of clay, push your thumb into it and squeeze around the sides to make a bowl shape.  Then flip it over, you can dent it in or push it out in areas or even push a hole through the side so you have a cave in your reef.  Next break off small pieces of clay and roll out 8 cone shapes for your octopus' legs.  Scratch the wide end of each of the legs and scratch the top of your reef and attach each of the legs on, its a good idea to put on hand underneath the reef as you push the legs on so that you don't collapse the reef in.  Take your time blending the legs together and shaping them.  Next roll a small sphere for the head of your octopus, scratch-to-attach it on top of where you attached the legs and blend it in with your finger or a tool.  You can add eyes or a face onto your octopus if you'd like too. 

Next we'll start building the coral and reef creatures to add on.  I encourage students to add on at least five different elements and to cover the entire surface with texture.  I also give students lots of images of coral reefs to inspire ideas.  Besides interestingly shaped and textured corals and seaweeds, students like to add on crabs or eels, sometimes a baby octopus or little fish.  Make sure that all the elements you build are scratched-to-attached on to the reef well.  You can also move the octopus' arms to wrap around the items that you add on.  Encourage students to continue to turn their sculptures around and view them from all sides, making sure that they have interesting elements from every point of view.  Once glazed, these sculptures are safe to put into a fish tank as handmade decoration if you'd like! 

!!!B CR8IV!!!

Friday, September 24, 2010

Fish Sculptures

Create a fun fish sculpture using the pinch pot method of building and scratching-to-attach your parts on.  Choose to create a realistic looking fish or an abstracted one.  Experiment with your tools to create a variety of textures.

Sessions: One 1 hour session to build

Age: Kinder and up

Materials:
Low Fire Clay
A Variety of Clay Tools
Low Fire Glazes & Brushes
Kiln

Steps:

1. Cut off a piece of clay that is about as big as a baseball.


2. Cut it into 3 equal pieces, two will be for the body of the fish and one for adding on parts.


3. Make two of the pieces into spheres by rolling them in your hands. Put the 3rd piece aside for now.


4. Push your thumb into each sphere and start to squeeze around the side to create a small pinch pot, repeat this with the other sphere.


5. Using a scratching tool, "scratch-to attach" the edges of both pinch pots so they will stay connected together. Anytime we attach two pieces of clay together, we'll be using scratch-to-attach techniques.


6. Gently press both halves together and blend the seam until the shape is smooth, be careful not to dent in the sphere as you smooth. You can shape the sphere to be more egg shaped for the body of your fish but make sure that you are keeping a hollow space inside the clay--if it is squeezed to the point where its a solid piece of clay, it can explode in the kiln. HINT: You can use steps 1-6 to use as a base for building a lot of projects.


7.  Now you are ready to start adding on your fish parts using your extra piece of clay that we put to the side.  Start with the tail rolling out a hot dog shape of clay and bend it into a cresent moon shape, then scratch-to-attach it on to one end of the body.  Then blend it into the body using your fingers and squeeze the tail thinner by pinching it and shaping it.


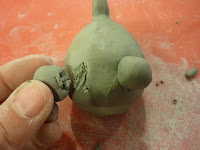
8.  Next, add on two large spheres for bulging eyes and use a tool (or the back of a tool) to push in a pupil. 


9.  You can use a knife to cut the mouth open or just draw a mouth on, squeezing the cheeks gently will make the mouth open wider.


10.  To add the dorsal fin, roll out a small hotdog shape and scratch-to-attach it on to the back of your fish.  Then you can squeeze it thinner and shape it to be a little wavy with your fingers. 


11.  To make the side fins, start with a hot dog shape, flatten it gently and cut it in half with a knife, then scratch-to-attach one on each side of your fish. 


12. Using a small loop tool you can gently press into the body of your fish to create a scale texture.  You can also add different textures to the fins, tail and belly of your fish by using different tools. 


13.  You also have the choice of abstracting your fish by adding on other parts, like a hat, skateboard or making it hold something in its fins.  Some of my students have made their fish wearing jetpacks, skiing or wearing a tutu! Let your finished fish dry before you bisque fire them and they are ready to glaze and fire again. 

B CR8IV!!